Table of Contents
Whether you want to engage in manual or automated backtesting, NinjaTrader is here to help you with both. This versatile trading platform is equipped with a replay tool and a reliable backtesting engine, allowing you to test virtually any trading idea. Once you load it with the necessary historical data, you get a universal backtesting solution for testing strategies for forex, equities, futures, CFDs, and other instruments.
This practical guide will show you step by step how to backtest on the NinjaTrader trading platform. You will learn how to use the built-in backtester, called Strategy Analyzer, and see two ways to perform manual backtesting. In addition, you will also discover how to import historical data into NinjaTrader and where to obtain it.
What is NinjaTrader?
NinjaTrader is a popular trading platform, especially well-known in the futures community. It appeared on the market in 2003 and, thanks to its feature-rich equipment and simple user interface, quickly gained a large number of fans among retail traders and investors. In addition to the futures, it supports trading and analysis of stocks, currencies (forex), cryptocurrencies, indices, CFDs, and even bonds.
NinjaTrader Key Features:
- Advanced Charting and Technical Analysis
- Highly customizable charts.
- Dozens of built-in indicators and drawing tools.
- Supports multiple chart types (candlestick, range bars, renko, Heikin-Ashi, etc.).
- Order Execution & Management
- Supports multiple order types (limit, stop, OCO – One Cancels Other, etc.).
- Chart Trader for placing and managing orders directly on charts.
- Advanced Trade Management (ATM) for automatic stop loss and profit targets.
- Automated Trading Capabilities
- Built-in tools to develop, test, and deploy algorithmic strategies.
- Strategy builder for creating simple algorithms.
- Strategy Analyzer for backtesting and optimization strategies.
- Simulated Trading Environment
- Paper trading (sim trading) allows users to practice without risking real money.
- Great for strategy testing and learning.
- Market Replay Feature
- Replay historical market data to simulate live trading conditions.
- Useful for backtesting and training.
- Brokerage Integration
- Trading through NinjaTrader Brokerage or other brokers such as Interactive Brokers, TD Ameritrade, Forex.com, etc.
- Third-Party Developer Ecosystem
- Large marketplace for third-party add-ons, indicators, and strategies.
- Wide Variety of Data Feeds
- Supports data providers like Kinetick, CQG, Rithmic, eSignal, etc.
- Simple Import of Historical Data
- Built-in feature for importing historical data from various sources.
- Customization Options
- NinjaScript (based on C#) for building custom automated strategies, indicators, and add-ons.
What You Need For Backtesting in NinjaTrader
To start testing your trading strategy in the NinjaTrader trading platform, you will need the following:
- NinjaTrader trading platform
- Historical data
- Trading plan
- Backtesting spreadsheet (for manual backtesting)
Getting NinjaTrader
If you don’t have the NinjaTrader platform installed on your PC yet, you’ll need to get it first. There are three ways to do this:
- Create a NinjaTrader account and get a 14-day demo of the platform.
- Open a trading account with NinjaTrader Brokerage and get the NinjaTrader platform without any limitations.
- Purchase a trading challenge from a prop firm offering the NinjaTrader platform.
Let’s take a look at each of these options.
Getting a 14-day Demo of the NinjaTrader Platform
If you’re unsure whether NinjaTrader is the most suitable backtesting solution for you, try a 14-day demo of the platform and make your decision later. Here are the instructions for downloading the platform.
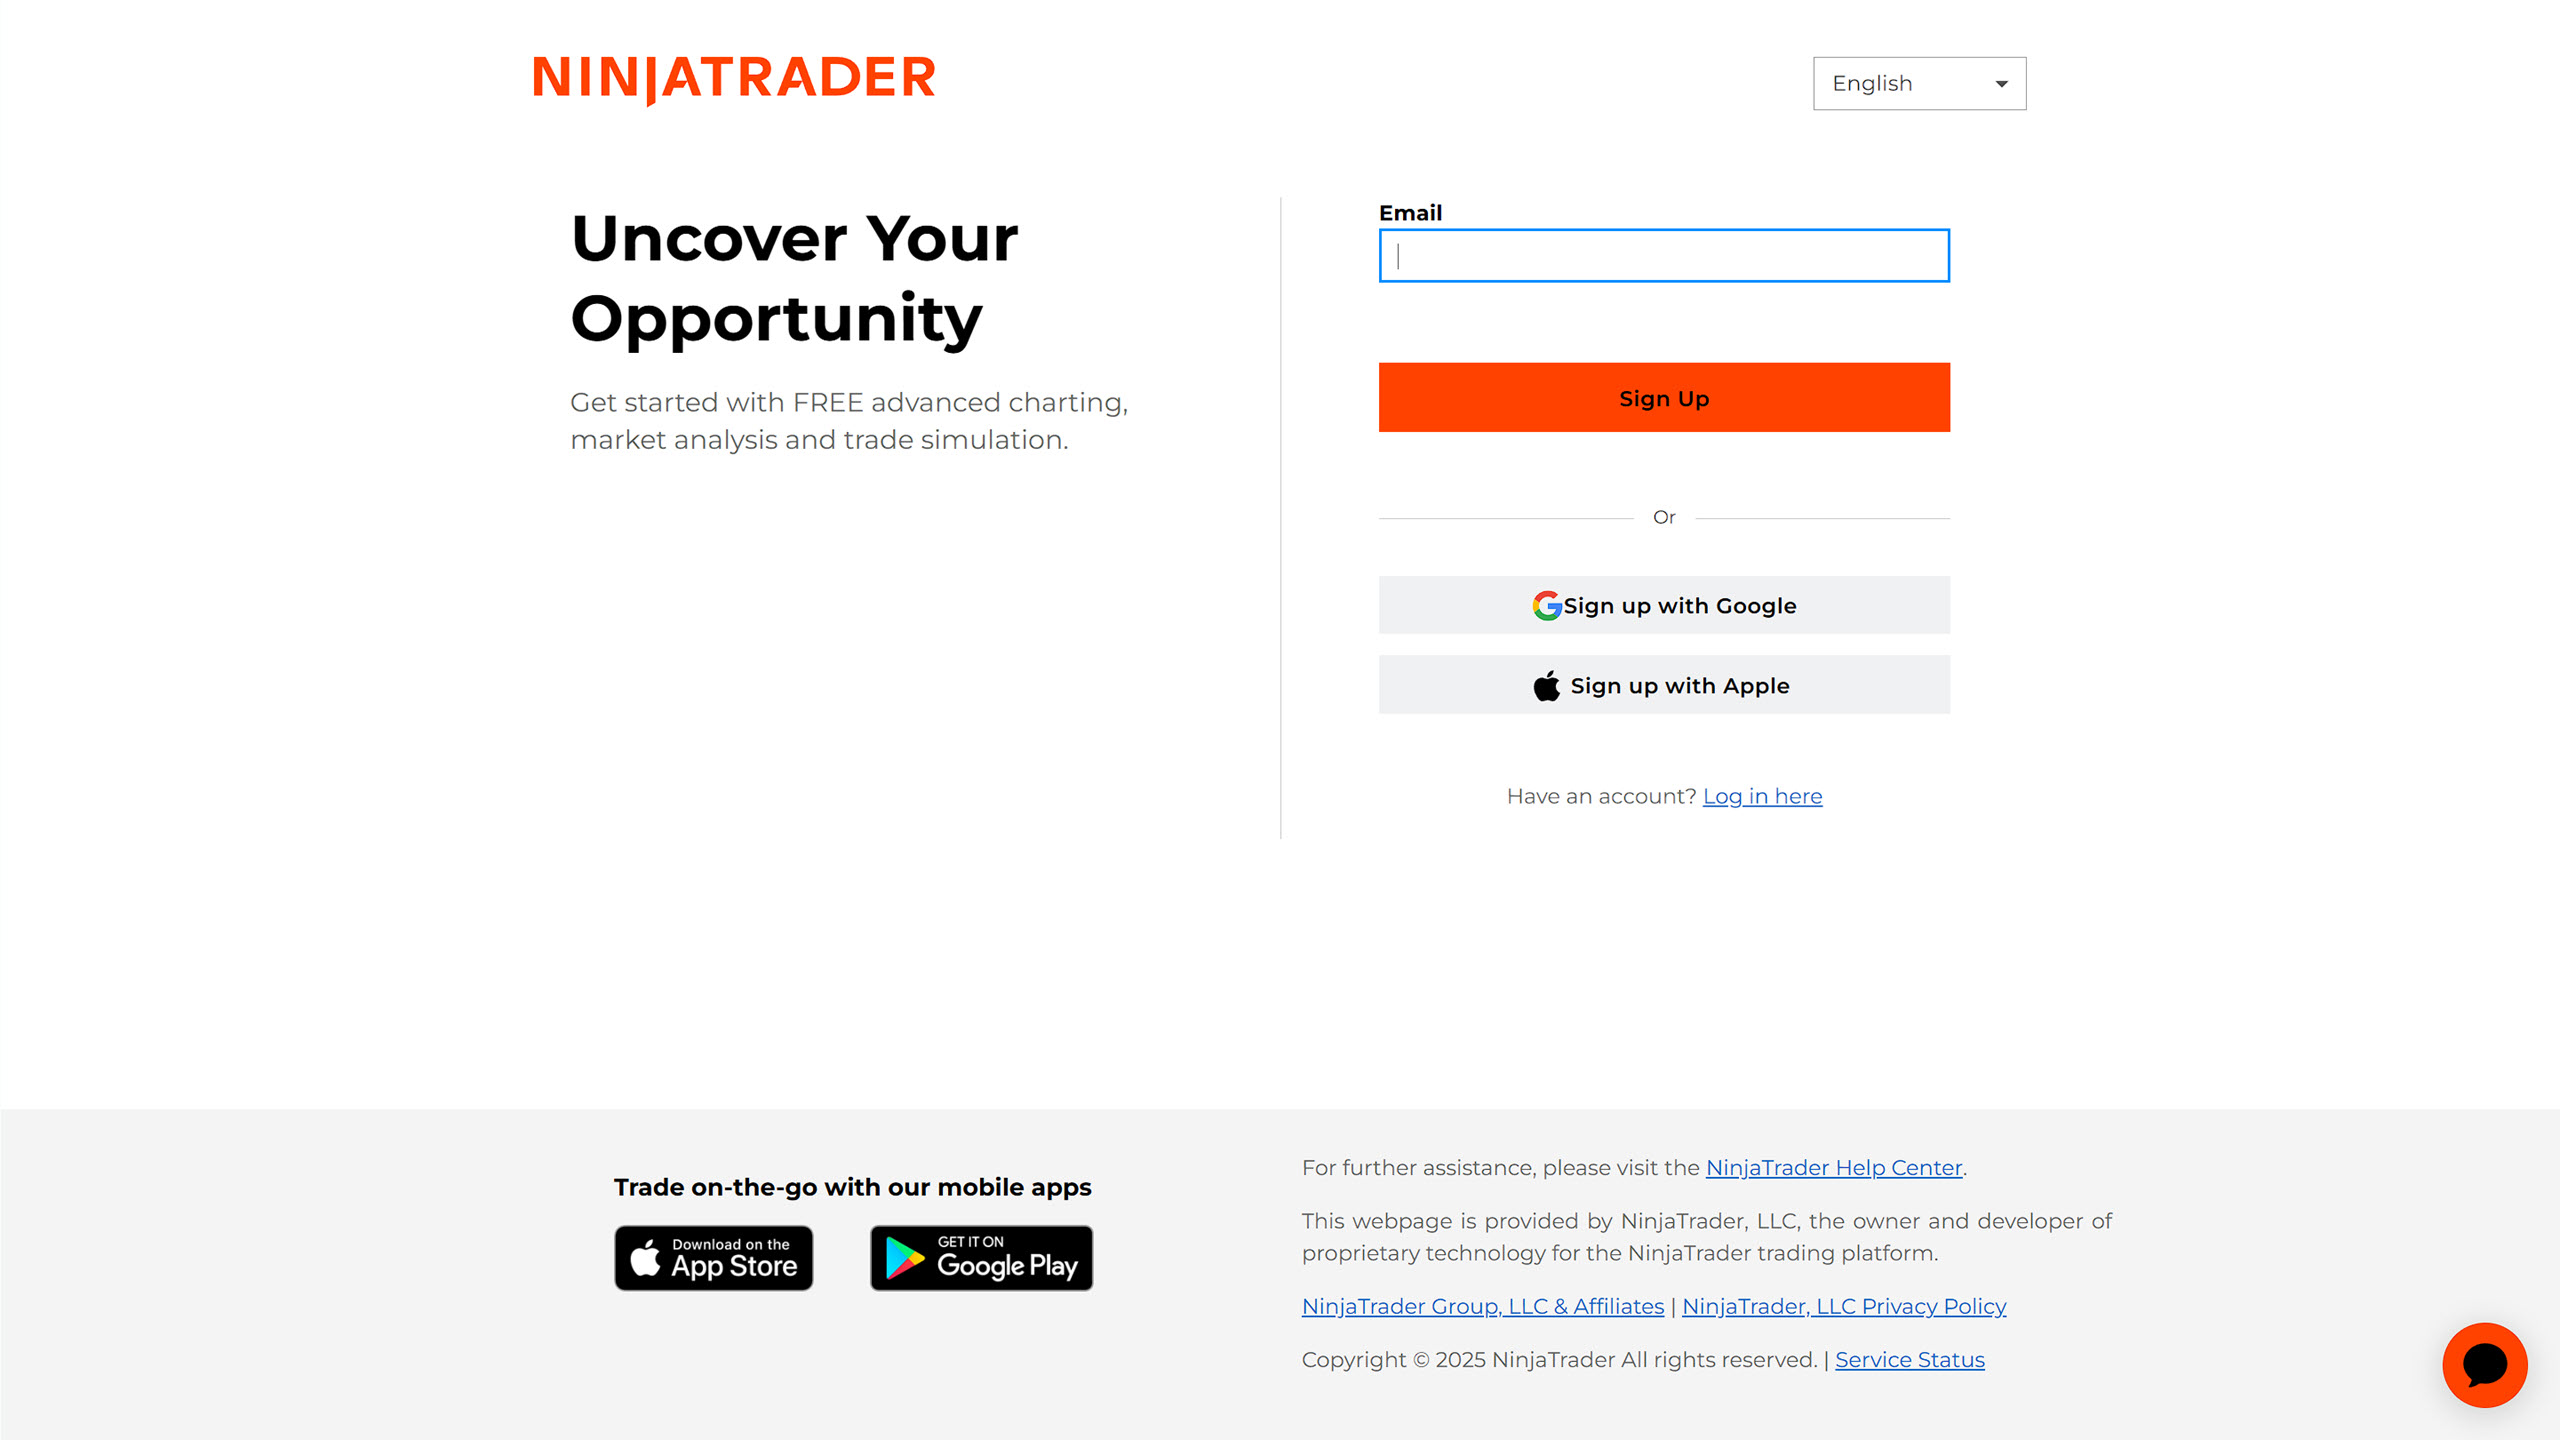
Go to the NinjaTrader website and click on the “Open Account” button.

Enter your email address or choose to log in via your Google or Apple account.
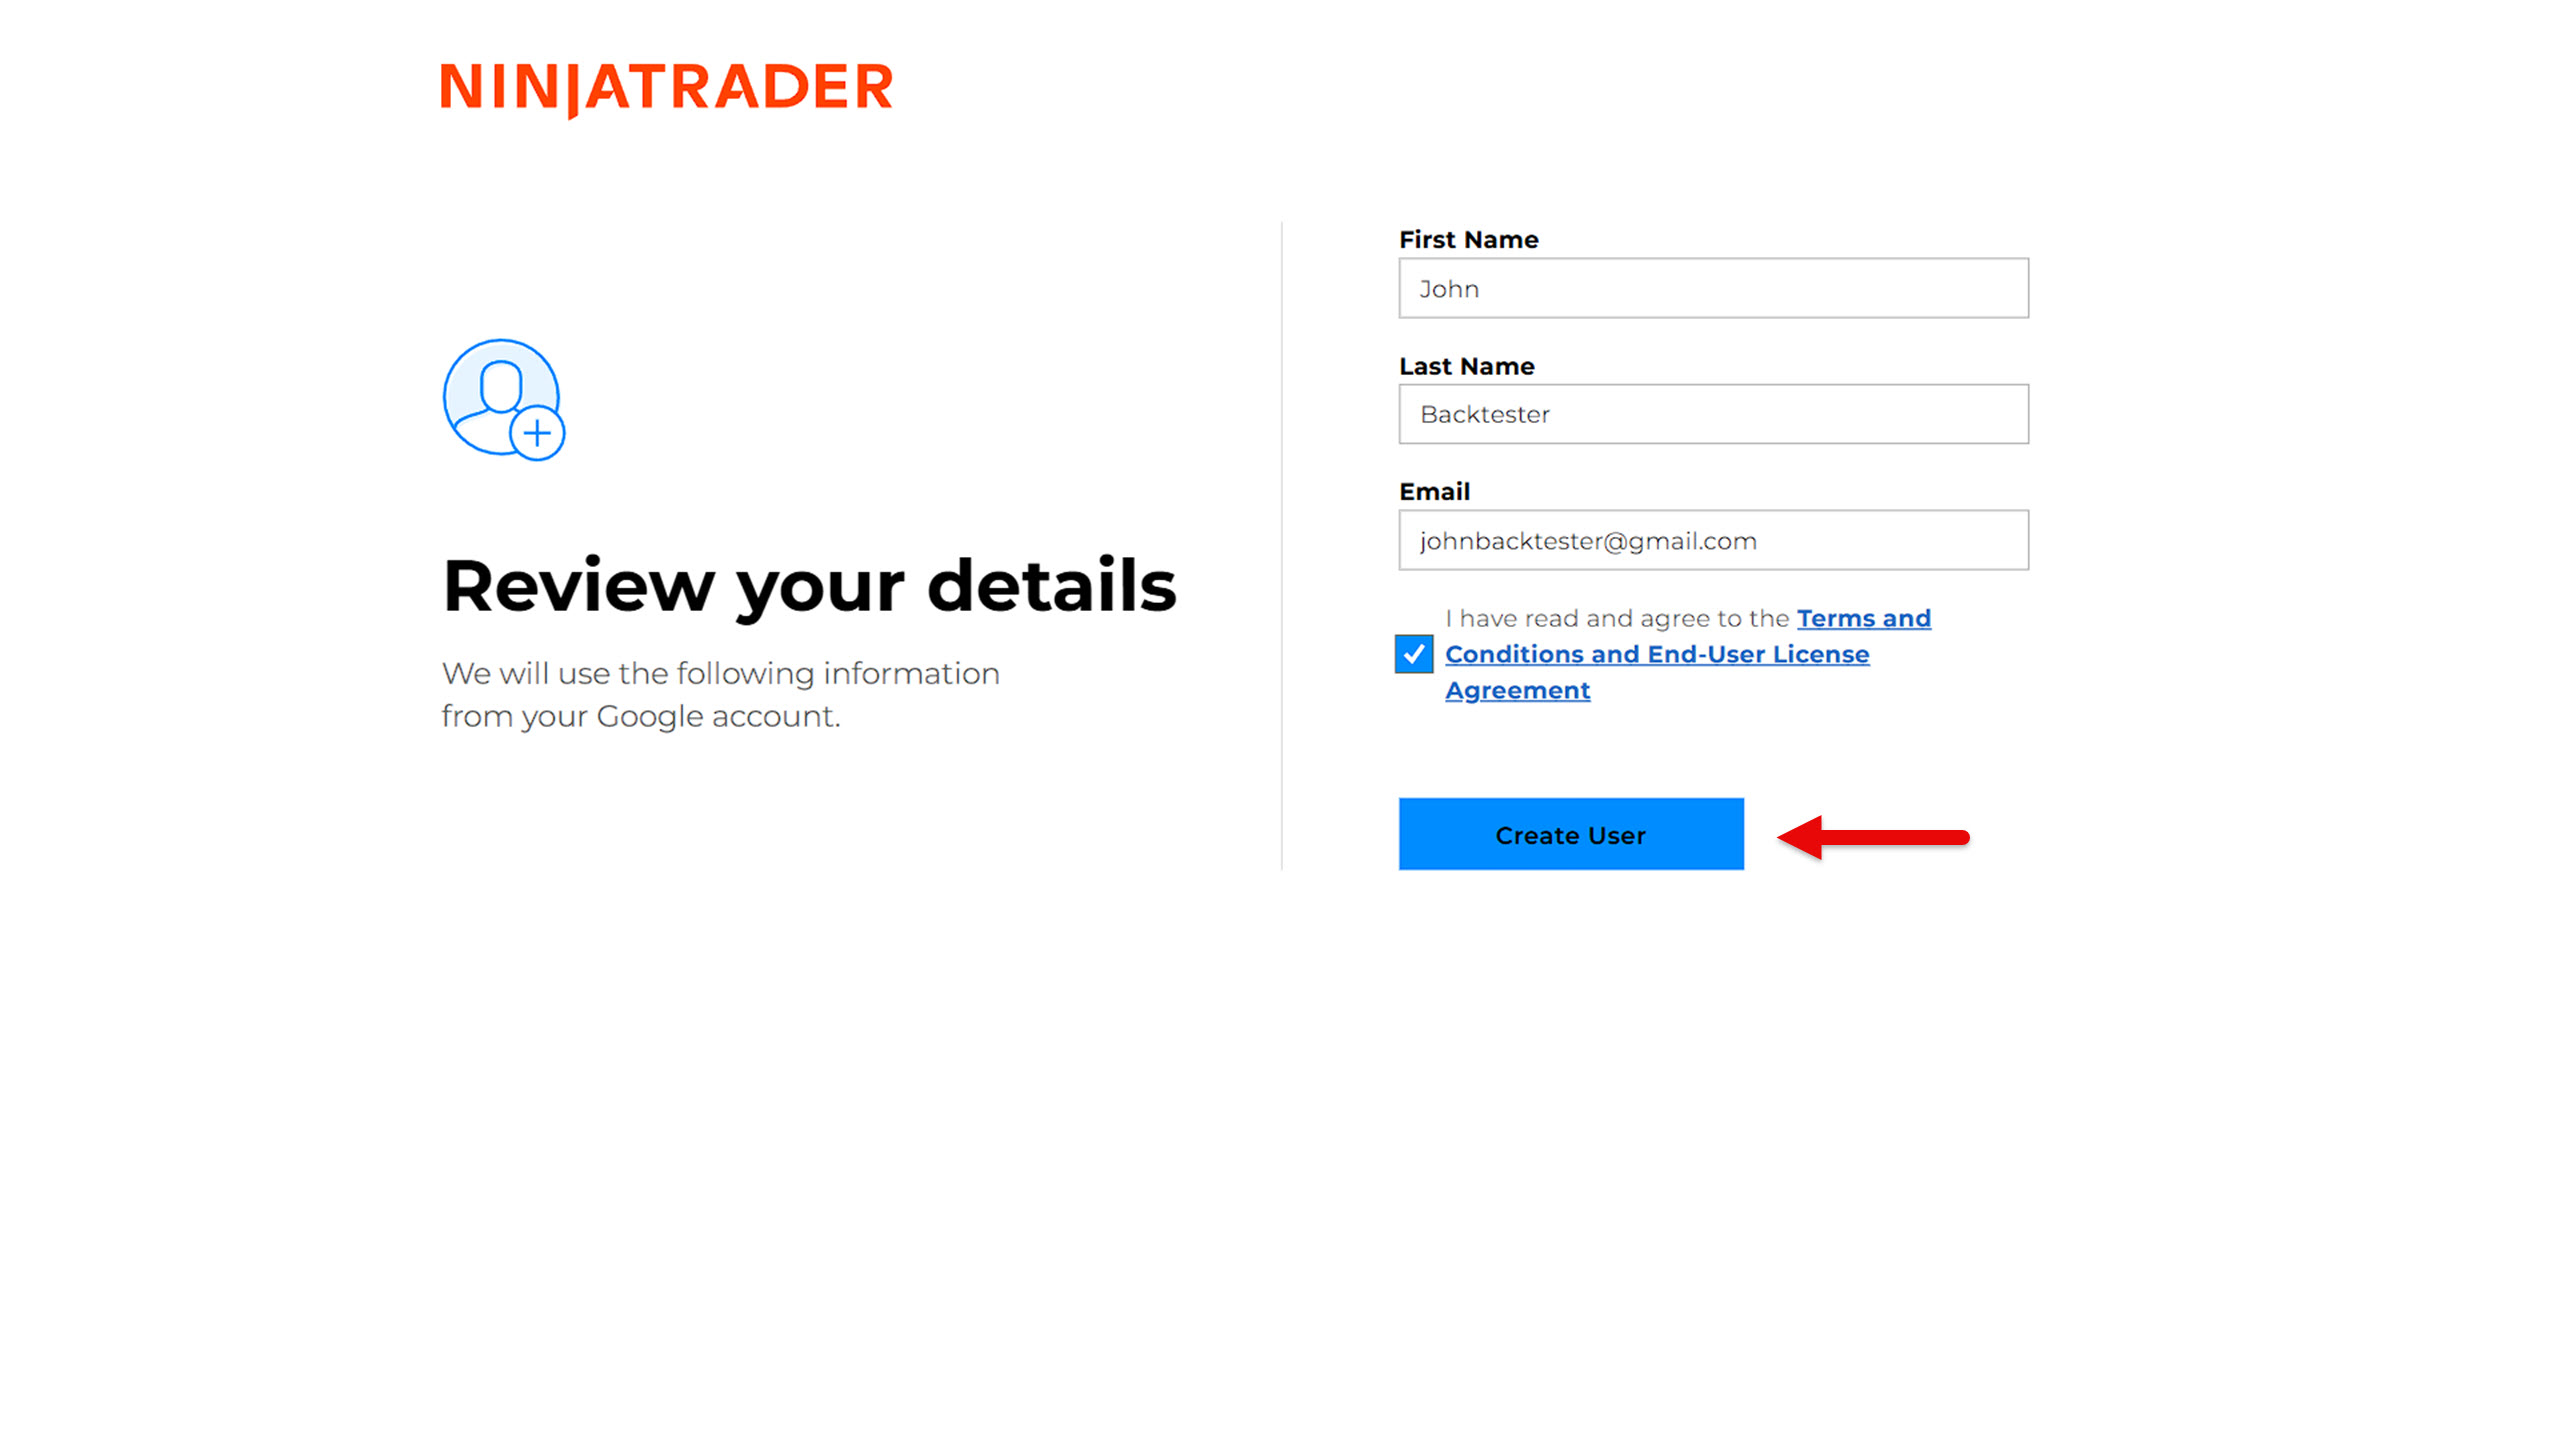
Then fill in the required information and create your NinjaTrader user account.
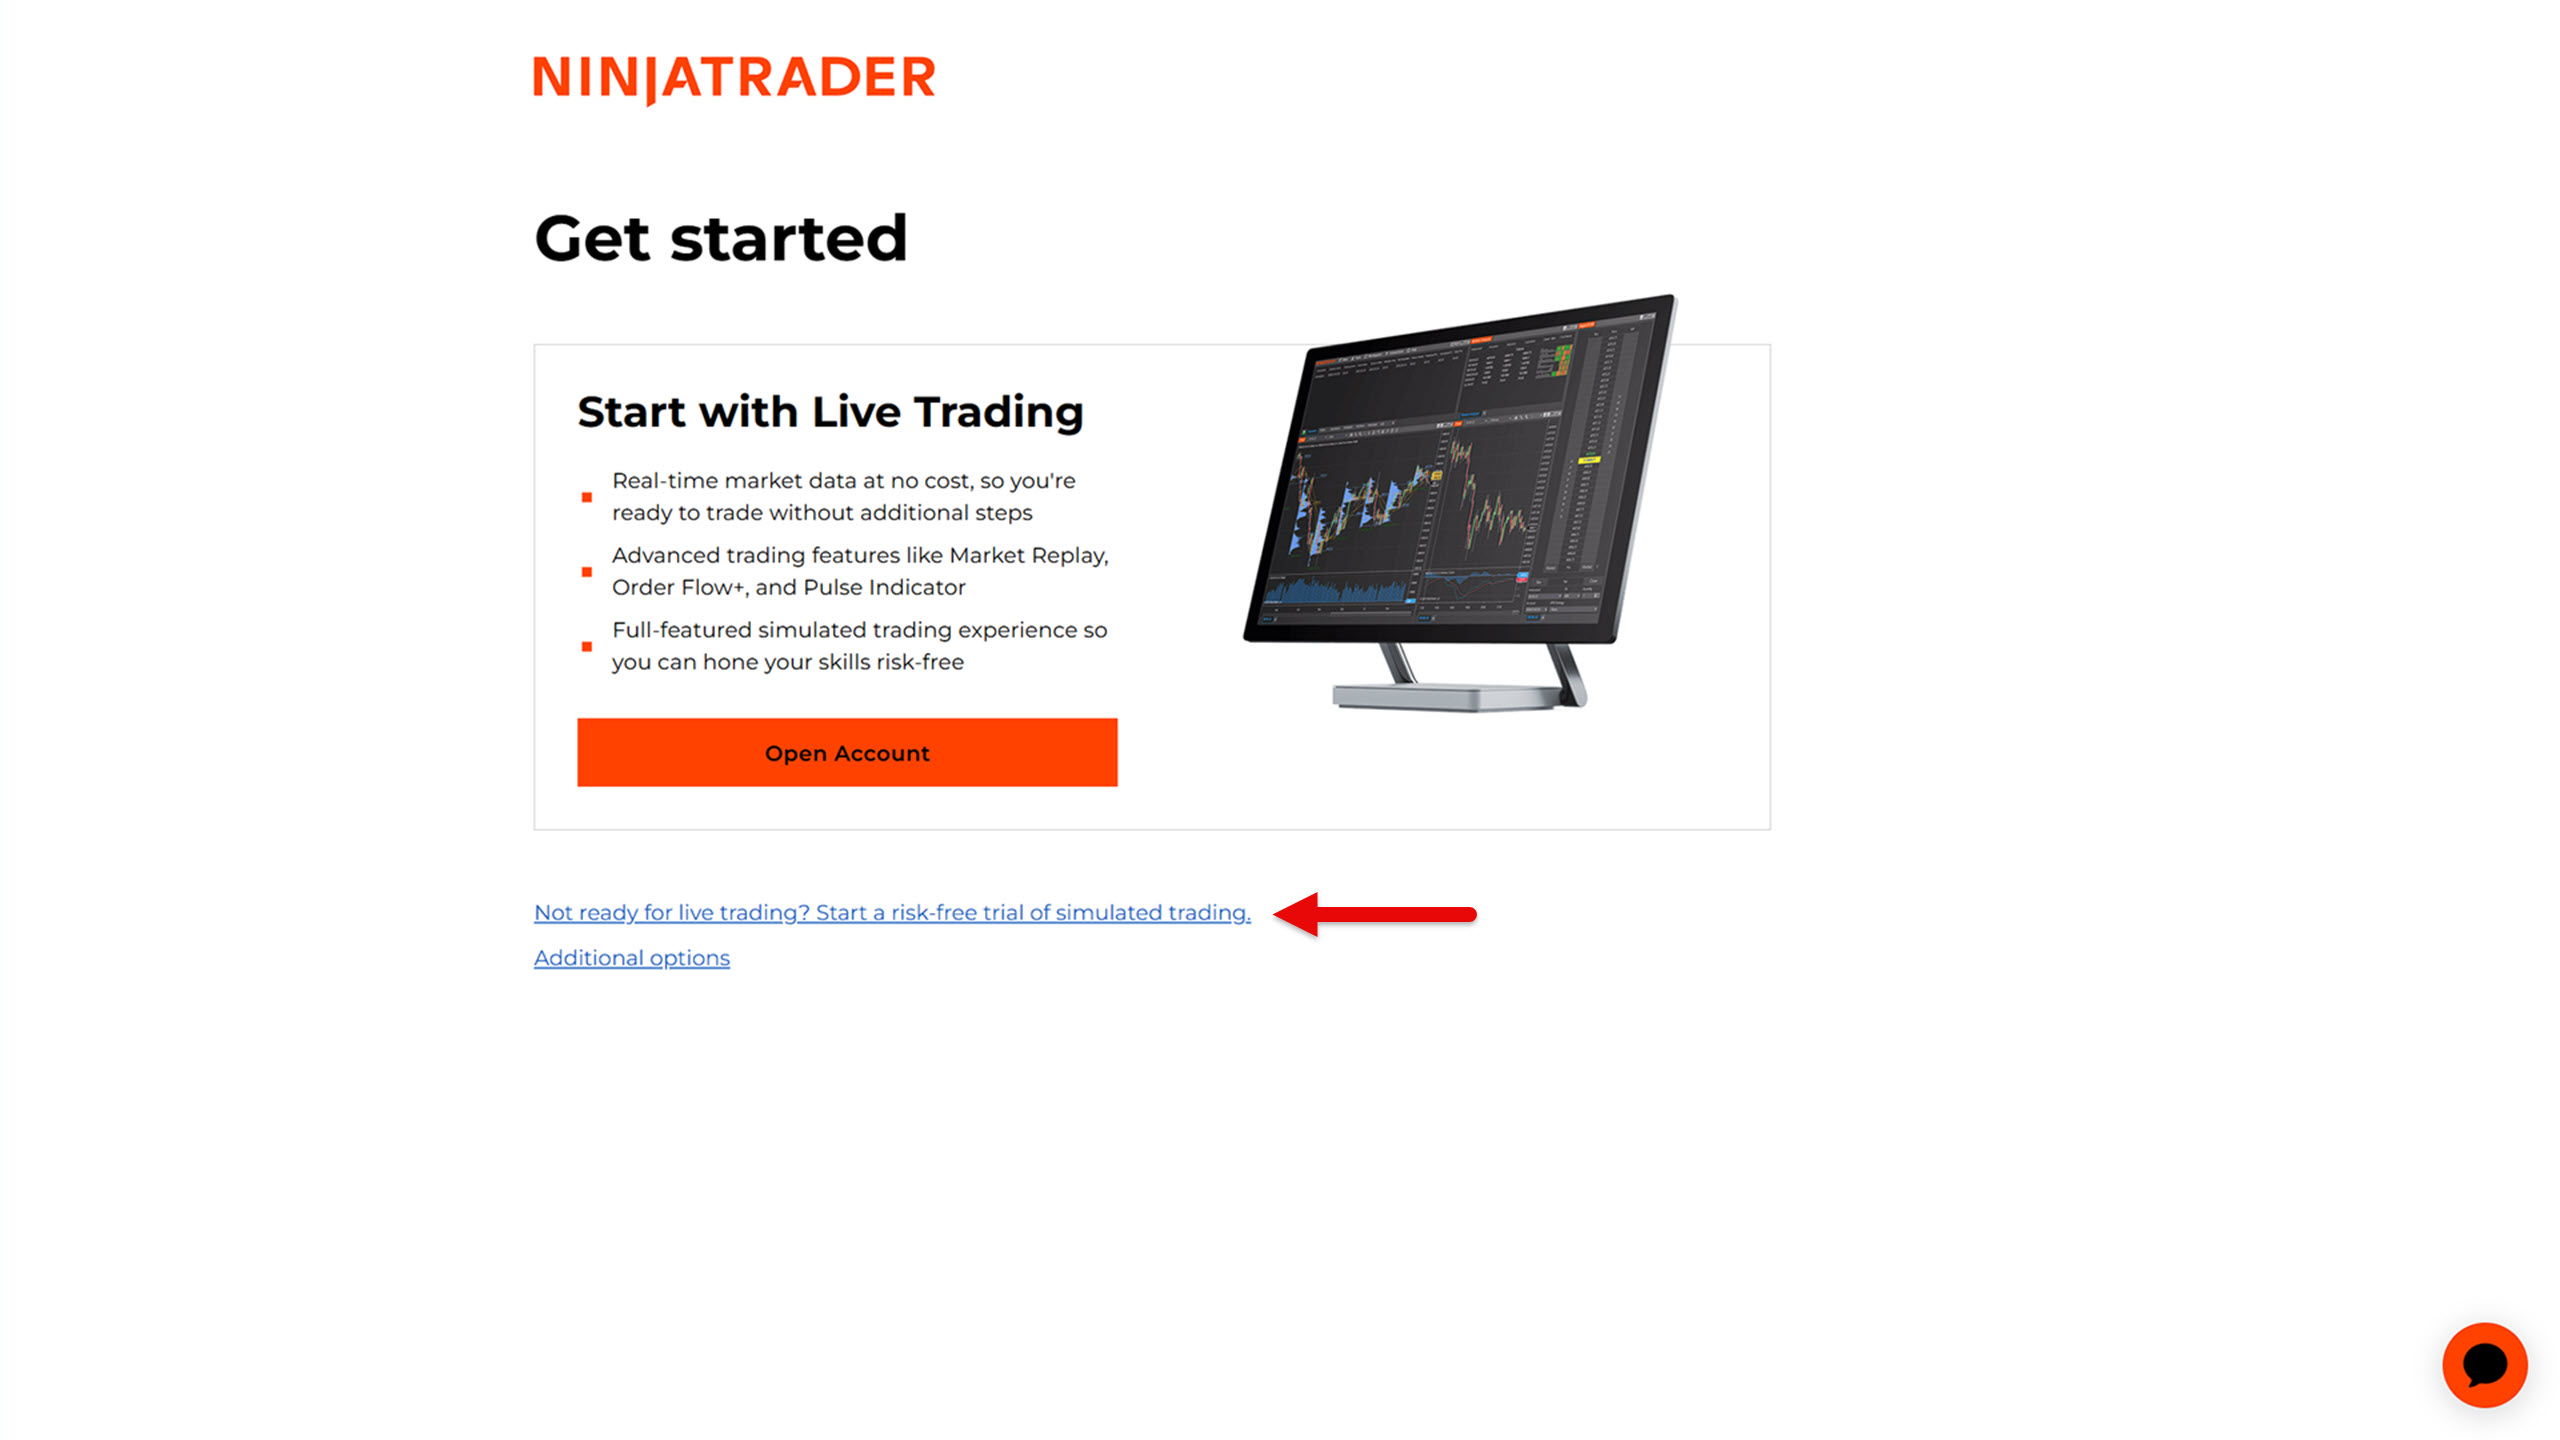
In the next window, you can choose whether you want to proceed to create a live trading account or a demo account. Since you are not yet sure whether you want to use NinjaTrader, proceed to create a demo account by clicking on the text indicated by the arrow in the image.
You will be asked to fill in additional information. Once you have done so, complete the demo account creation process by clicking the Continue button.

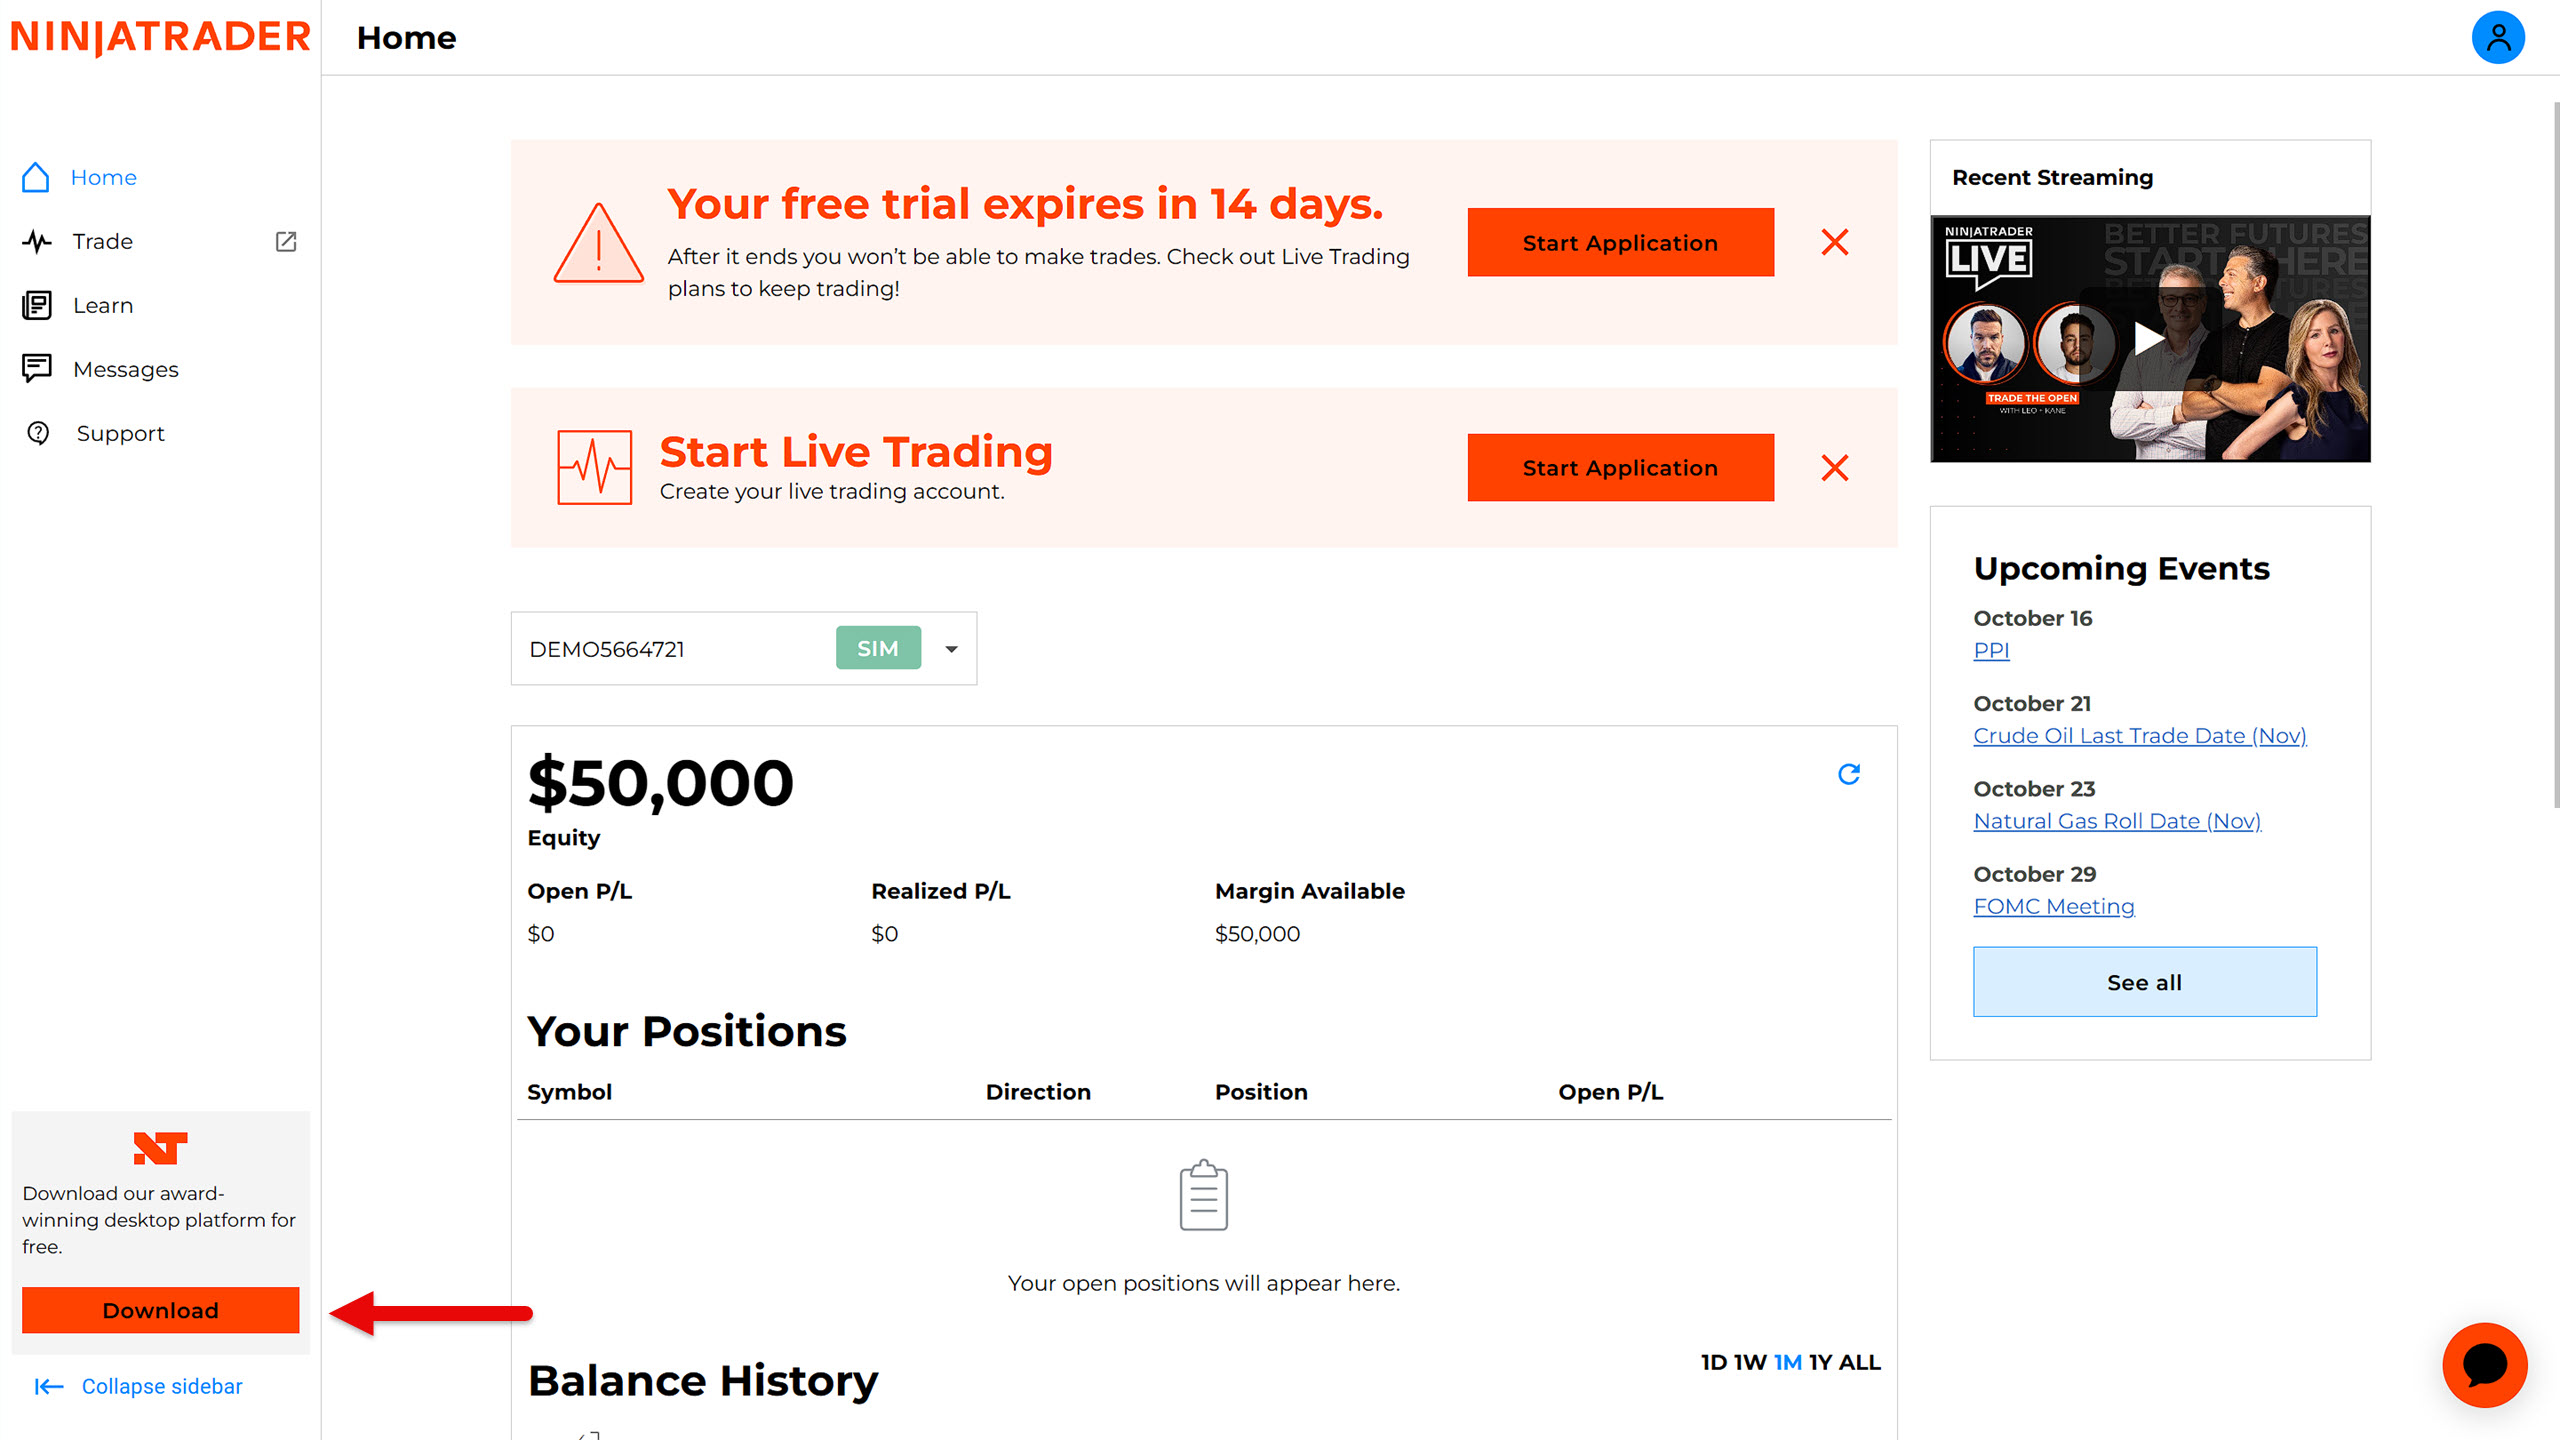
You should now see the web interface for managing your account. In the lower left corner, click the Download button and save the NinjaTrader installation file to your hard drive.
Open the downloaded file and follow the instructions to install NinjaTrader on your device.
Getting the NinjaTrader Platform After Opening a Live Account
If you want to use NinjaTrader permanently as your backtesting solution, then open a live trading account with NinjaTrader Brokerage.
The platform itself is provided by NinjaTrader Brokerage free of charge. However, there is one catch. The broker requires you to make at least one trade per month; otherwise, they will charge you a $35 inactivity fee. This is therefore the real monthly price for NinjaTrader.
If you want to avoid this fee, you will need to make at least one trade.
However, to make a trade, you must have a data subscription and a sufficient deposit in your trading account. Basic Level 1 data for CME markets costs $12 per month, and margin requirements start at $50 for intraday trading. Therefore, you must fund your account with a minimum of $100.
Once you have a live account, simply open and close a position on any micro futures market (e.g., MNQ) and the inactivity fee will no longer apply to you. This way, you can reduce your platform costs to less than $20 per month.
While none of the above options correspond to the advertised slogan “free platform,” it is certainly not a significant cost for obtaining decent backtesting software.
Getting NinjaTrader via a Prop Firm Trading Challenge
Today, numerous prop firms offer NinjaTrader with live data as part of a purchased trading challenge. To name a few, there are Apex Trader Funding, My Funded Futures, Alpha Futures, and Take Profit Trader.
The price of the trading challenge depends largely on whether a promotional campaign is underway. However, you can usually purchase it for as little as $30 per month.
If you are a good trader, you should have no problem passing the challenge. In that case, the prop firm will typically offer to pay a one-time fee for lifetime access to the platform and live data. This is often around $100.
So, when you add it all up, you can theoretically get the NinjaTrader platform with lifetime live data for approximately $130. Sounds like a great deal, doesn’t it?
Getting Historical Data for NinjaTrader
Once you have installed the NinjaTrader platform, your next task will be to obtain historical data for backtesting. There are three ways to do this:
- Download market replay data using the built-in historical data downloader.
- Download historical data using the built-in historical data downloader.
- Download historical data from an external source and then import it into the platform.
Downloading Market Replay Data via the Built-in Historical Data Downloader
Market replay data is historical tick data that also contains information about market depth (Level 2). As the name suggests, it is used for the accurate replaying of market data, making it particularly important for traders who manually backtest.
Since this data contains more information than regular historical tick data, it is also much larger. This increases the demands on the server solution, which is probably why NinjaTrader only allows you to download market history for the last 90 days. Given this limitation, it is rather suitable only for training or backtesting scalping strategies.
The method of downloading market replay data is also suboptimal. NinjaTrader users are forced to download it day by day, which is not only annoying but also time-consuming. One might almost think that the difficult download is an intentional feature of the platform to prevent the servers from becoming overloaded.
Either way, here’s how to get market replay data:
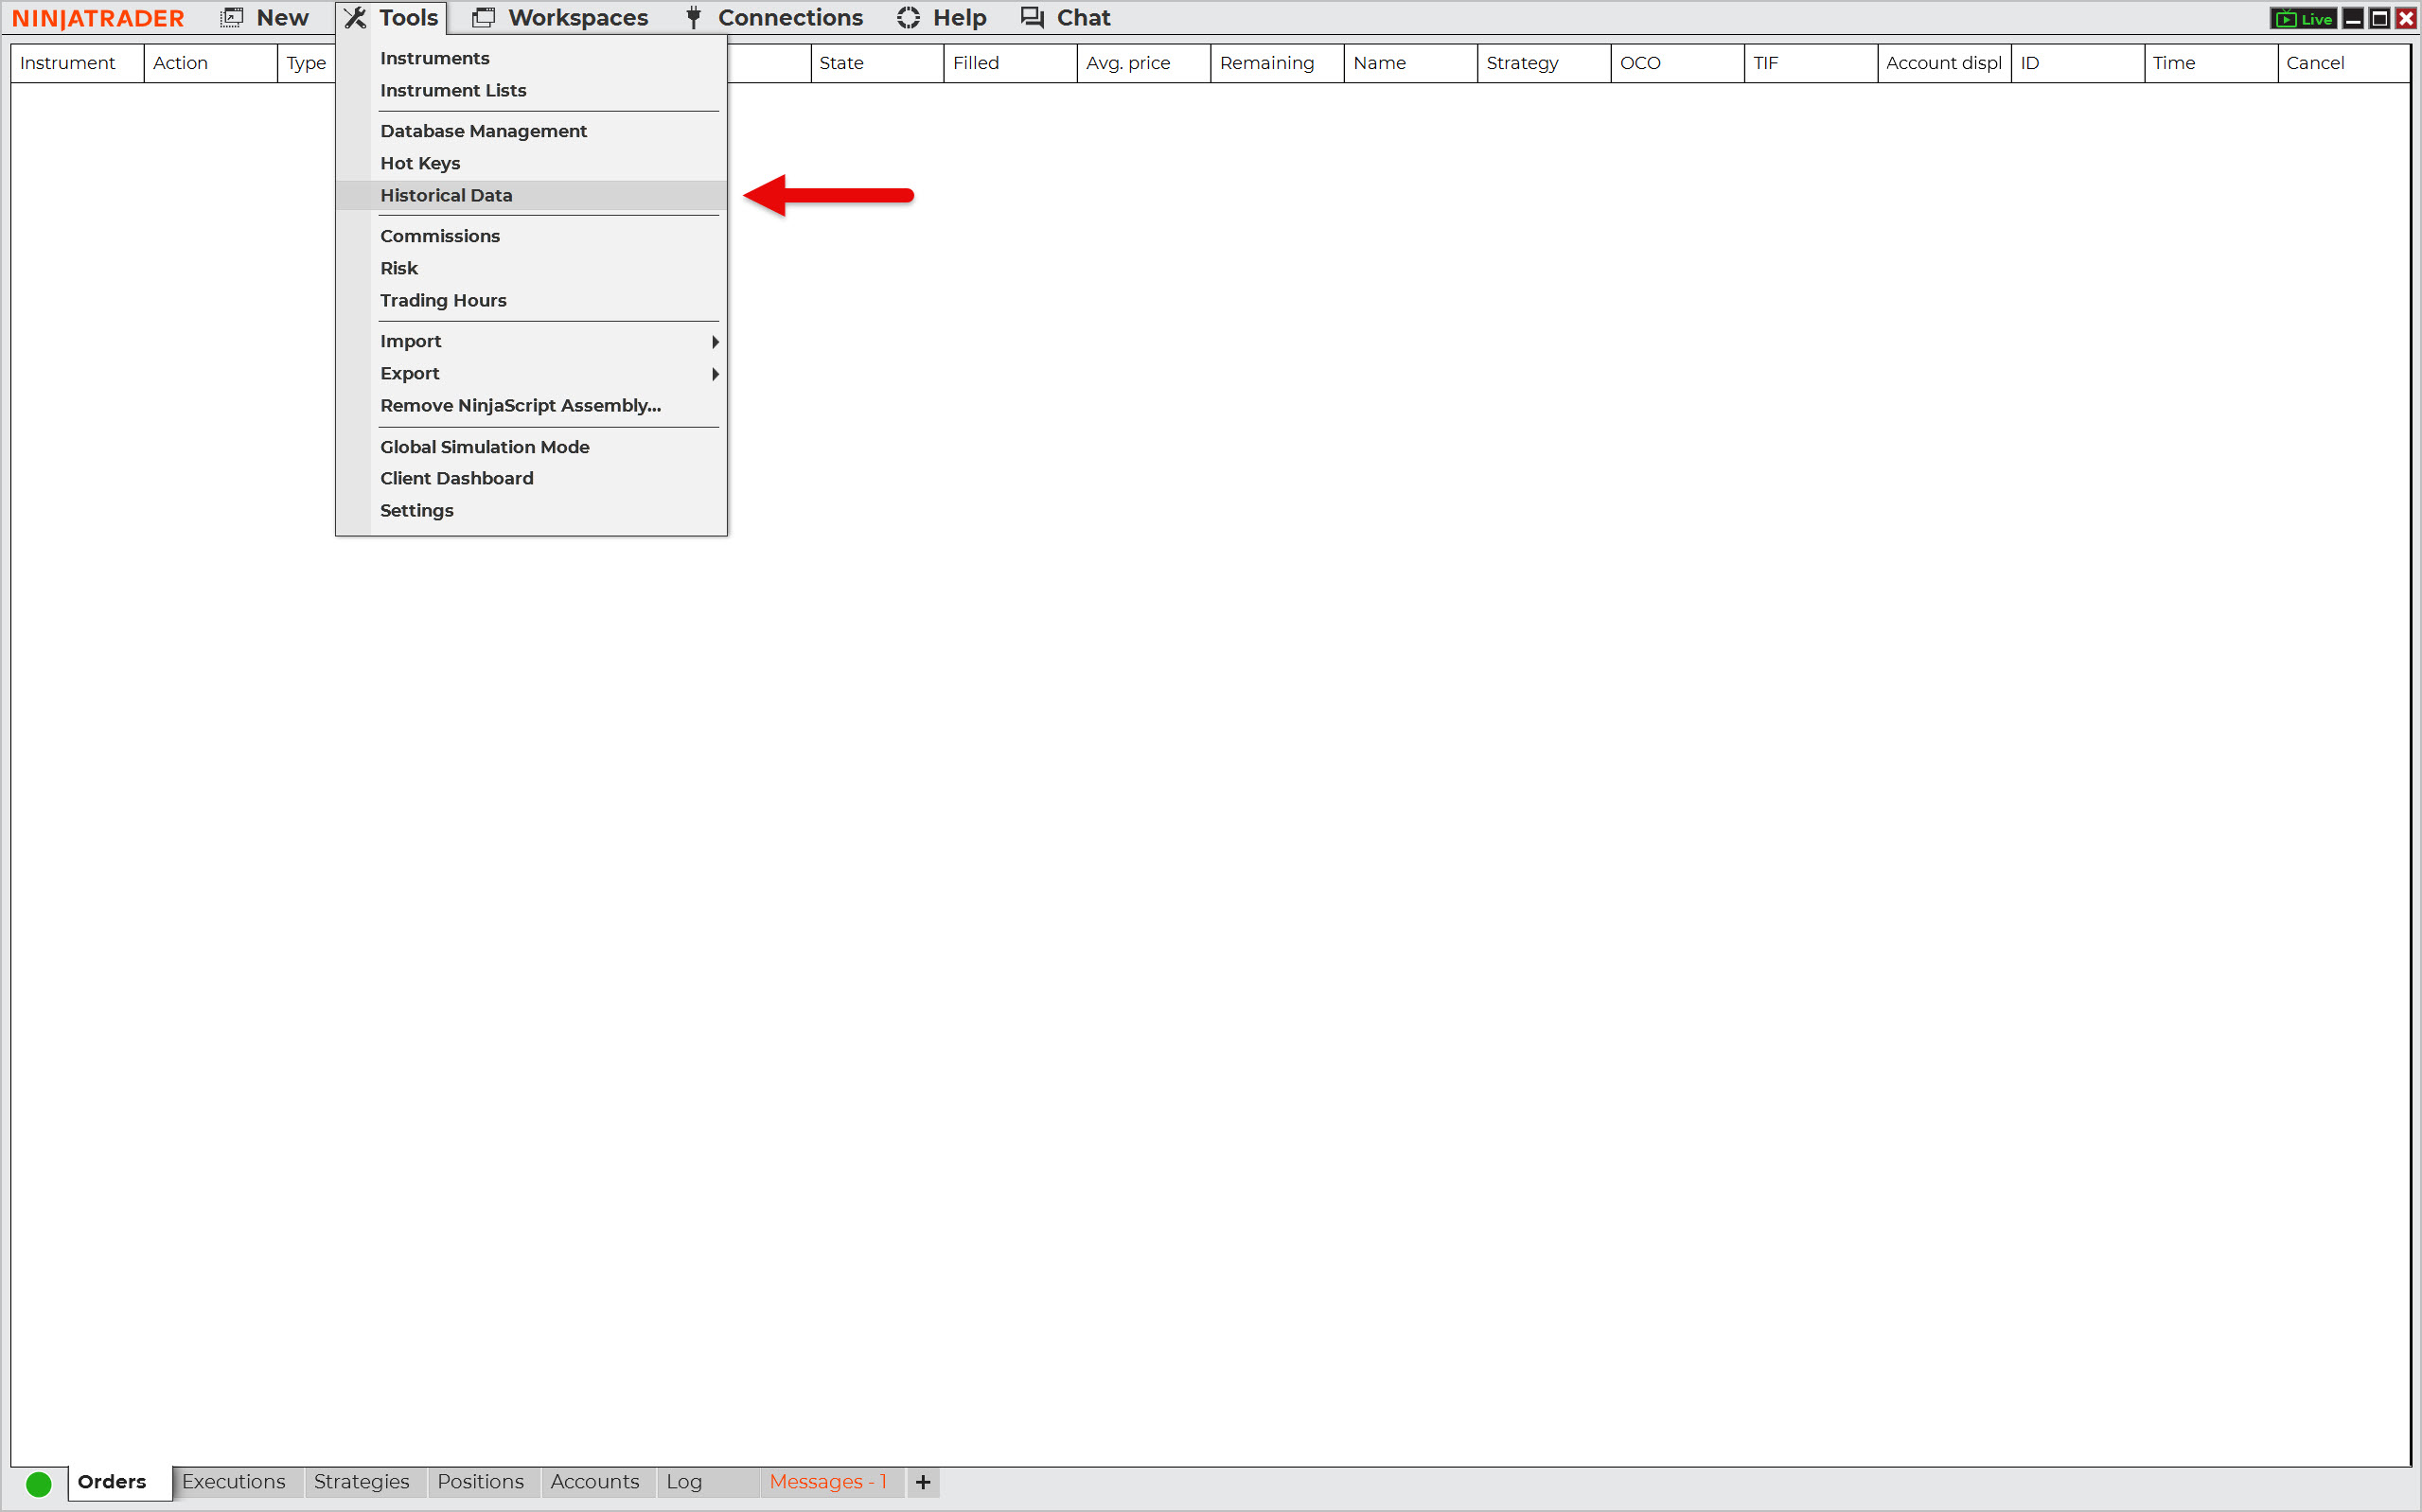
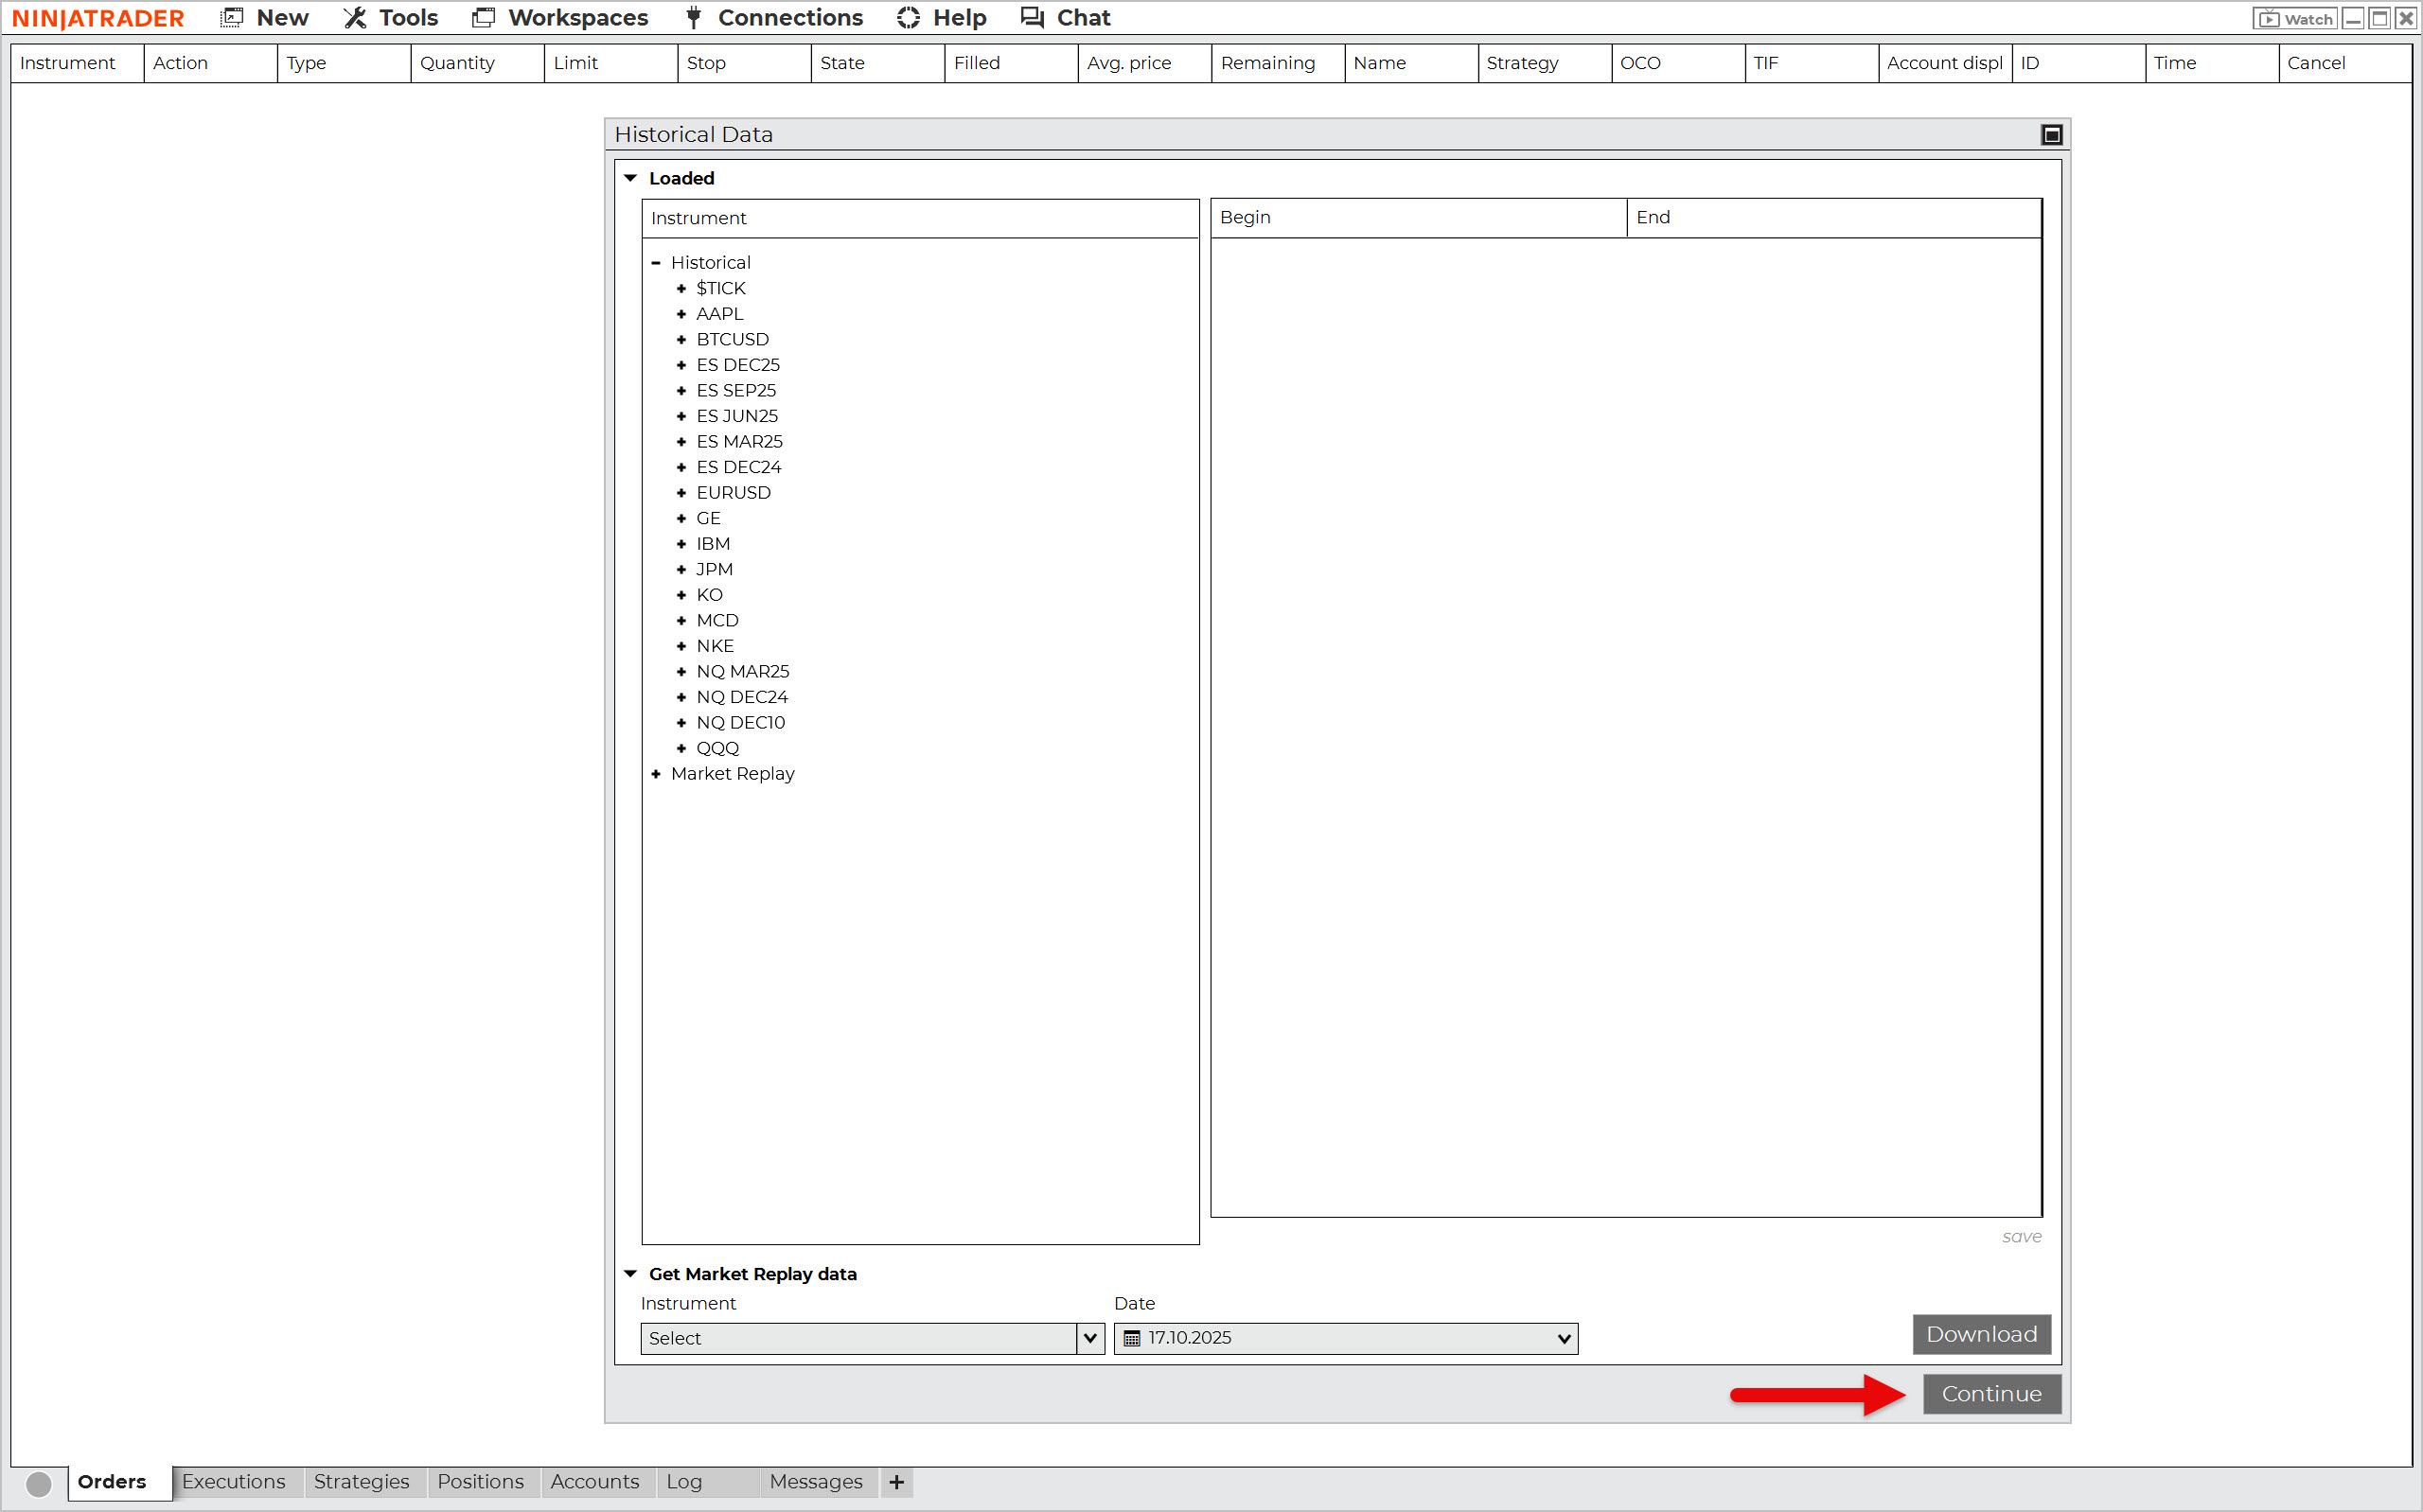
Launch NinjaTrader and select Tools from the main menu, then Historical Data.
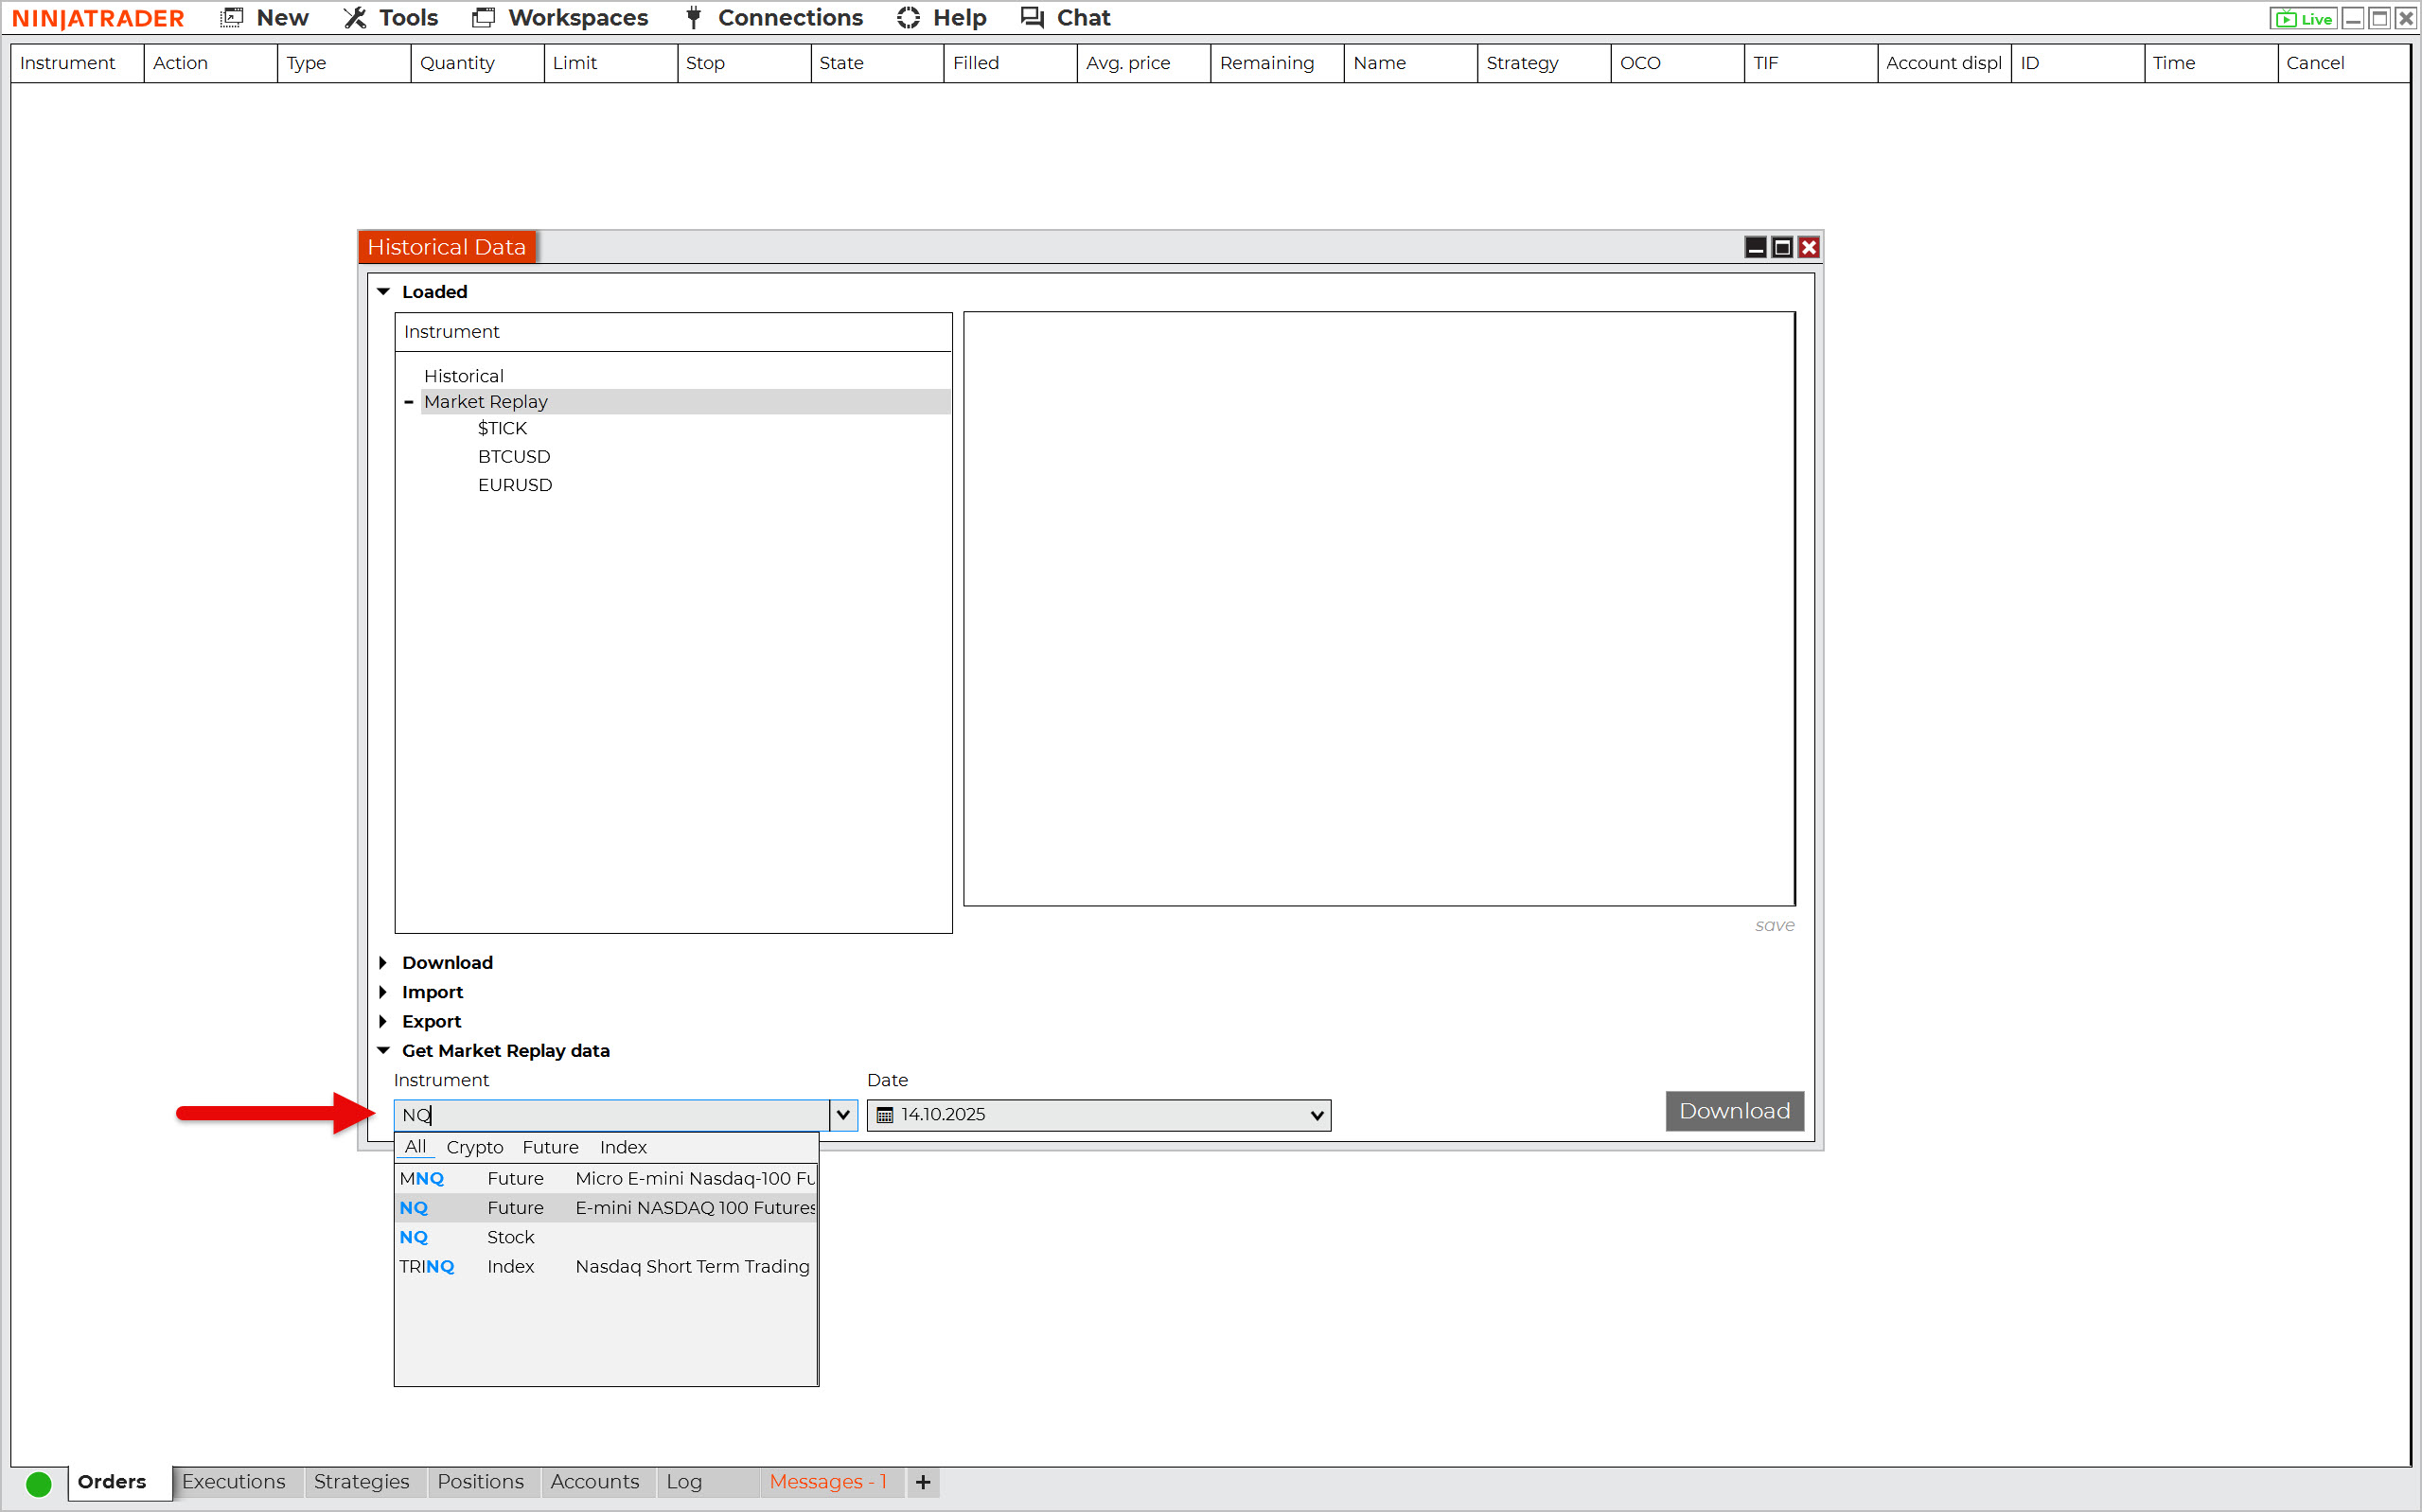
Once the Historical Data window appears, click on Get Market Replay data. Enter the market (ticker) and the day for which you want to download market replay data. Then press the Download button.
Repeat the download process until you have downloaded all the days you need for backtesting.
Download Historical Data Using the Built-in Historical Data Downloader
The same built-in downloader can also be used to download historical tick-by-tick, 1-minute, and daily data from your market data provider. Typically, you can obtain tick-by-tick data for the last year and up to 25 years of 1-minute data for selected instruments.
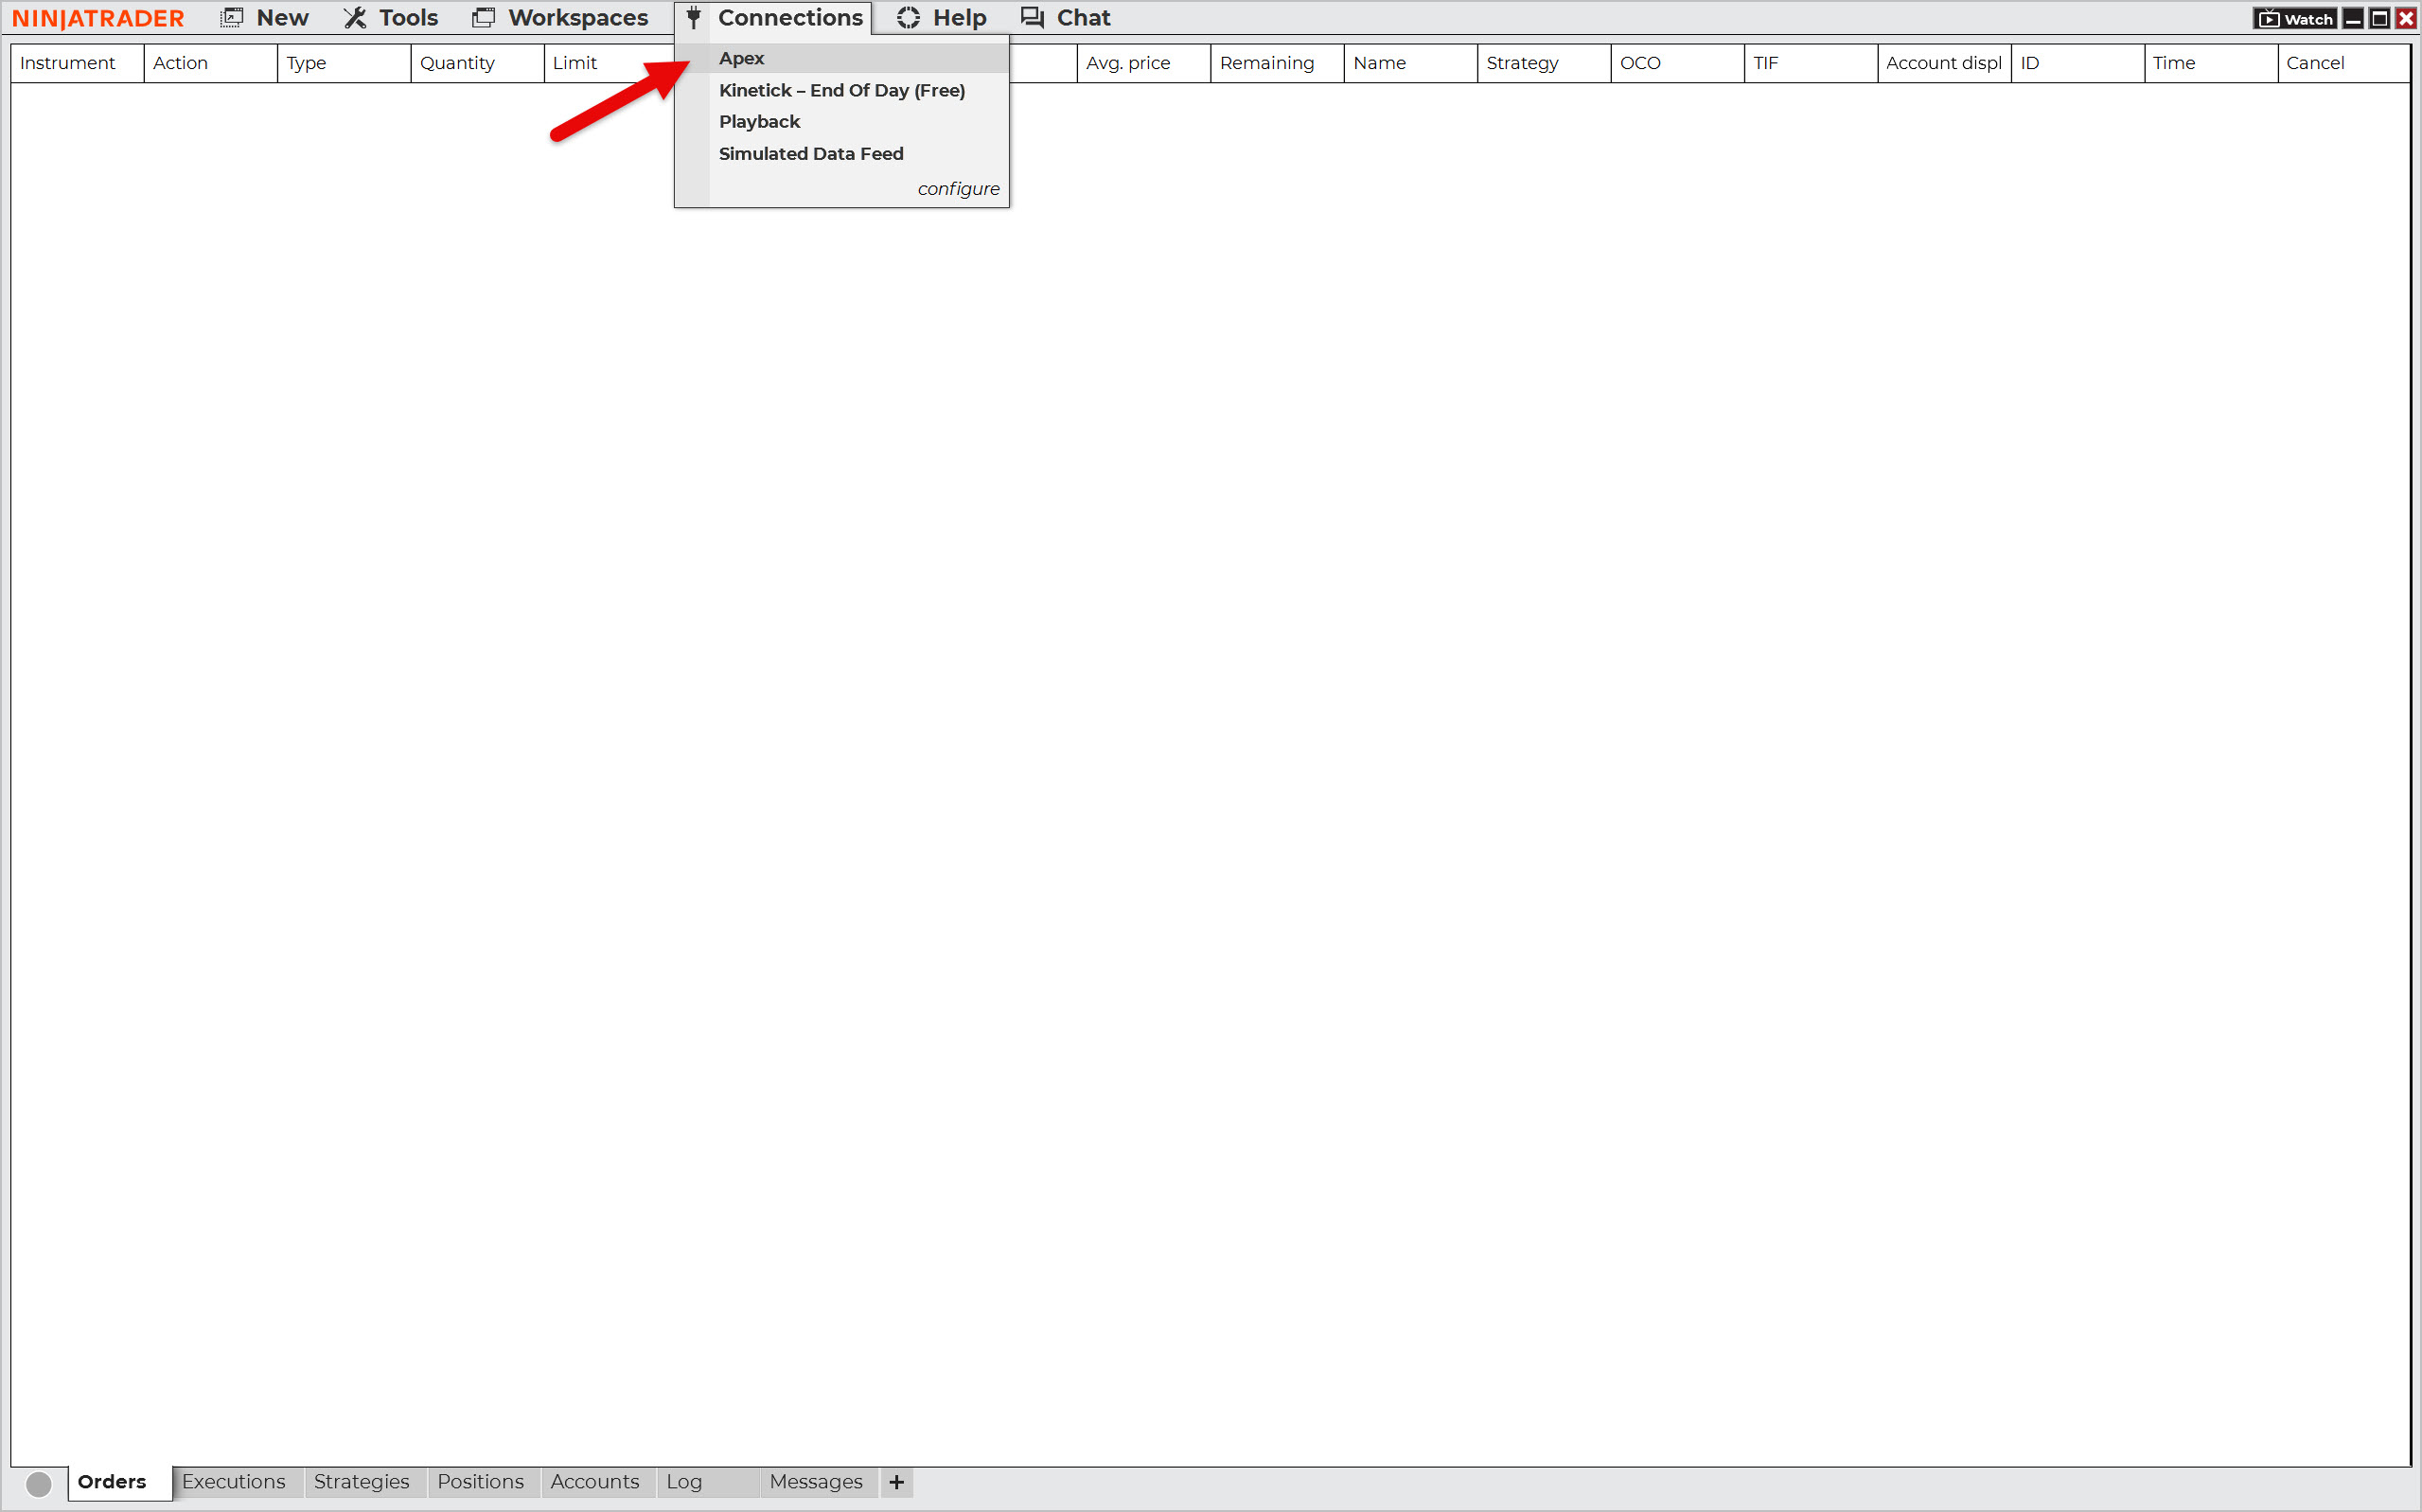
Before you start downloading, you must first connect to your data source. Select Connections from the main panel and then your data provider. In this example, Apex Trader Funding is used.
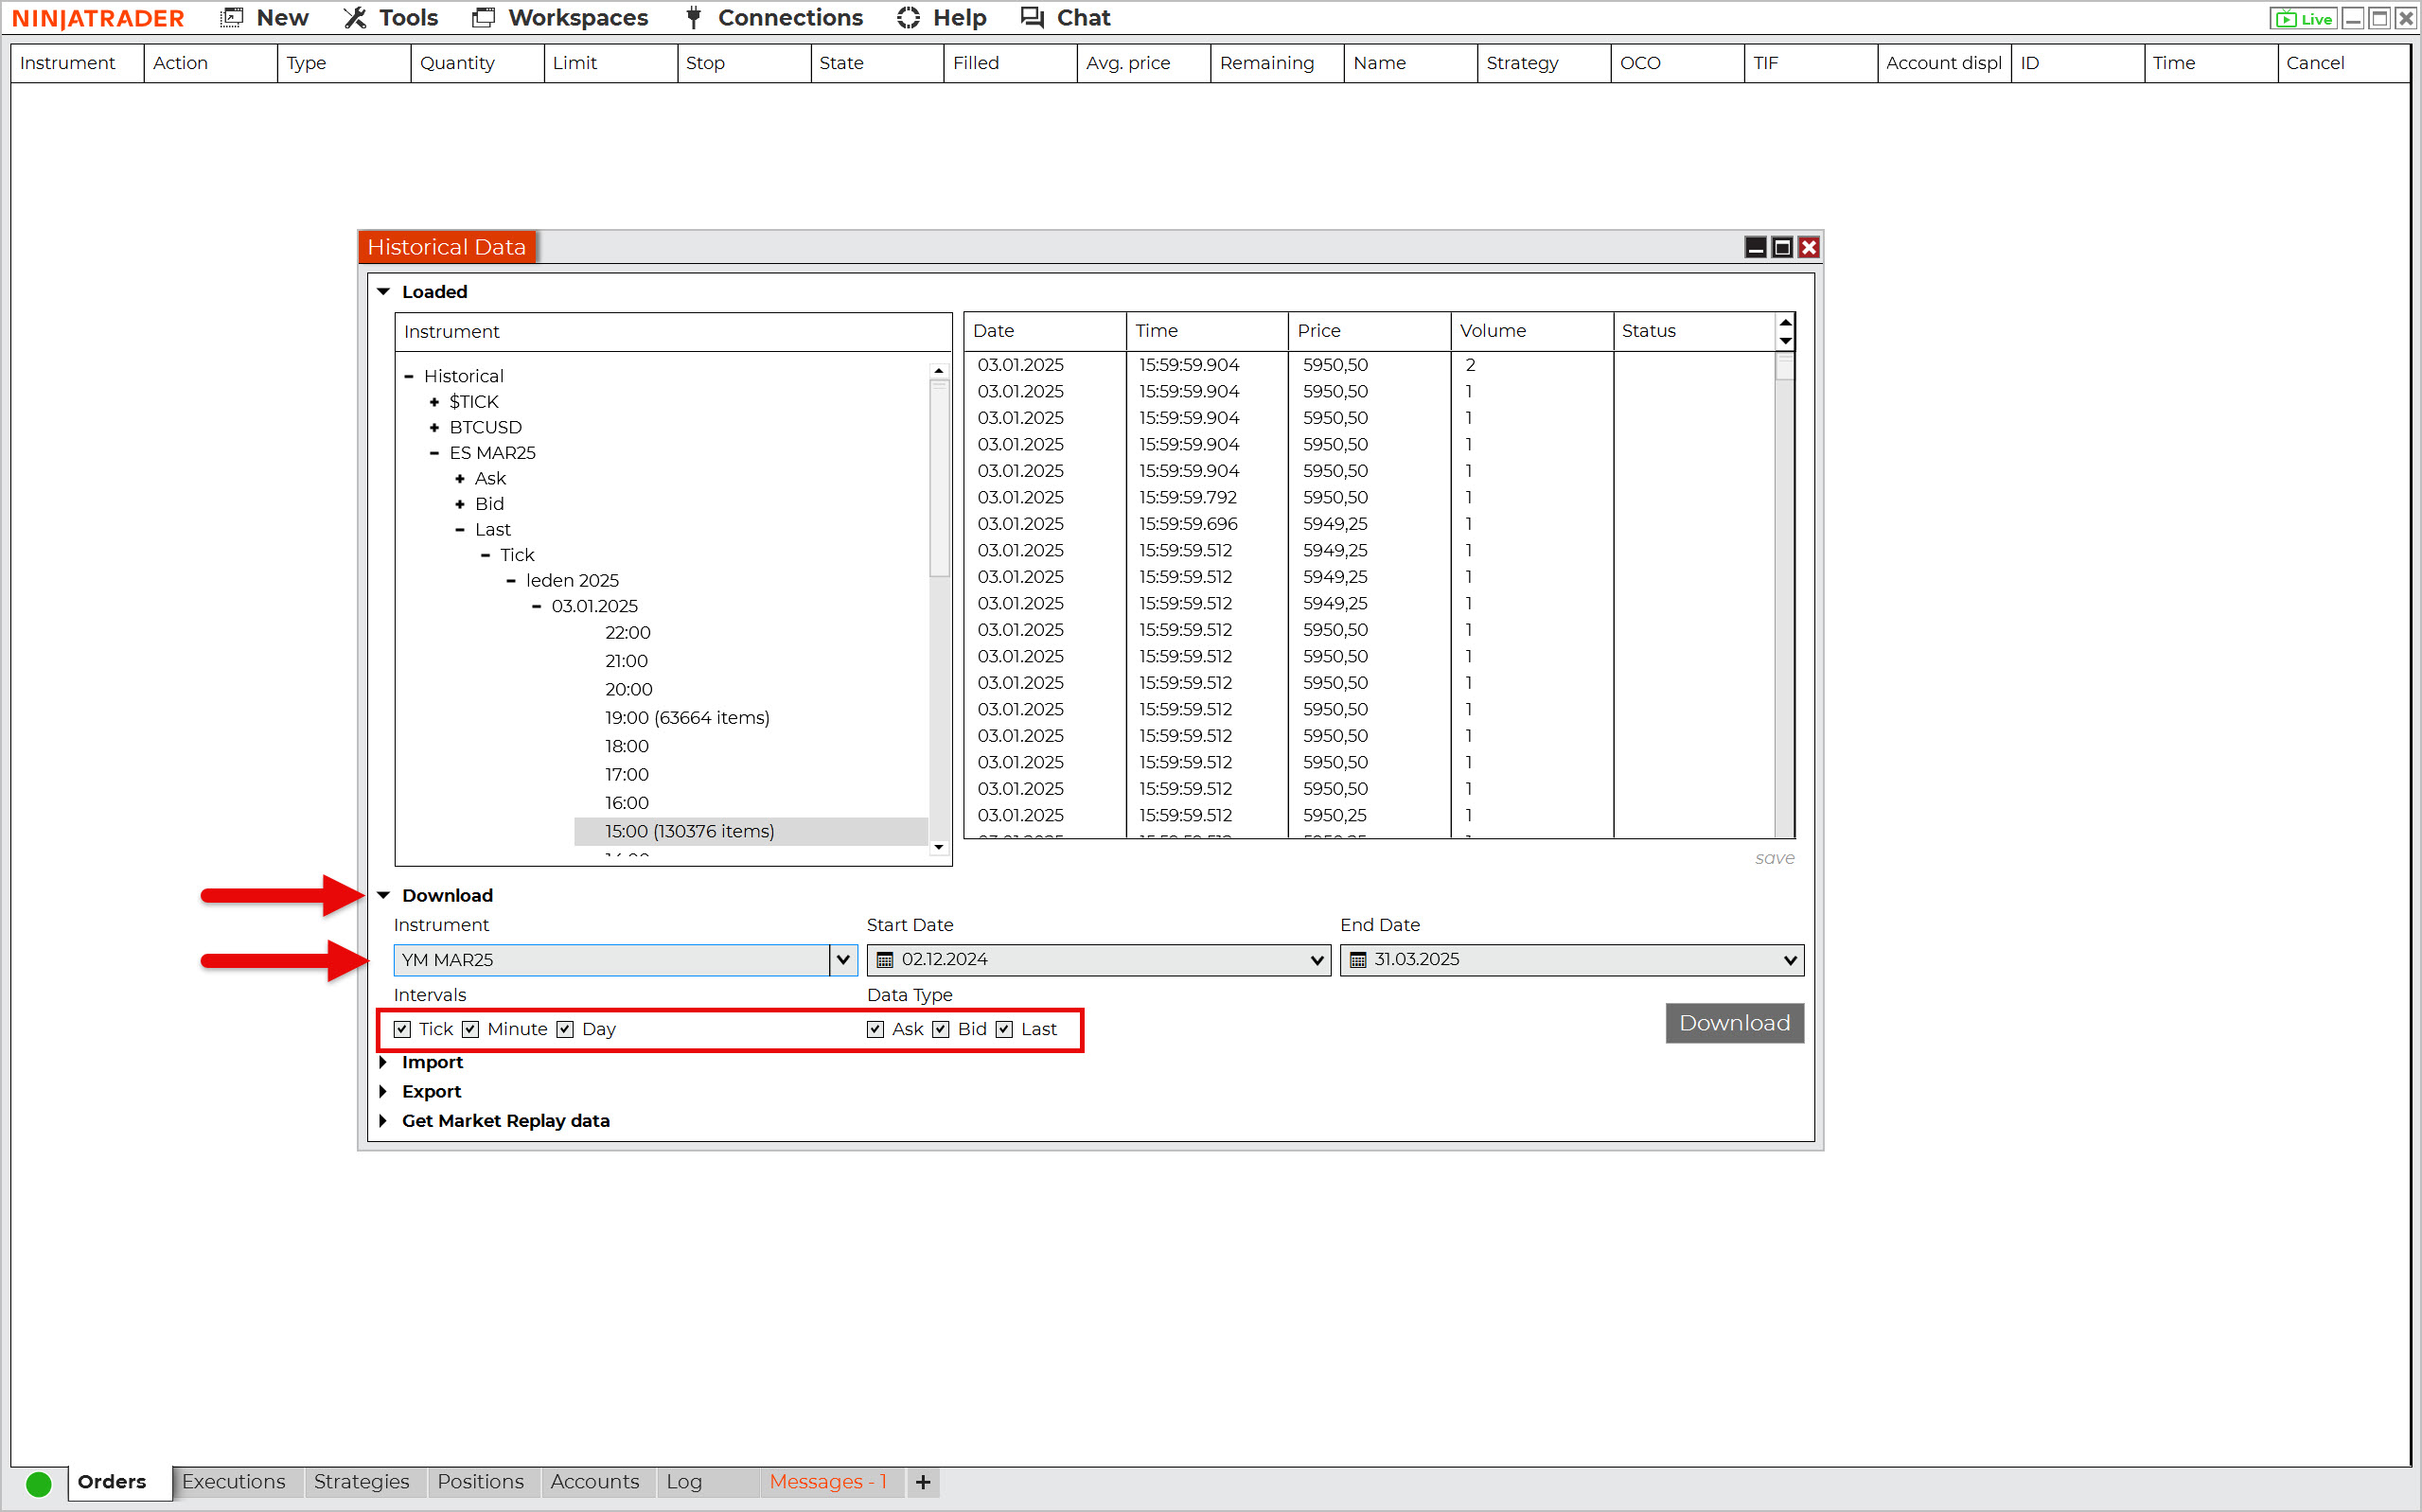
In the Historical Data window, click Download and enter the name of the instrument along with the period for which you are requesting historical data. Depending on what you intend to use the data for, select its granularity and type.
For example, if you are going to test a strategy using only a 15-minute time frame, 1-minute data with the last price option will suffice.
Please note that the more options you select, the larger the file you will receive.
Downloaded historical tick data can also be replayed in NinjaTrader, as you will see later.
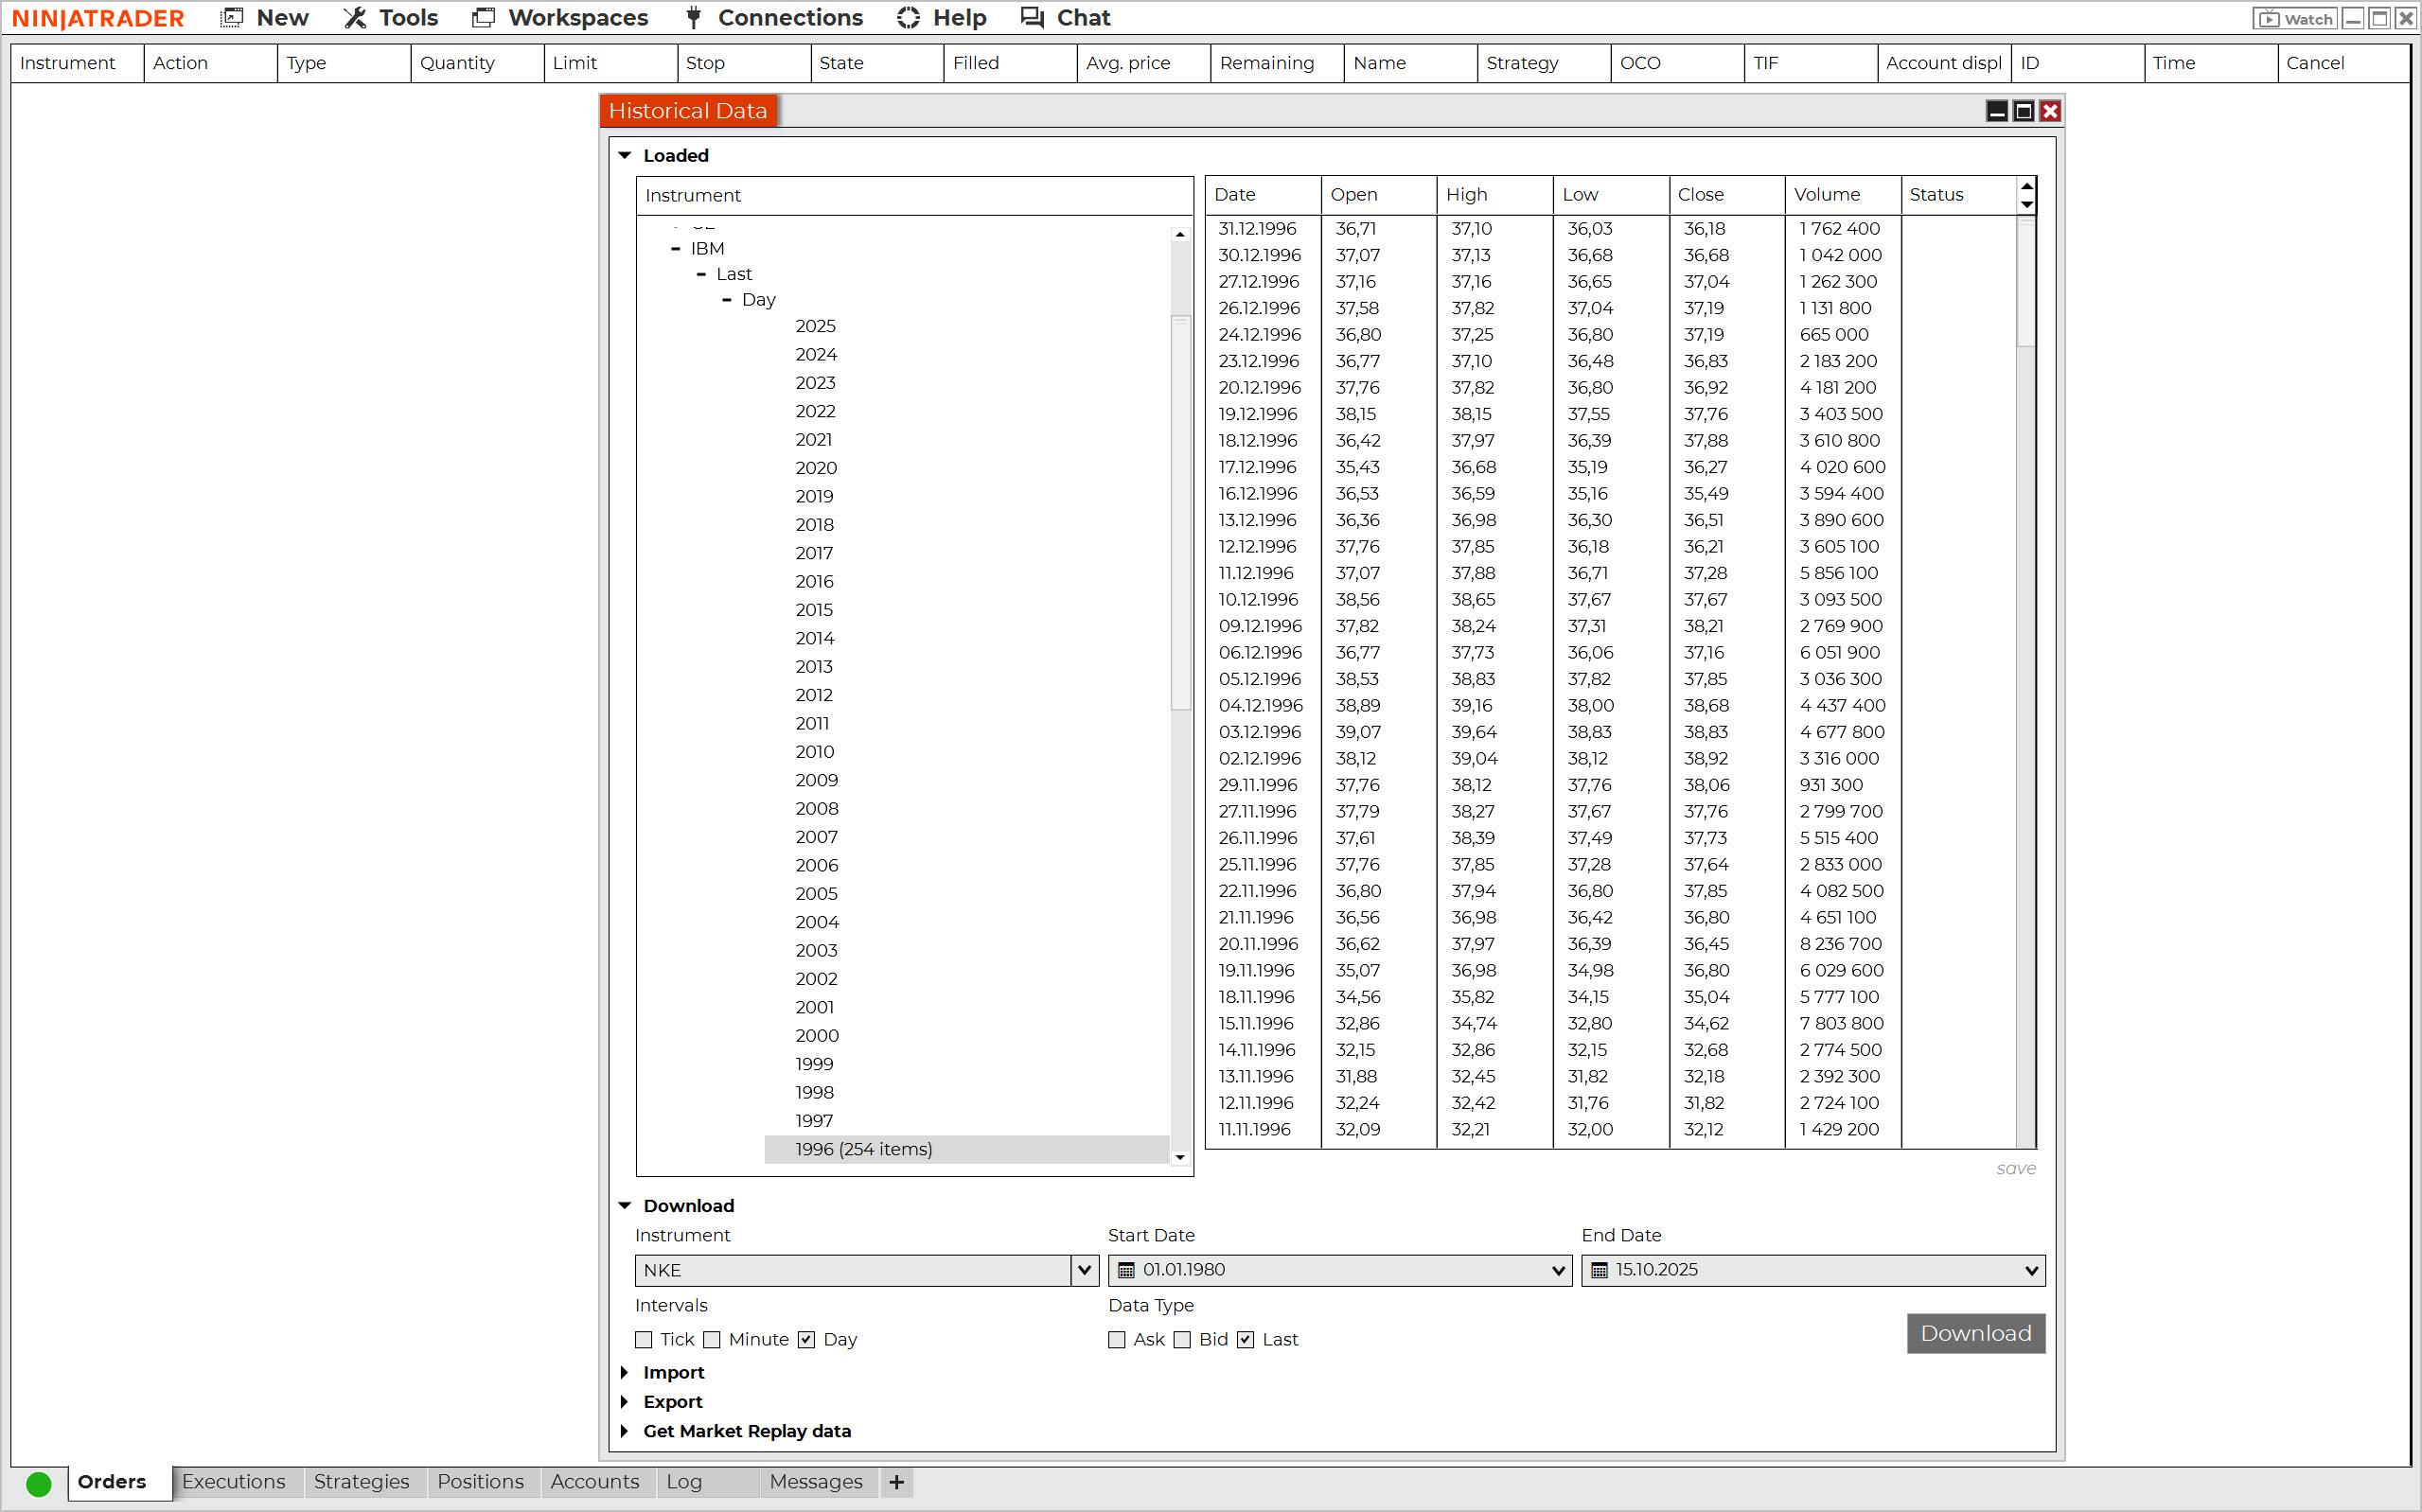
NinjaTrader also allows you to obtain free end-of-day data from Kinetick servers. This should be of particular interest to traders who want to backtest stocks, as their historical daily data usually goes back to 1996.
Importing Historical Data From an External Source
The last option of getting historical data for backtesting is from external sources. In most cases, you have to pay for such data, but there are also ways to get it completely free of charge. Here is an overview of the most interesting historical data providers:
- Tickdatamarket – Historical tick data for NinjaTrader and Metatrader.
- Tickstory – Historical tick data for NinjaTrader, Metatrader, Amibroker, and other platforms.
- Portara Ninja – Historical tick data for NinjaTrader.
- Tick Data – Historical tick data with a choice of custom formats.
- PriceIsKing – Historical market replay data for Ninja Trader.
- Dukascopy – Free historical tick data for forex and CFD markets.
To see how data is imported into NinjaTrader, let’s look at an example of preparing historical data for backtesting the EURUSD currency pair.
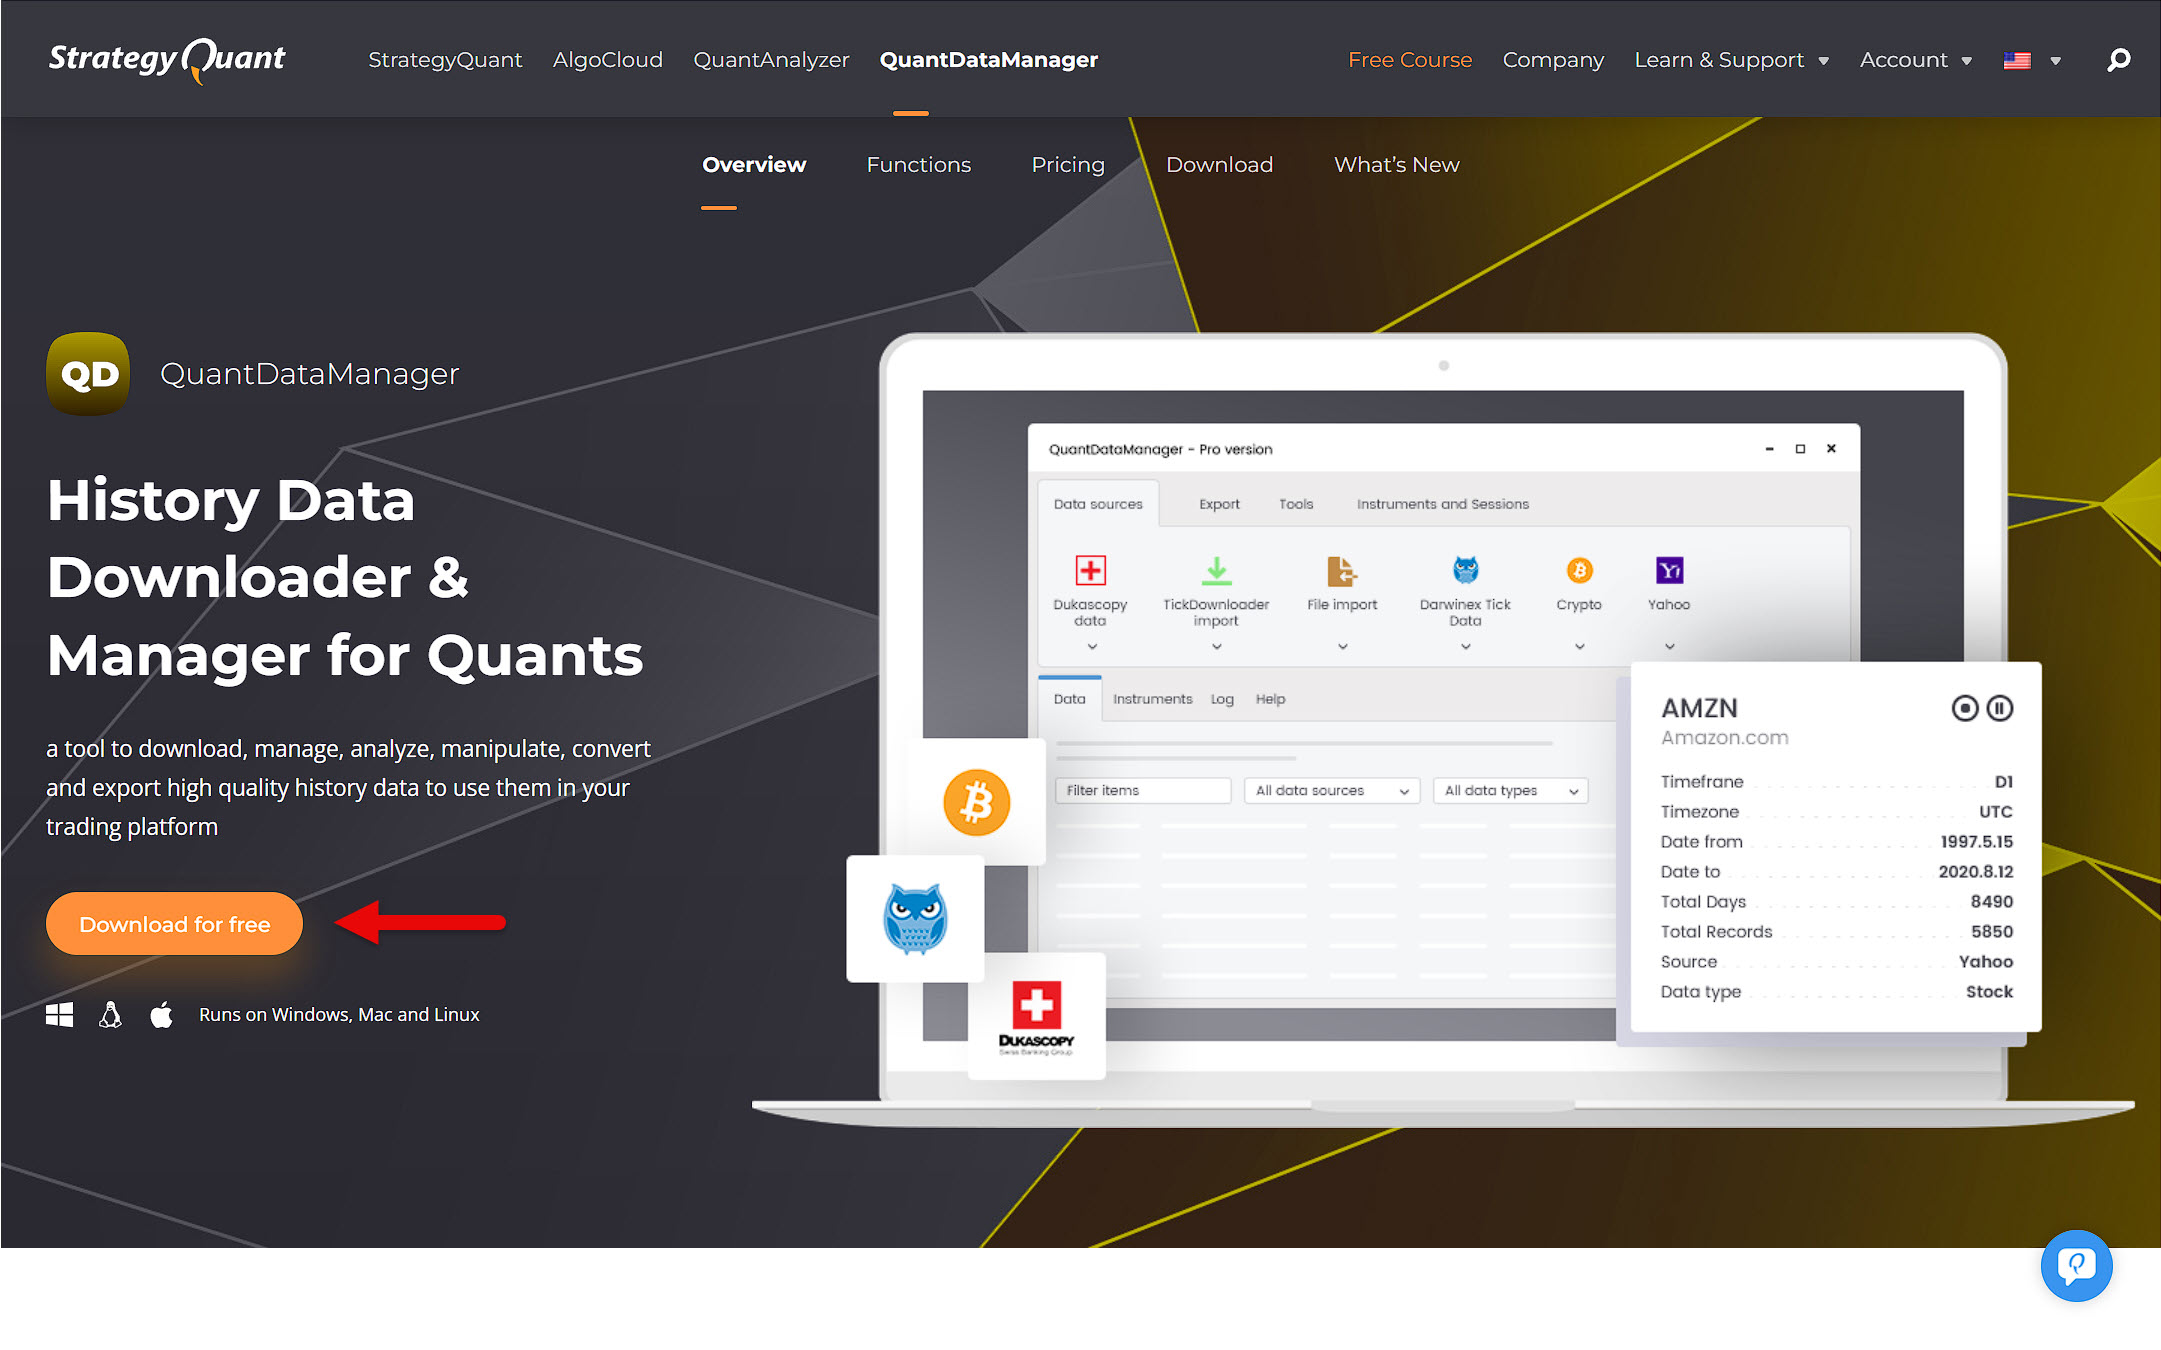
For this purpose, we will use the free Quant Data Manager software, which can download and edit historical data from Dukascopy, Darwinex, Yahoo Finance, and several other sources, including cryptocurrency exchanges such as Binance.
Start by downloading the free version of Quant Data Manager and then installing it on your device.
Launch Quant Data Manager and add the symbol (ticker) you want to download. The example below shows the procedure for downloading tick data for EURUSD from Dukascopy.
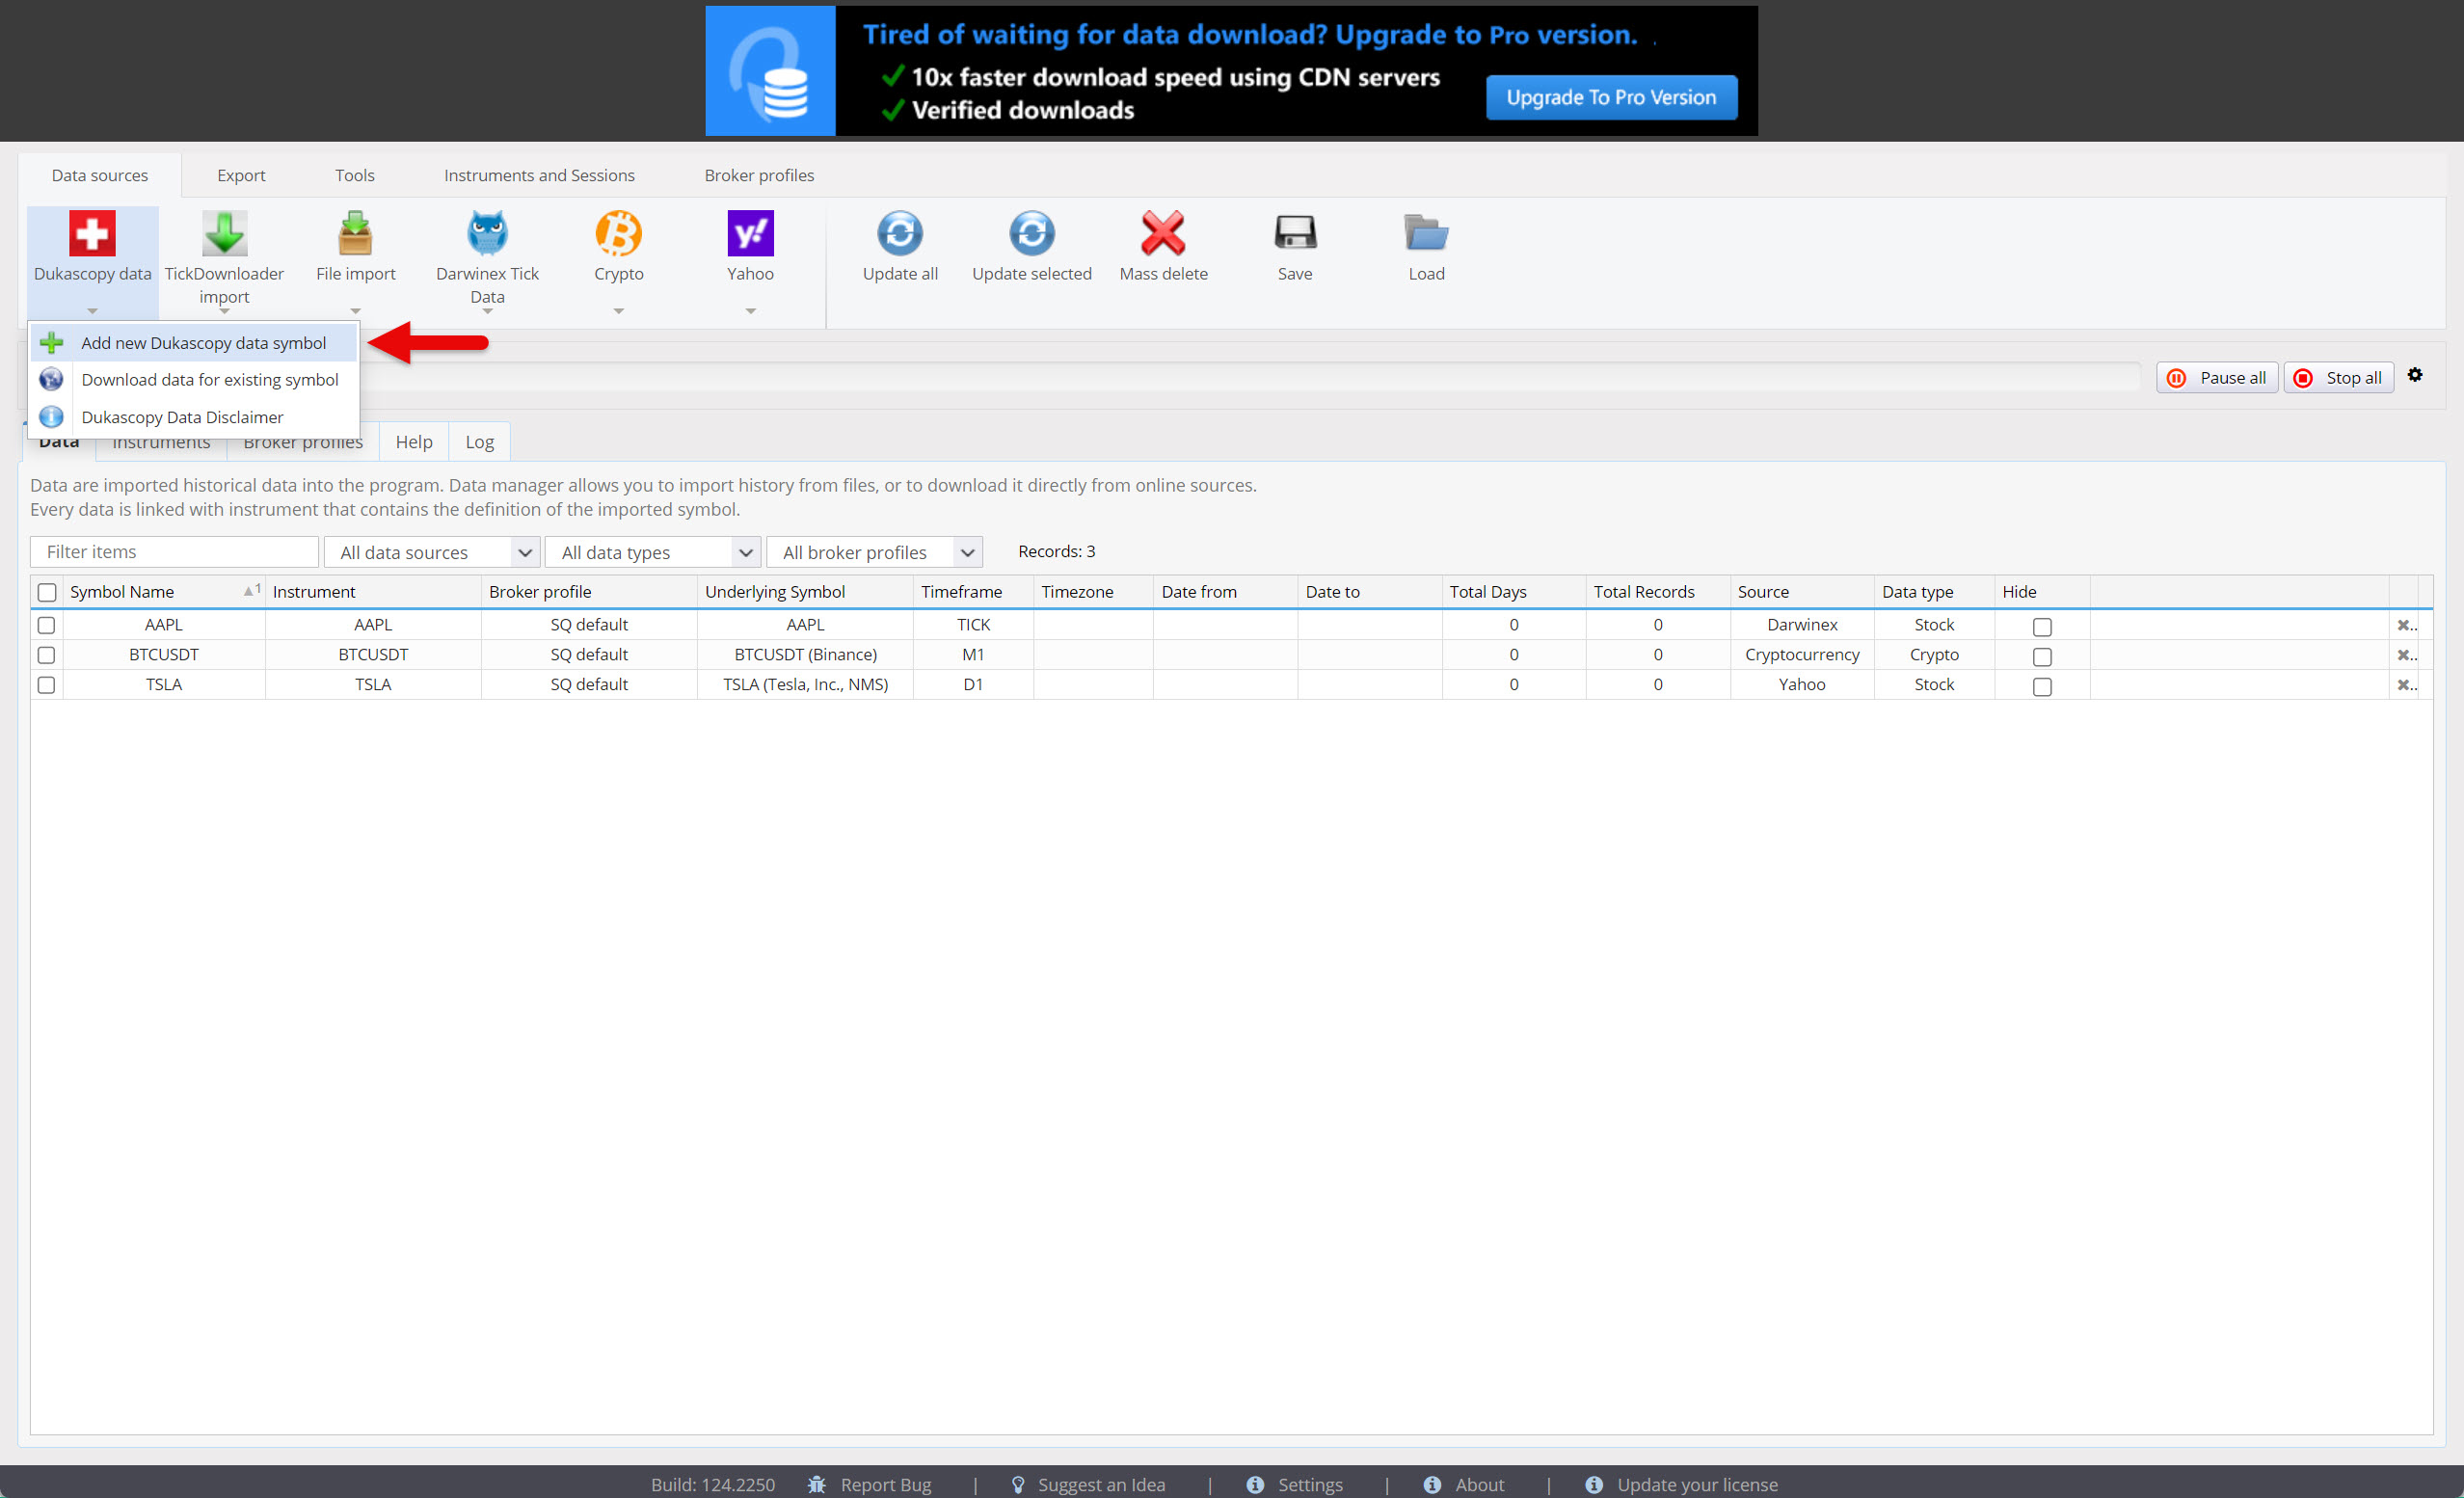
Go to Dukascopy Data and click on this button. A menu will appear from which you can select Add new Dukascopy data symbol.
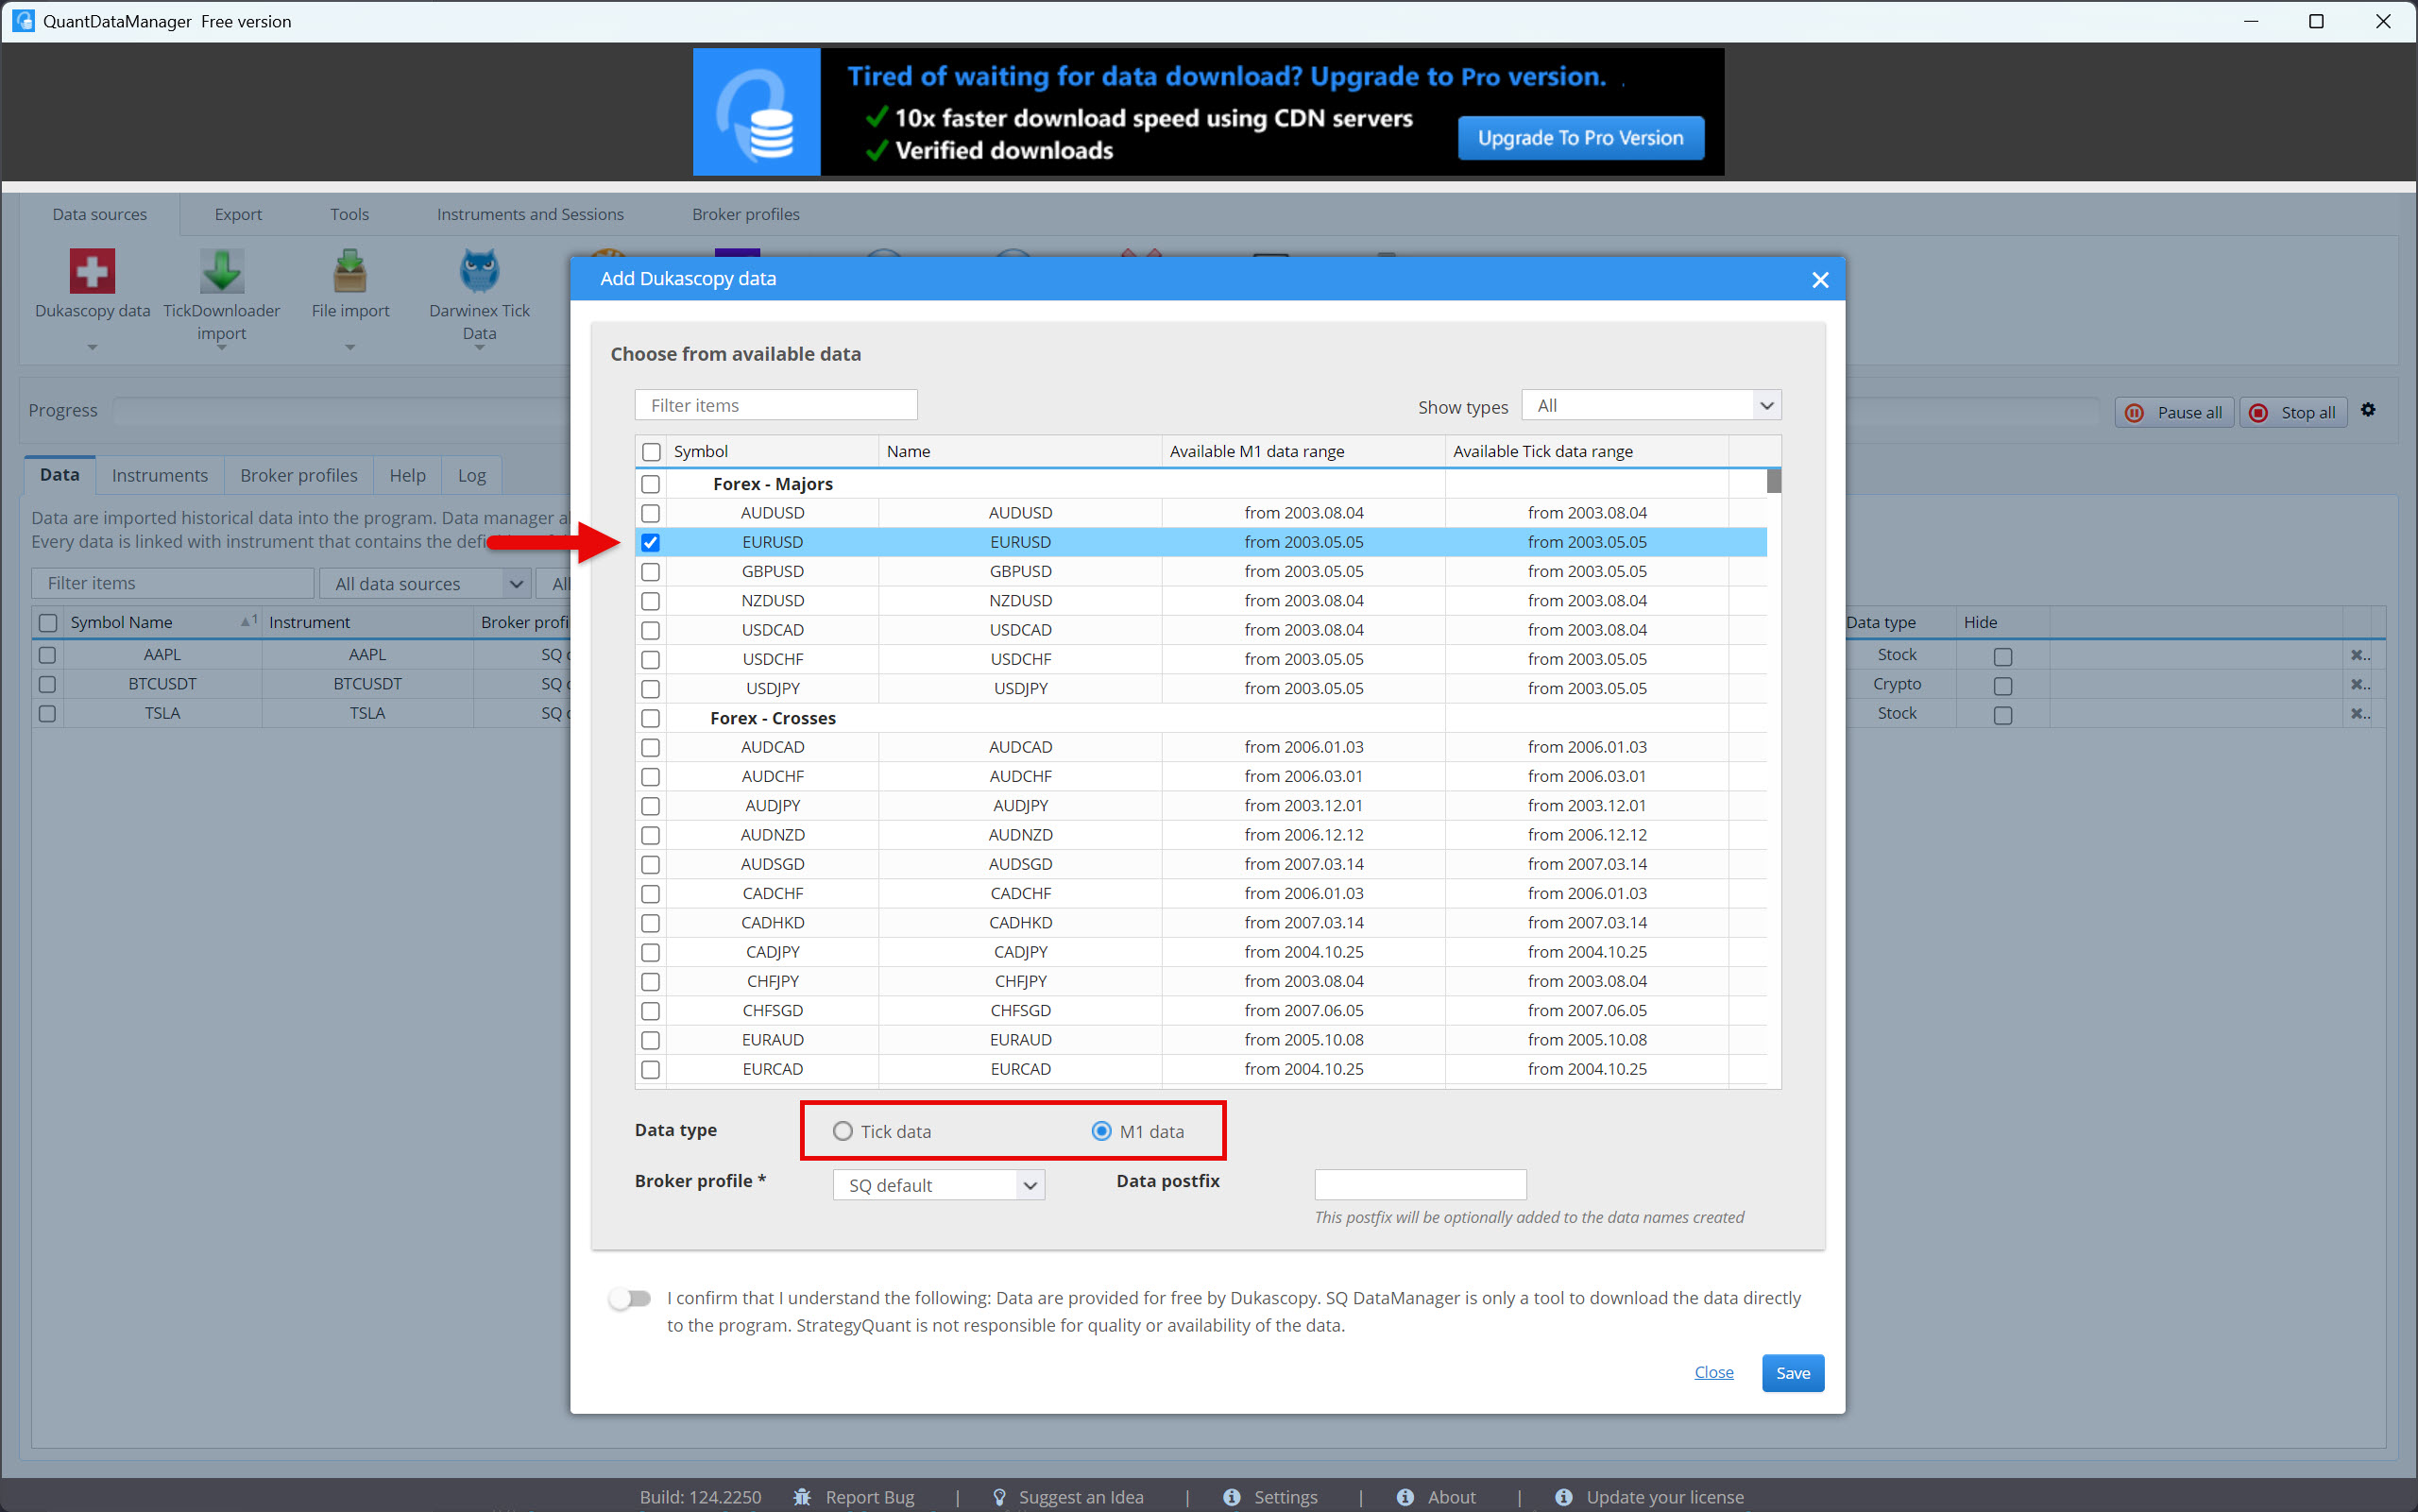
Select the symbol, data type, and confirm your agreement with the Data Disclaimer. Then press the Save button.
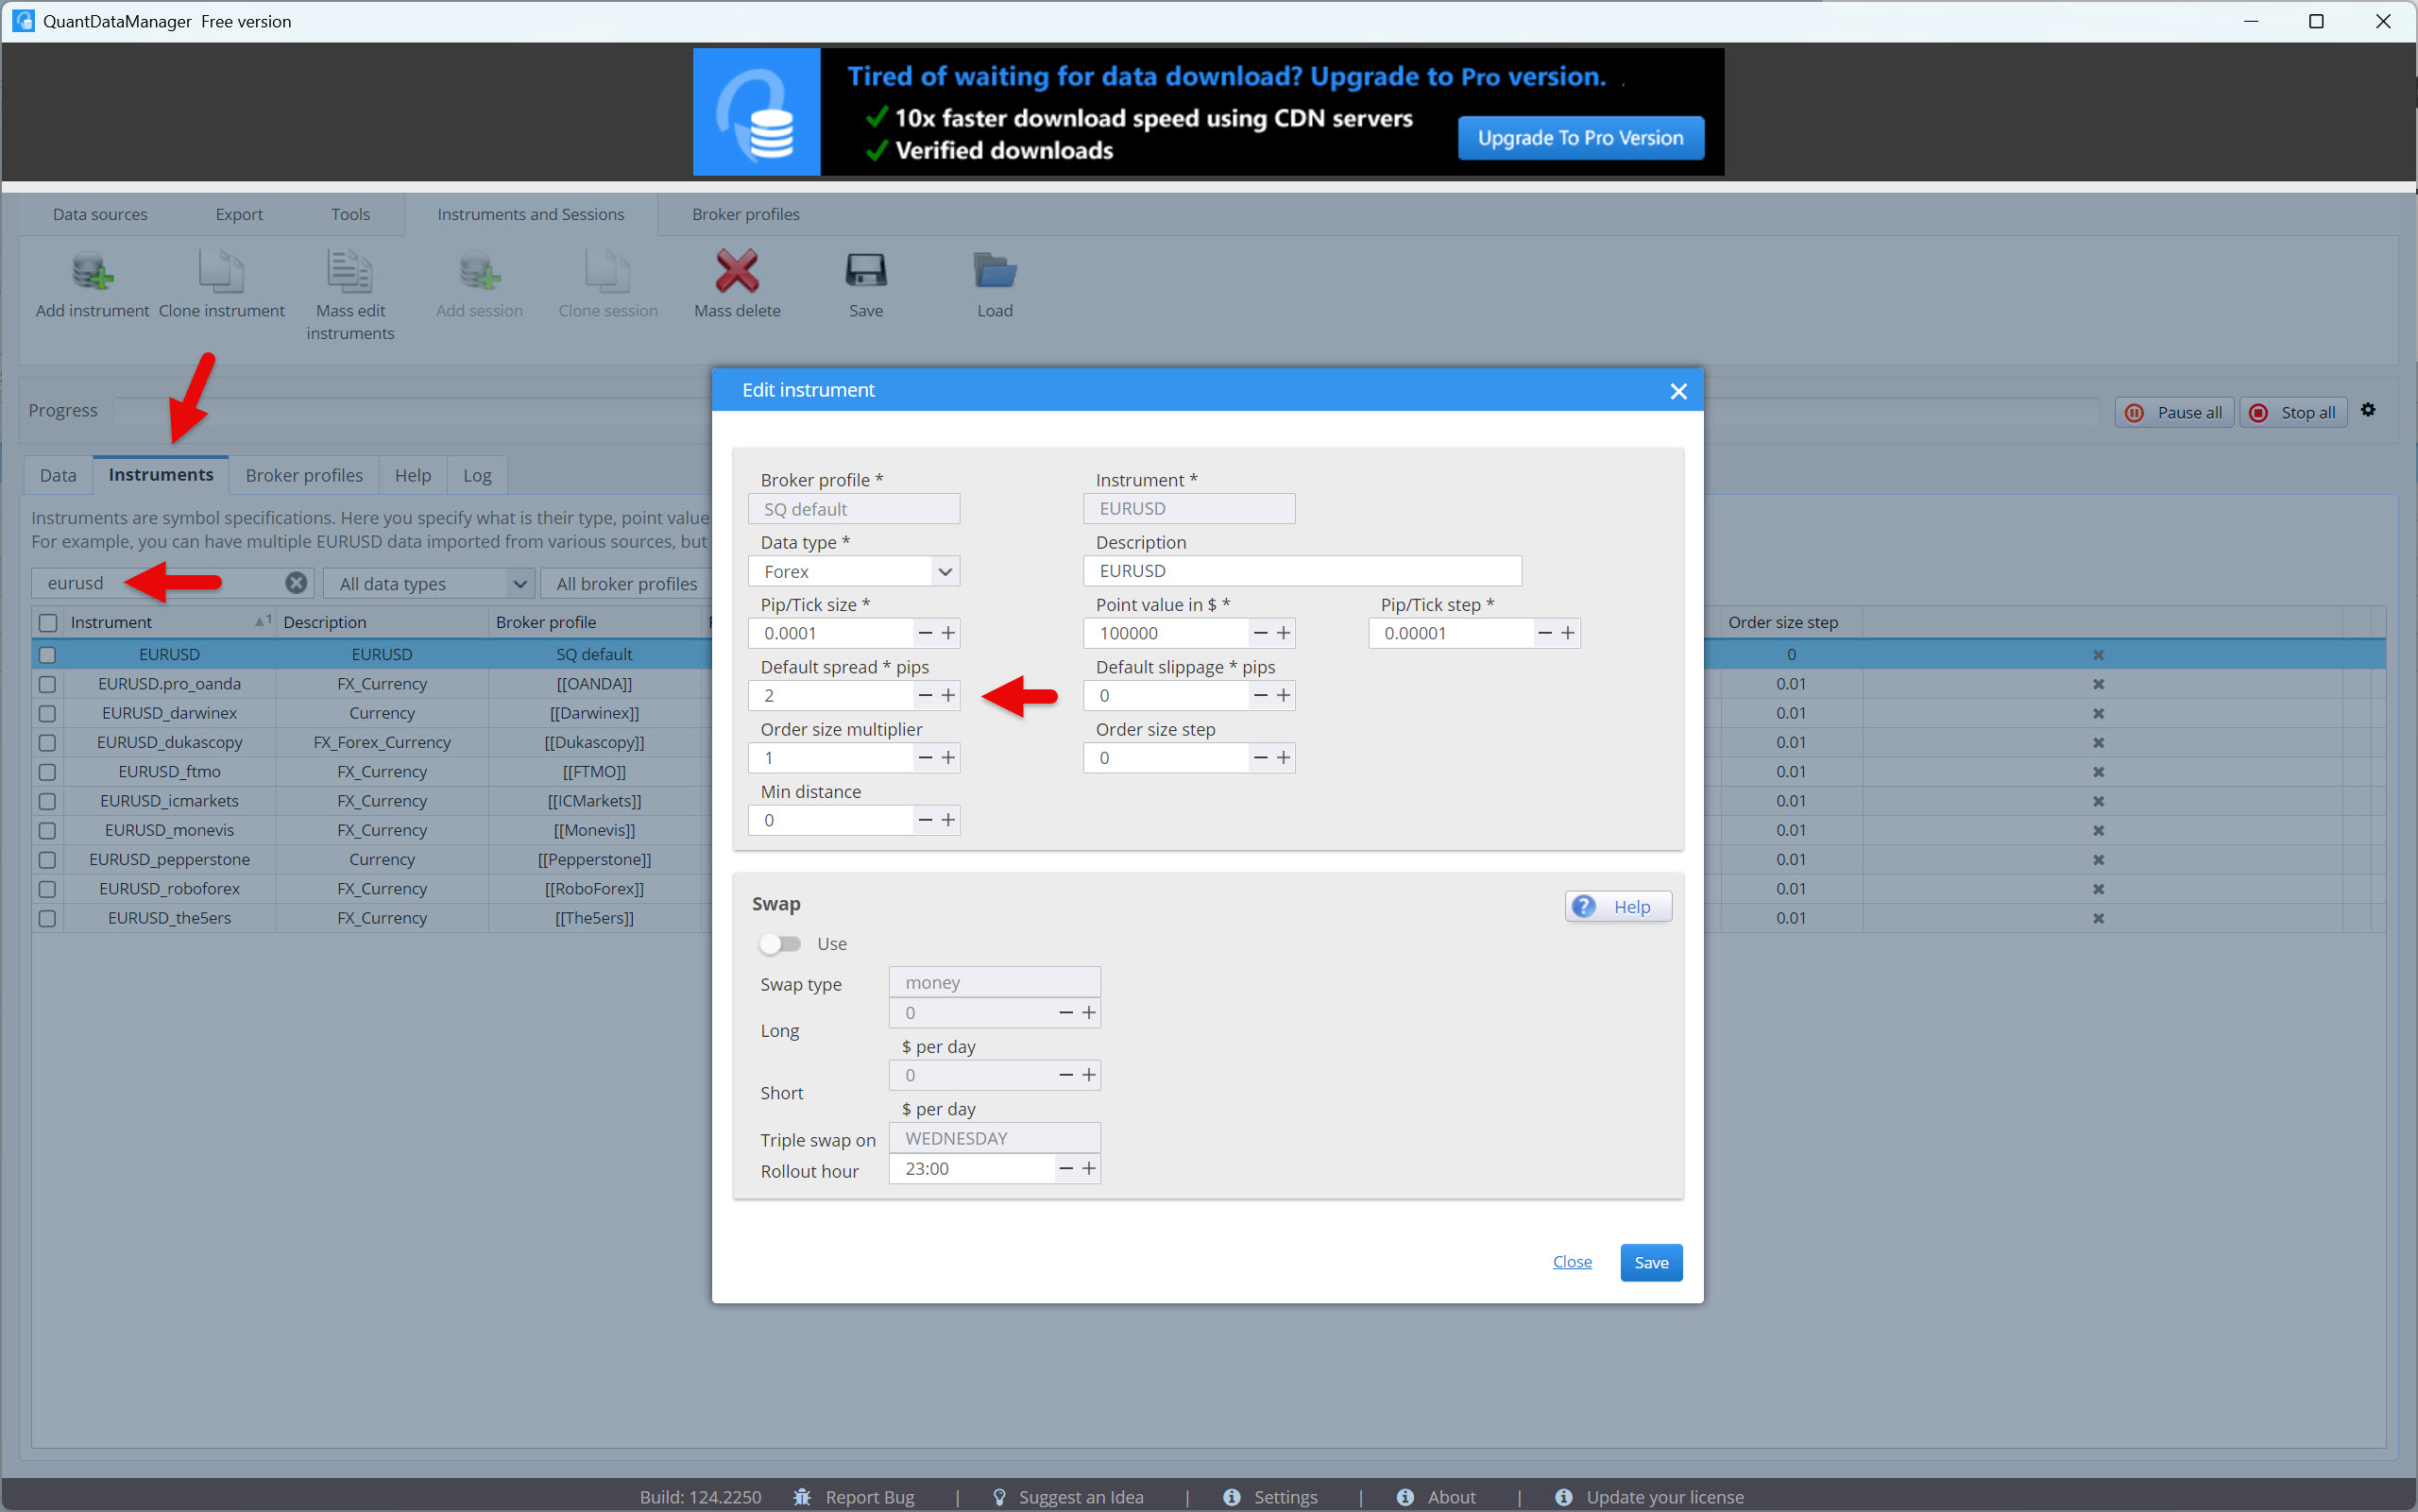
If you want, you can set the default spread. Go to the Instruments tab and find your symbol. Then double-click on it to open the symbol settings. Set the spread and press the Save button.
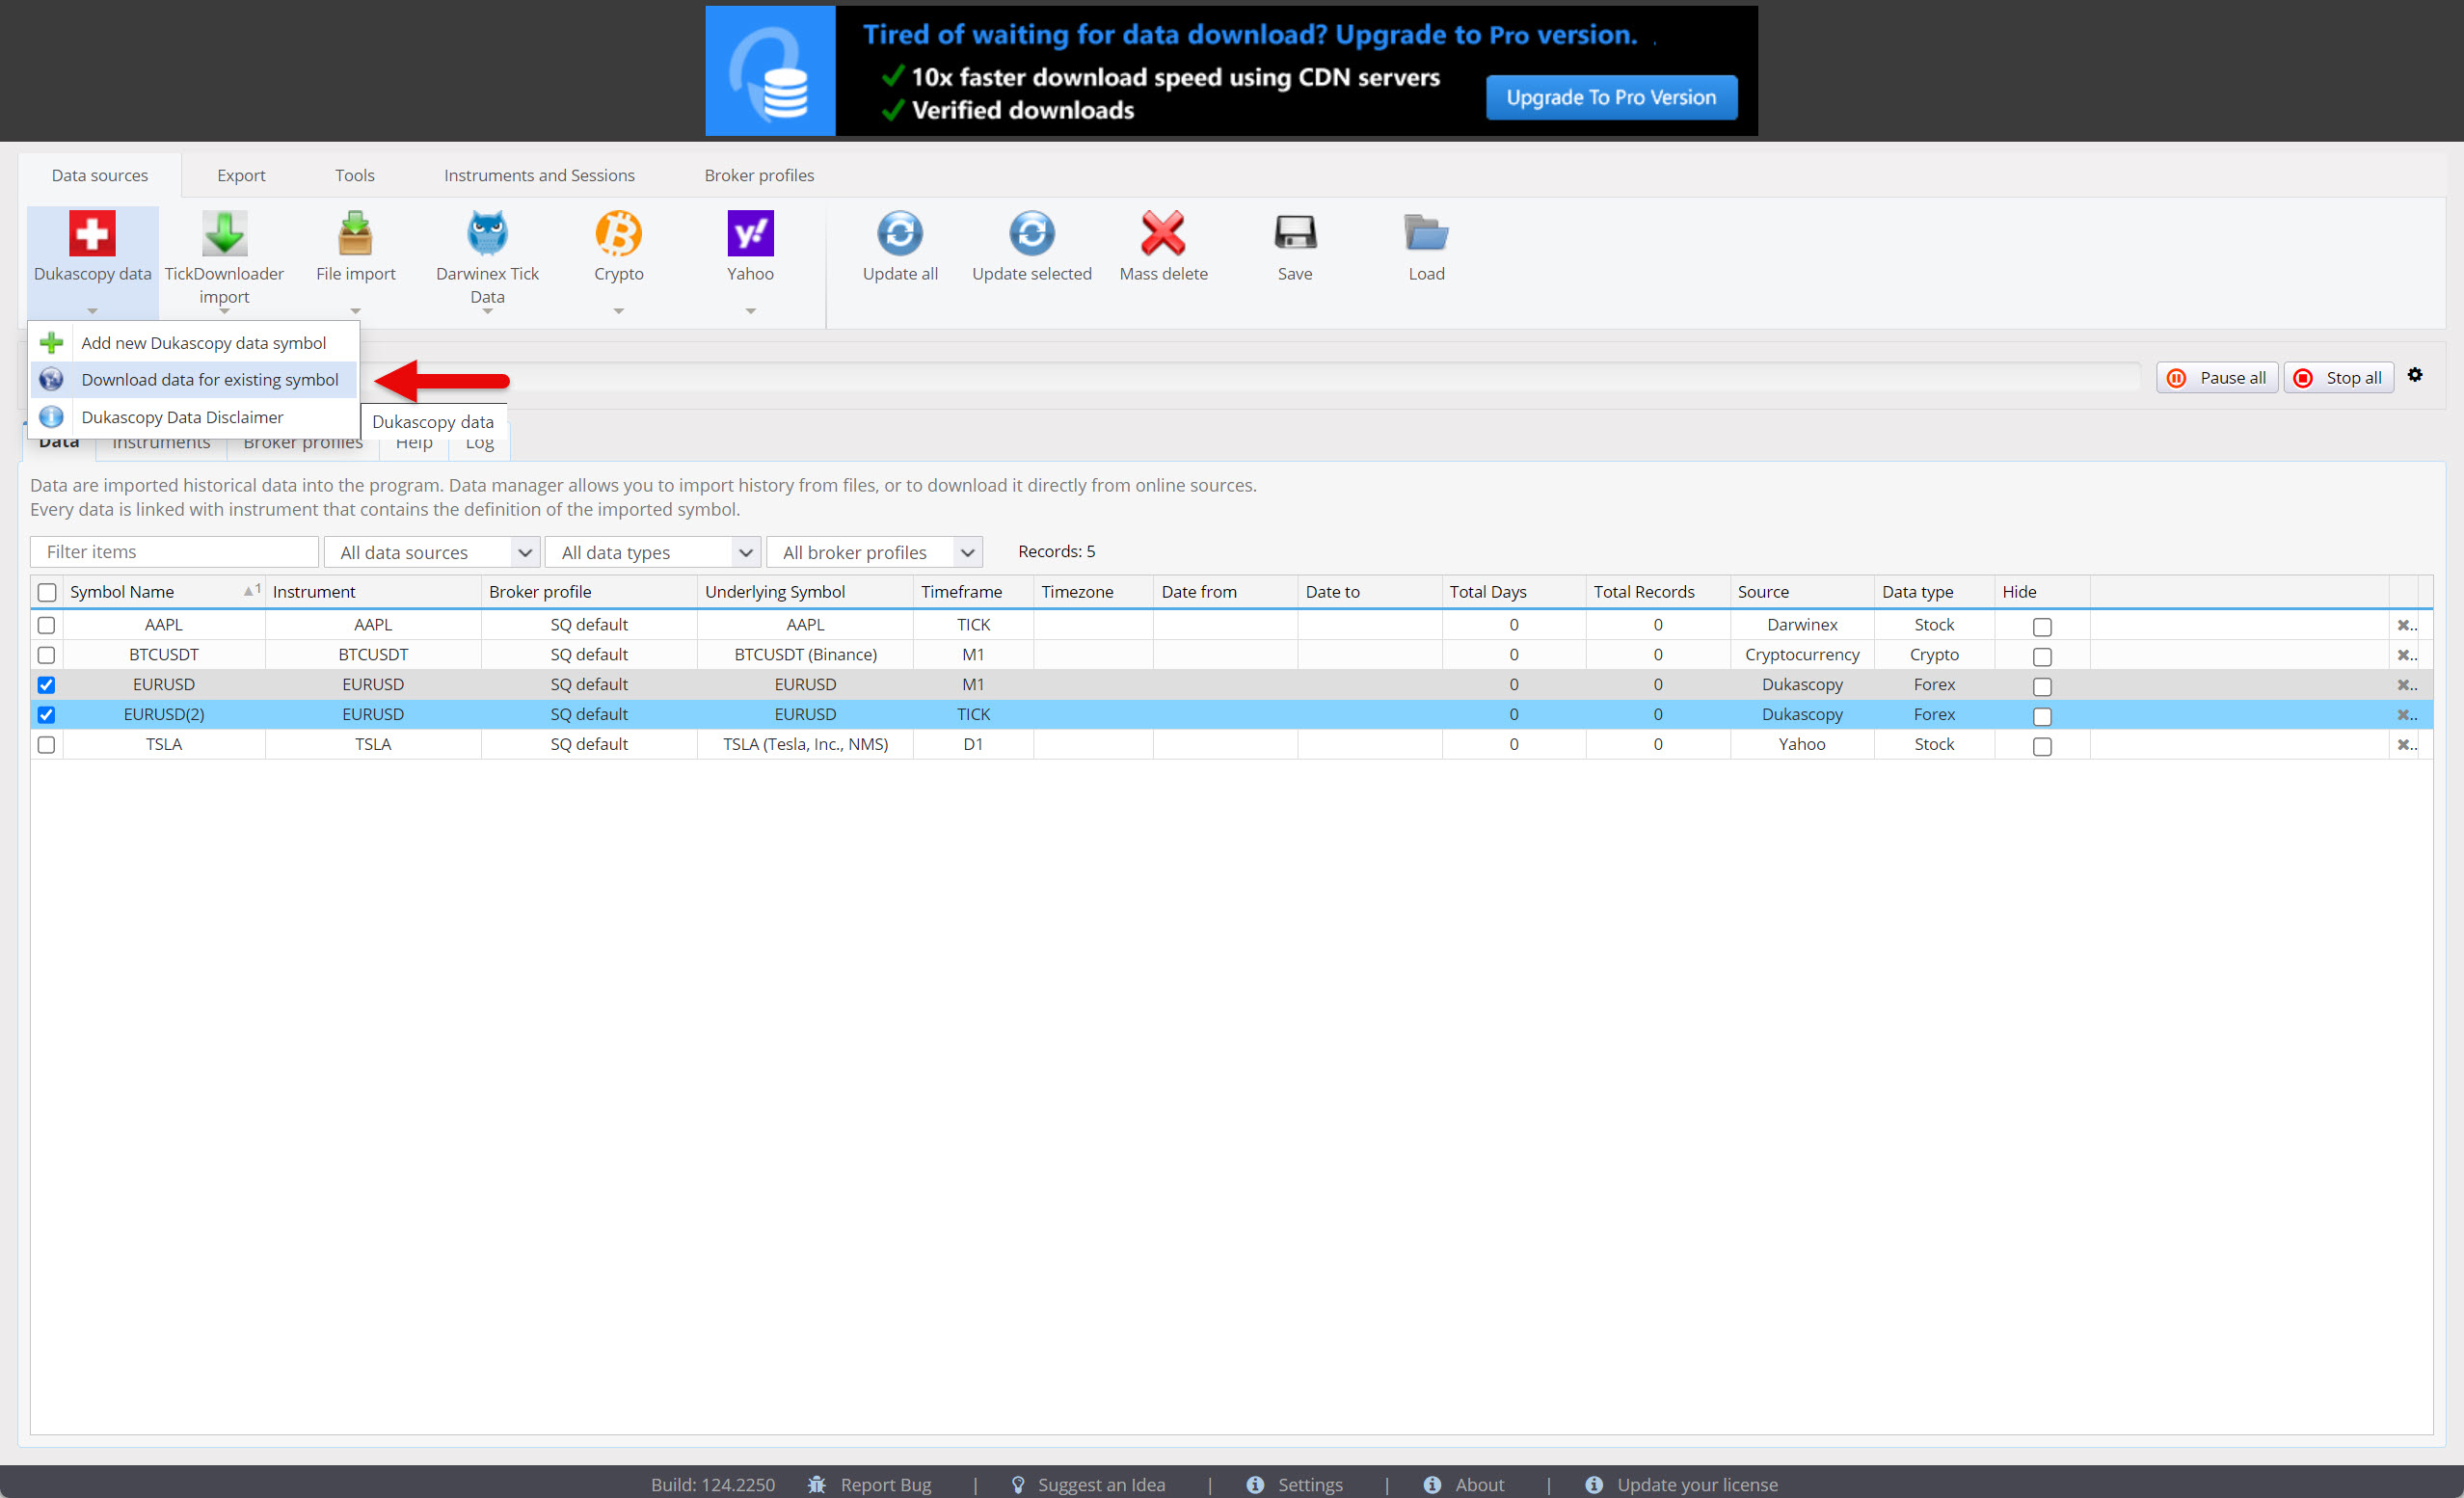
You can now download historical data. First, select the symbols to download, then click on the Dukascopy Data button in the Data sources tab and select Download data for existing symbol from the menu.
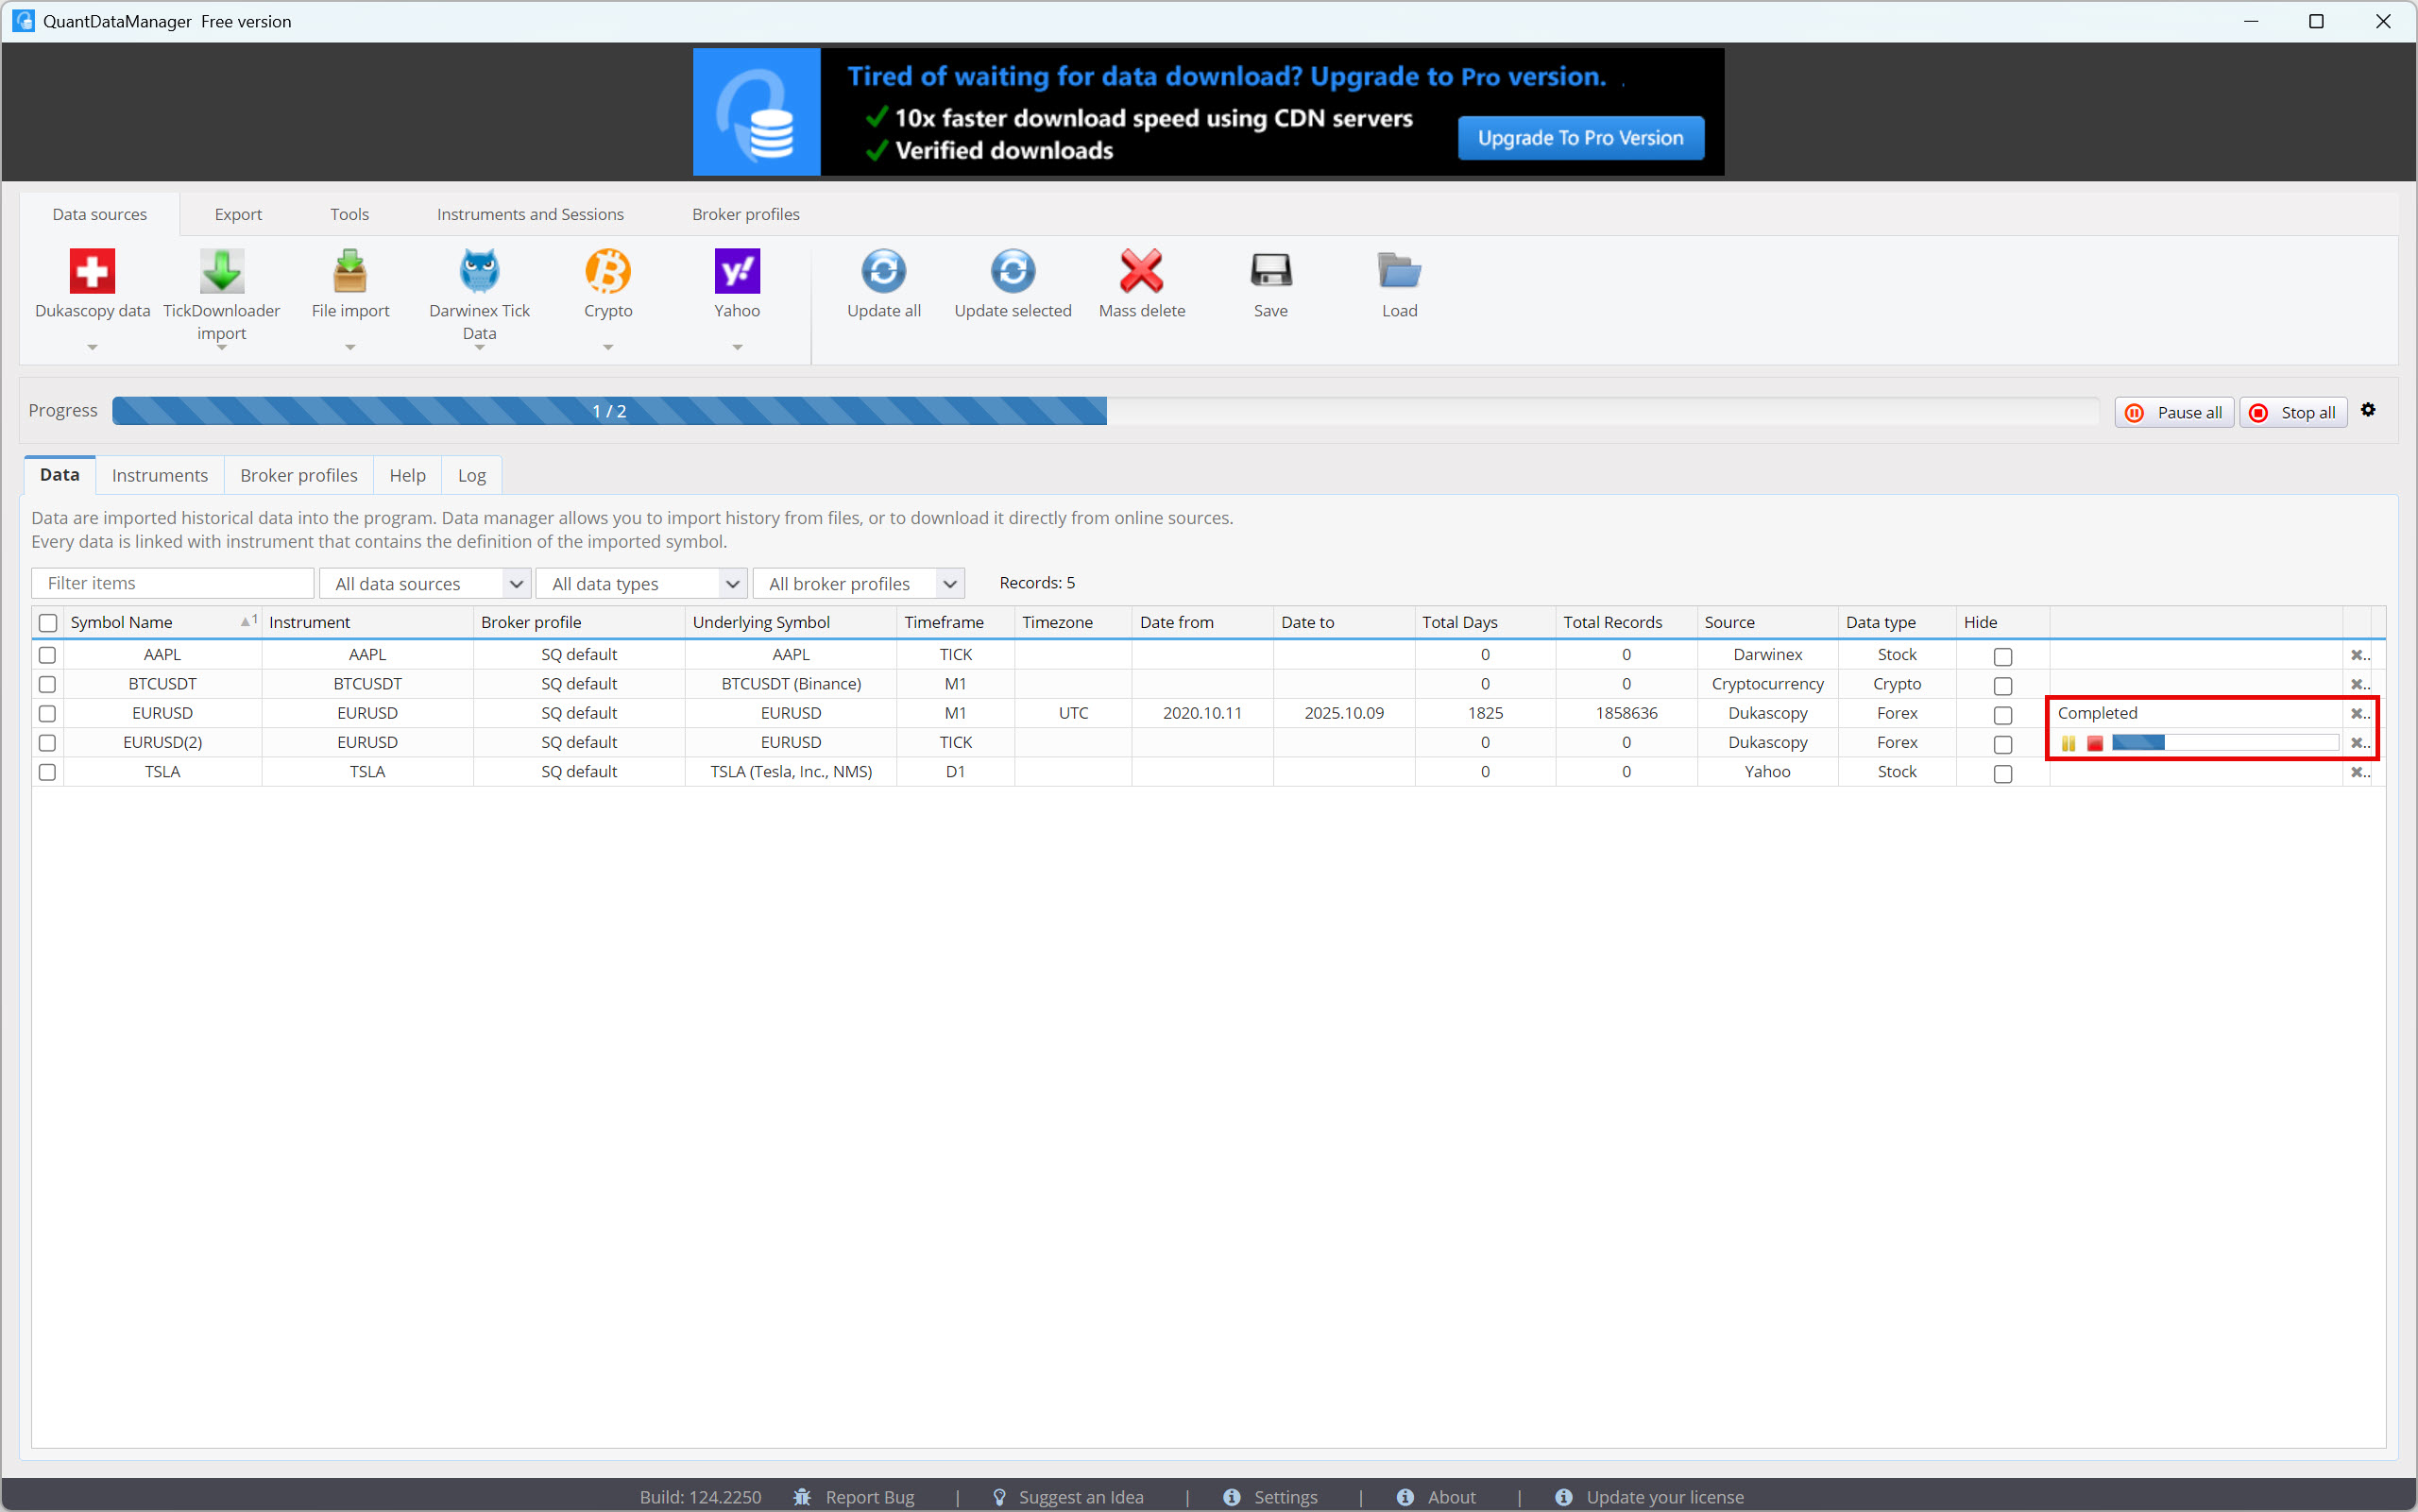
The historical data will start downloading, which is indicated by a progress bar. The 1-minute data is usually downloaded within a few minutes, while tick-by-tick data can take several hours to download. The download time depends on server load, your internet speed, and the volume of data you request.
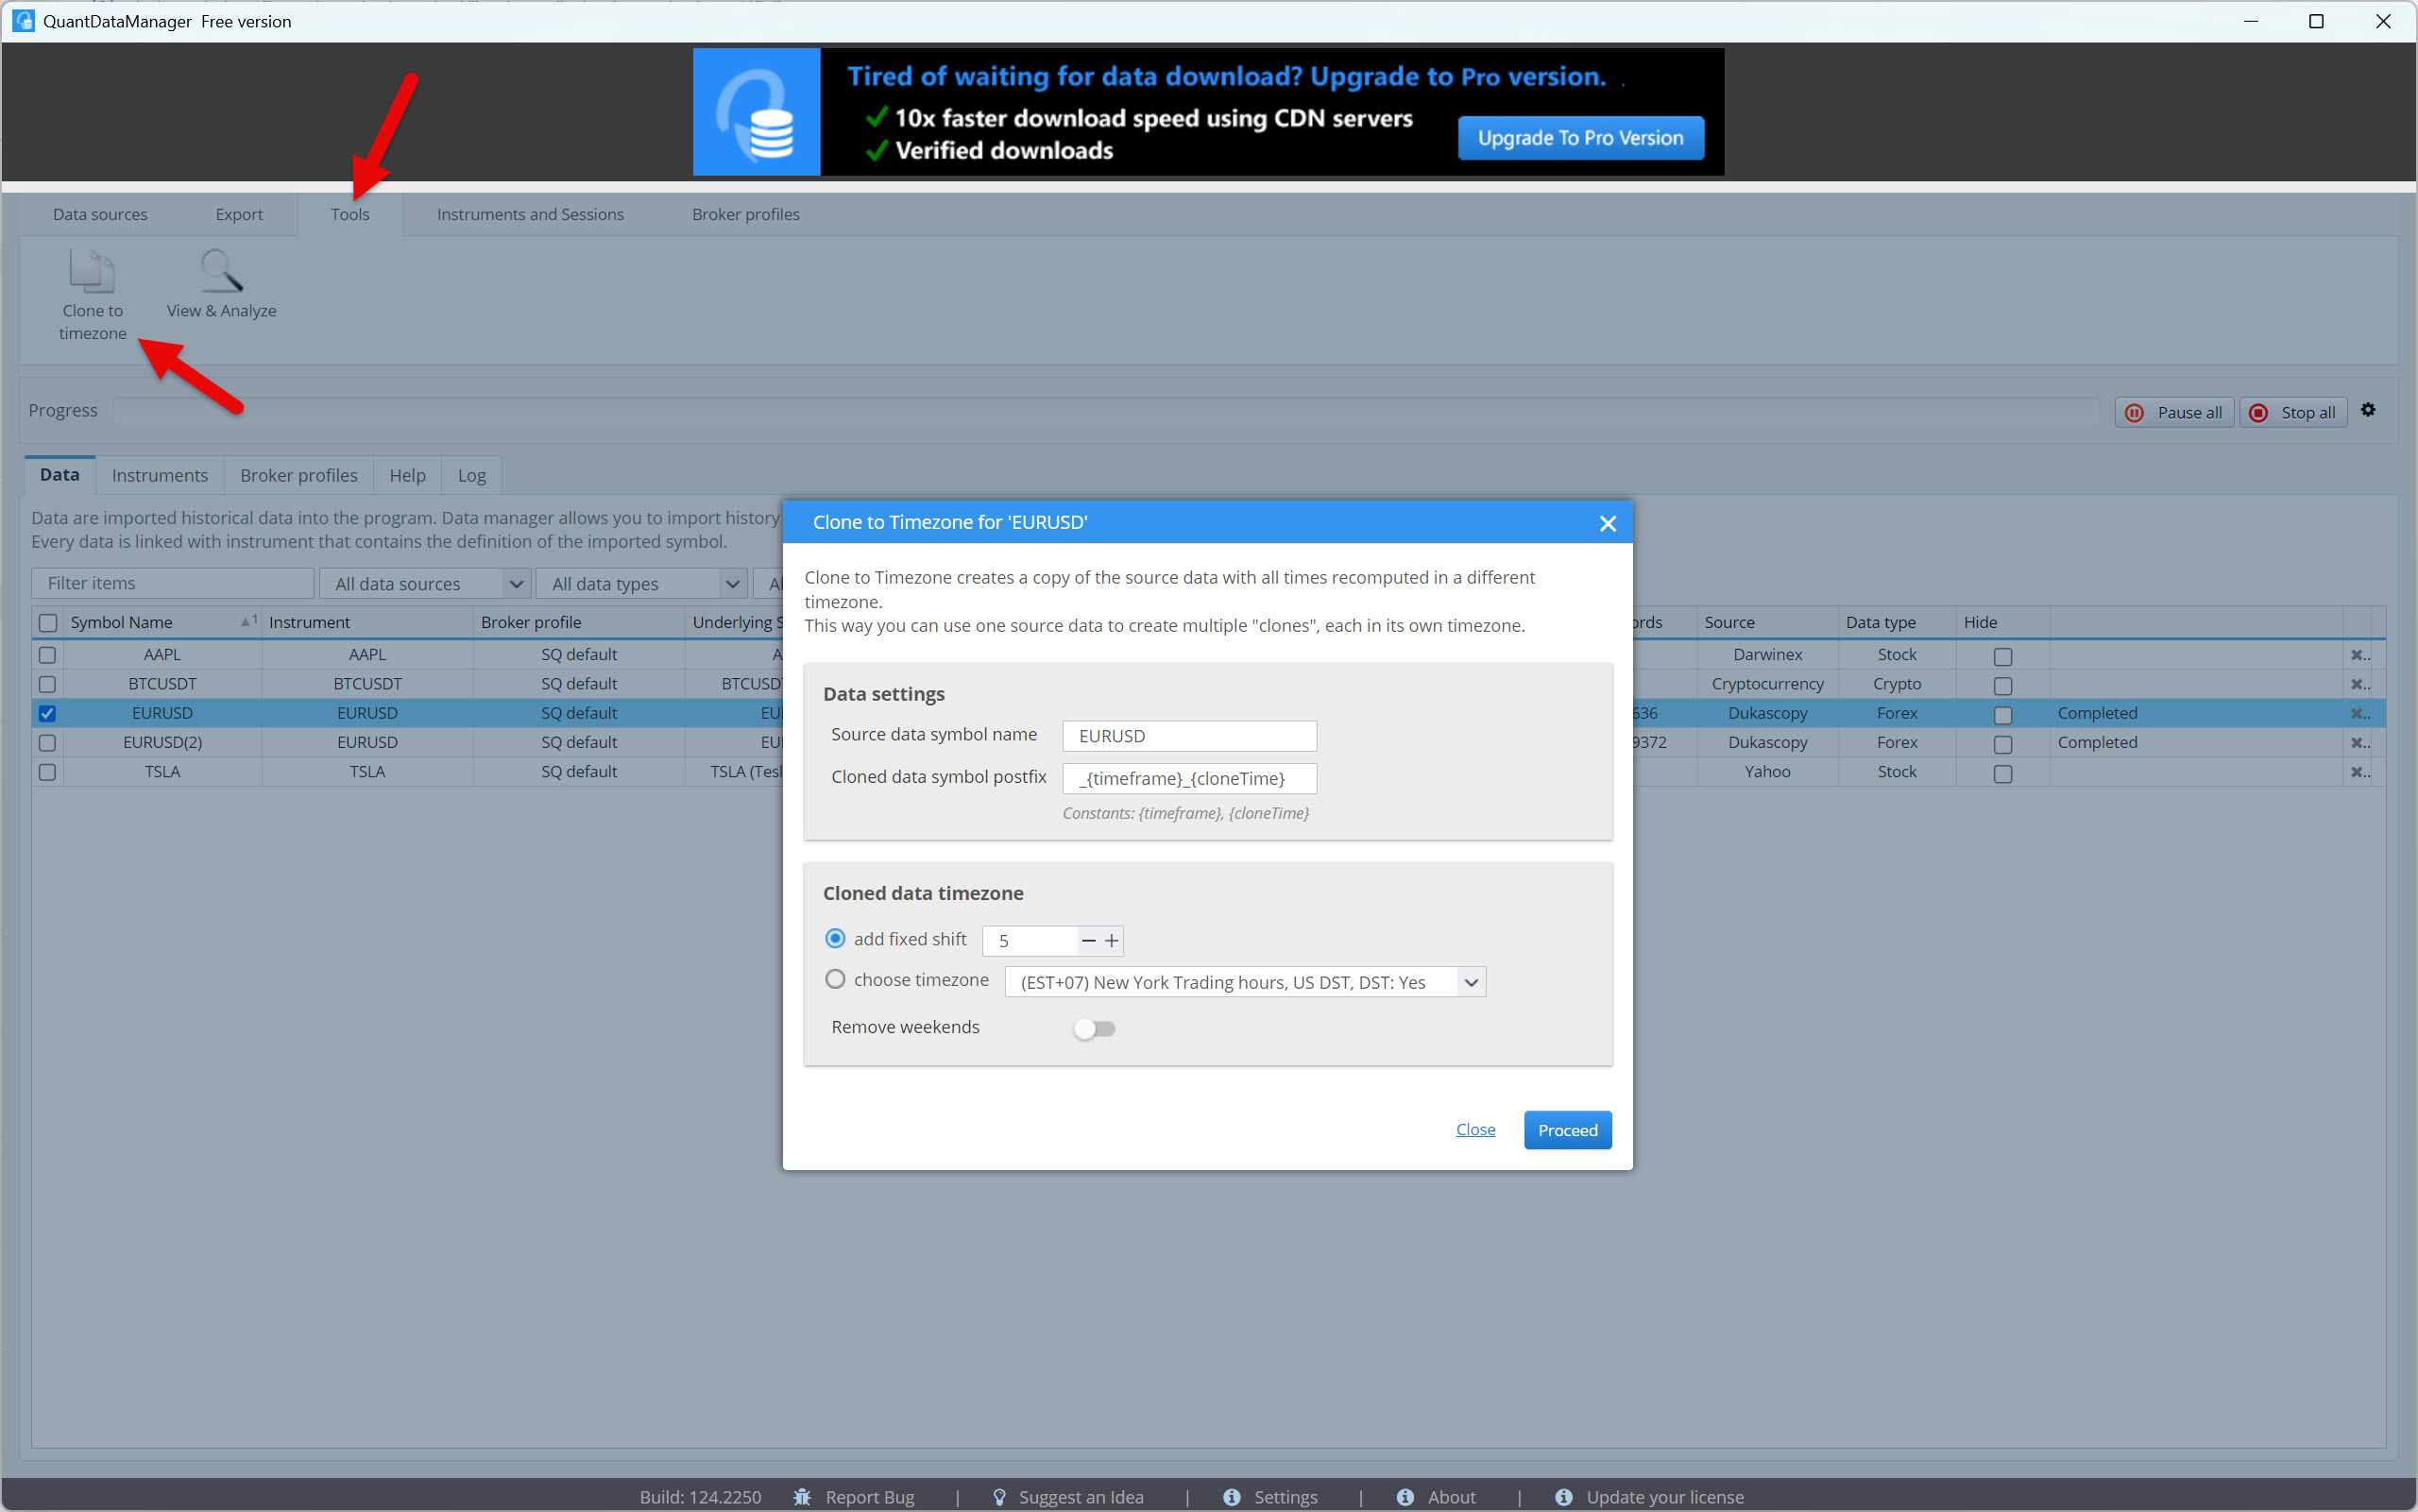
Data downloaded from the Dukascopy server is in UTC format. However, if you prefer a different time zone, you can convert it.
Go to the Tools tab, select the symbol to convert, and click the Clone to time zone button.
Select the time zone or data shift by a certain number of hours and press the Proceed button.
Now you are ready to export your data.
Go to the Export tab and then click on Export to CSV. After that, you will see a window where you need to enter the parameters for export. Start by selecting the period you want to export data for.
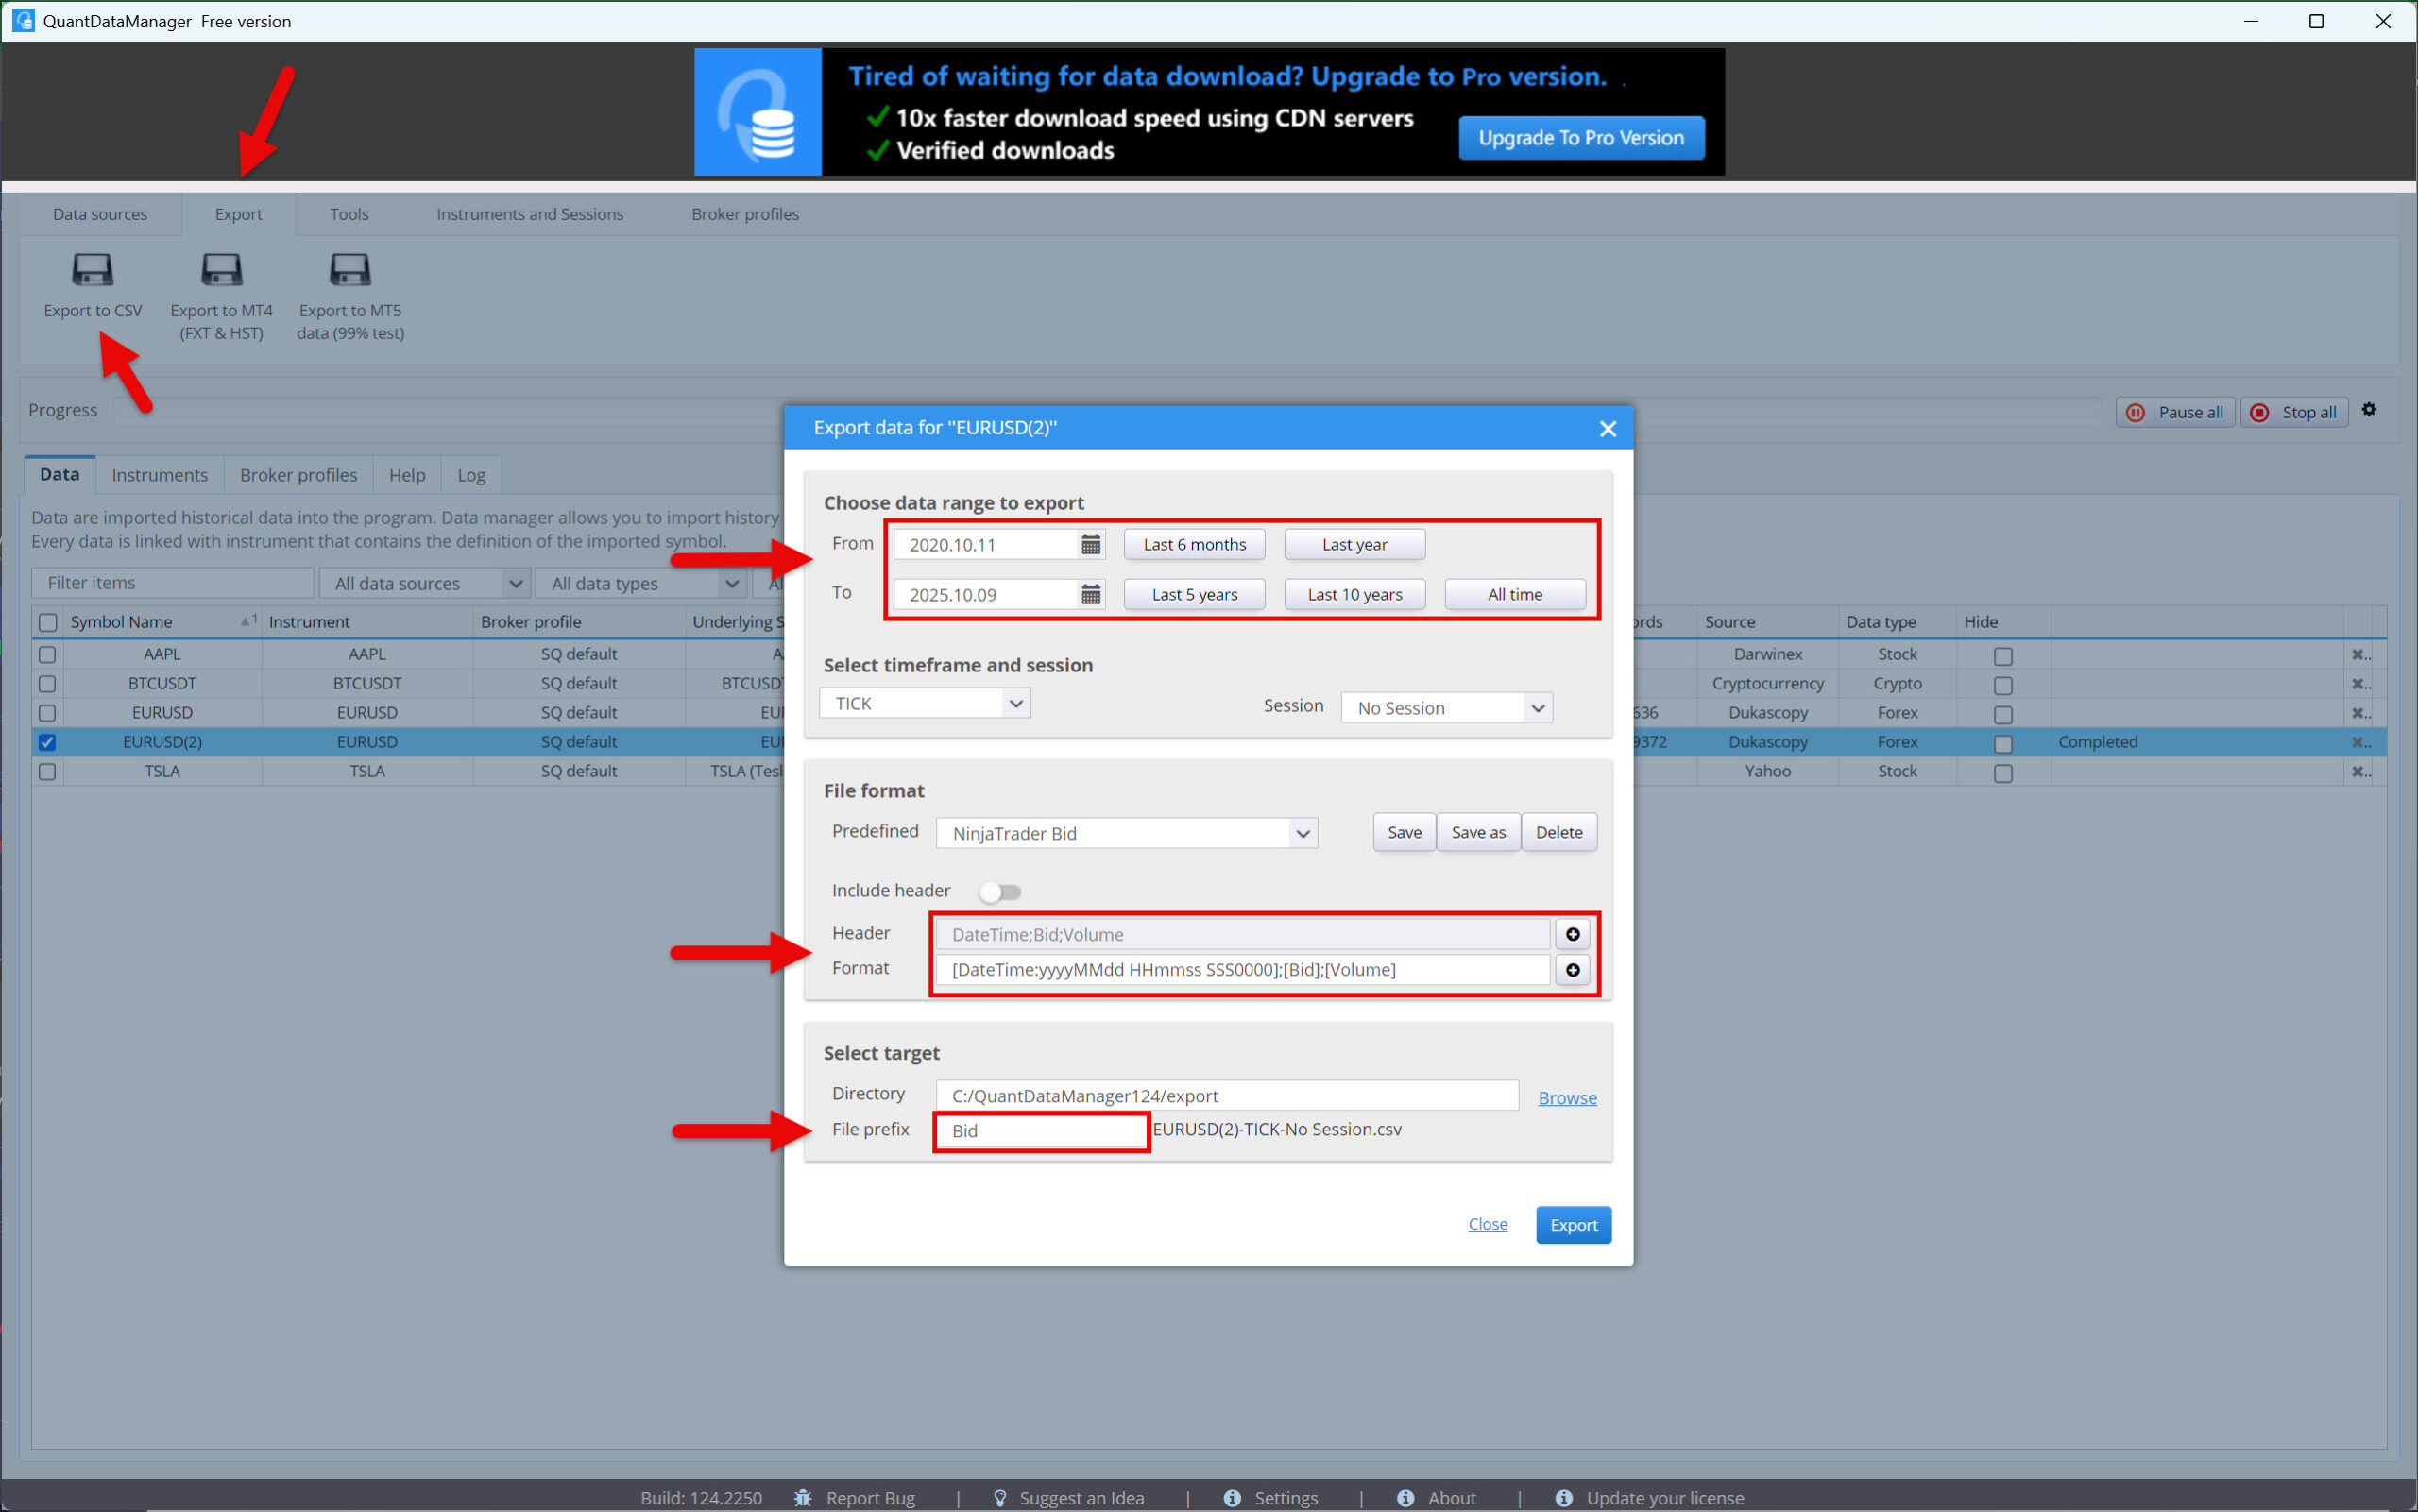
Next, you will need to enter the correct format for exporting the data. Even though you will find a NinjaTrader preset in the predefined options, do not use this setting, as it is incorrect. Instead, create a new profile with the following parameters:
- NinjaTrader Ask
- Header – DateTime;Ask;Volume
- Format – [DateTime:yyyyMMdd HHmmss SSS0000];[Ask];[Volume]
- NinjaTrader Bid
- Header – DateTime;Bid;Volume
- Format – [DateTime:yyyyMMdd HHmmss SSS0000];[Bid];[Volume]
Although we will not be exporting a file containing a header, Quant Data Manager requires it to be entered correctly; otherwise, it will not perform the export. Therefore, activate the Include header option and, after entering the header format, deactivate it again. Save the export profile by clicking Save as.
Finally, choose a prefix for the file and select the folder where it should be saved (or leave the default). Then start the data export process by clicking the Export button.
Now that you have historical tick-by-tick data for your backtesting, all you need to do is import it into NinjaTrader.
However, before you start importing, you will first need to rename the files so that NinjaTrader can understand them. According to the official instructions, we will therefore change the name of the CSV files to EURUSD.Bid and EURUSD.Ask.
Once you have finished renaming, go to the NinjaTrader main panel and select Tools > History Data
In the familiar window, click Import and set everything as shown in the screenshot below. Then start importing historical Ask prices.
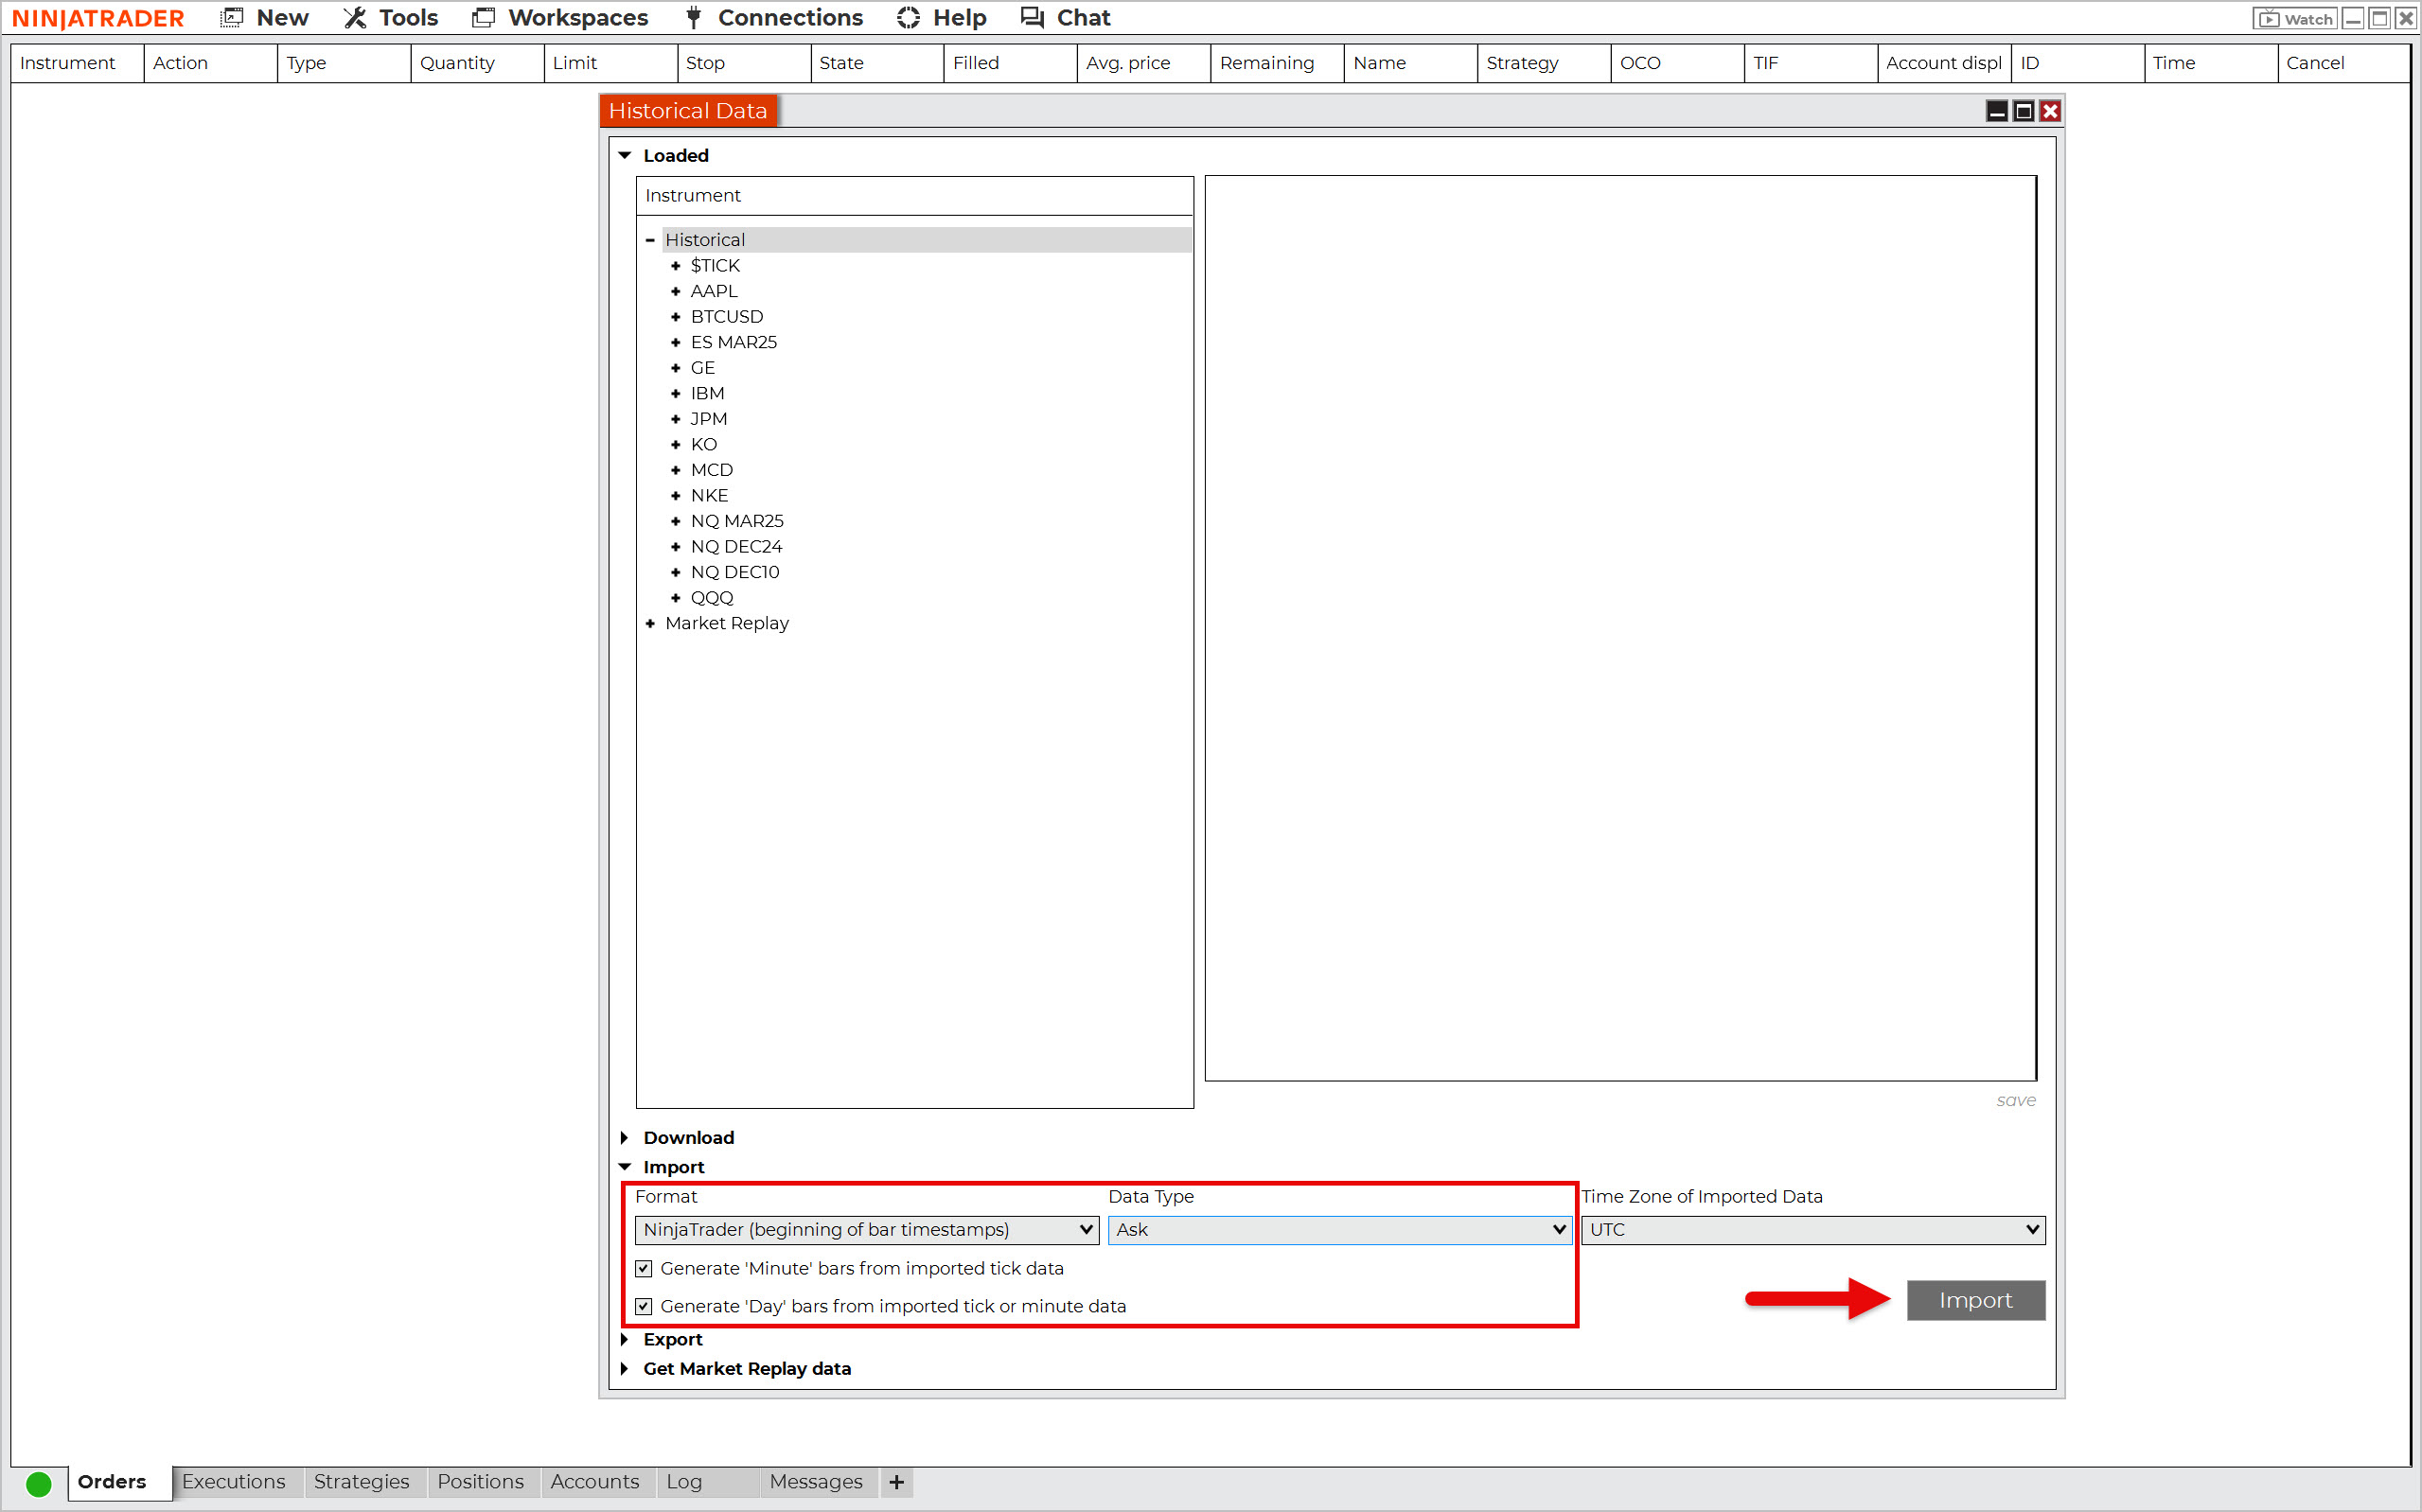
Repeat the process to import Bid prices, but this time do not create minute and daily bars (candles).

For NinjaTrader to be able to replay this historical tick data, one thing is still missing: the so-called Last price. This is the price of the last tick.
Unfortunately, Dukascopy’s historical data does not include this type of price. So, how can this be solved?
The solution is quite simple. Import either the Bid or Ask price as Last, and you will have complete data.
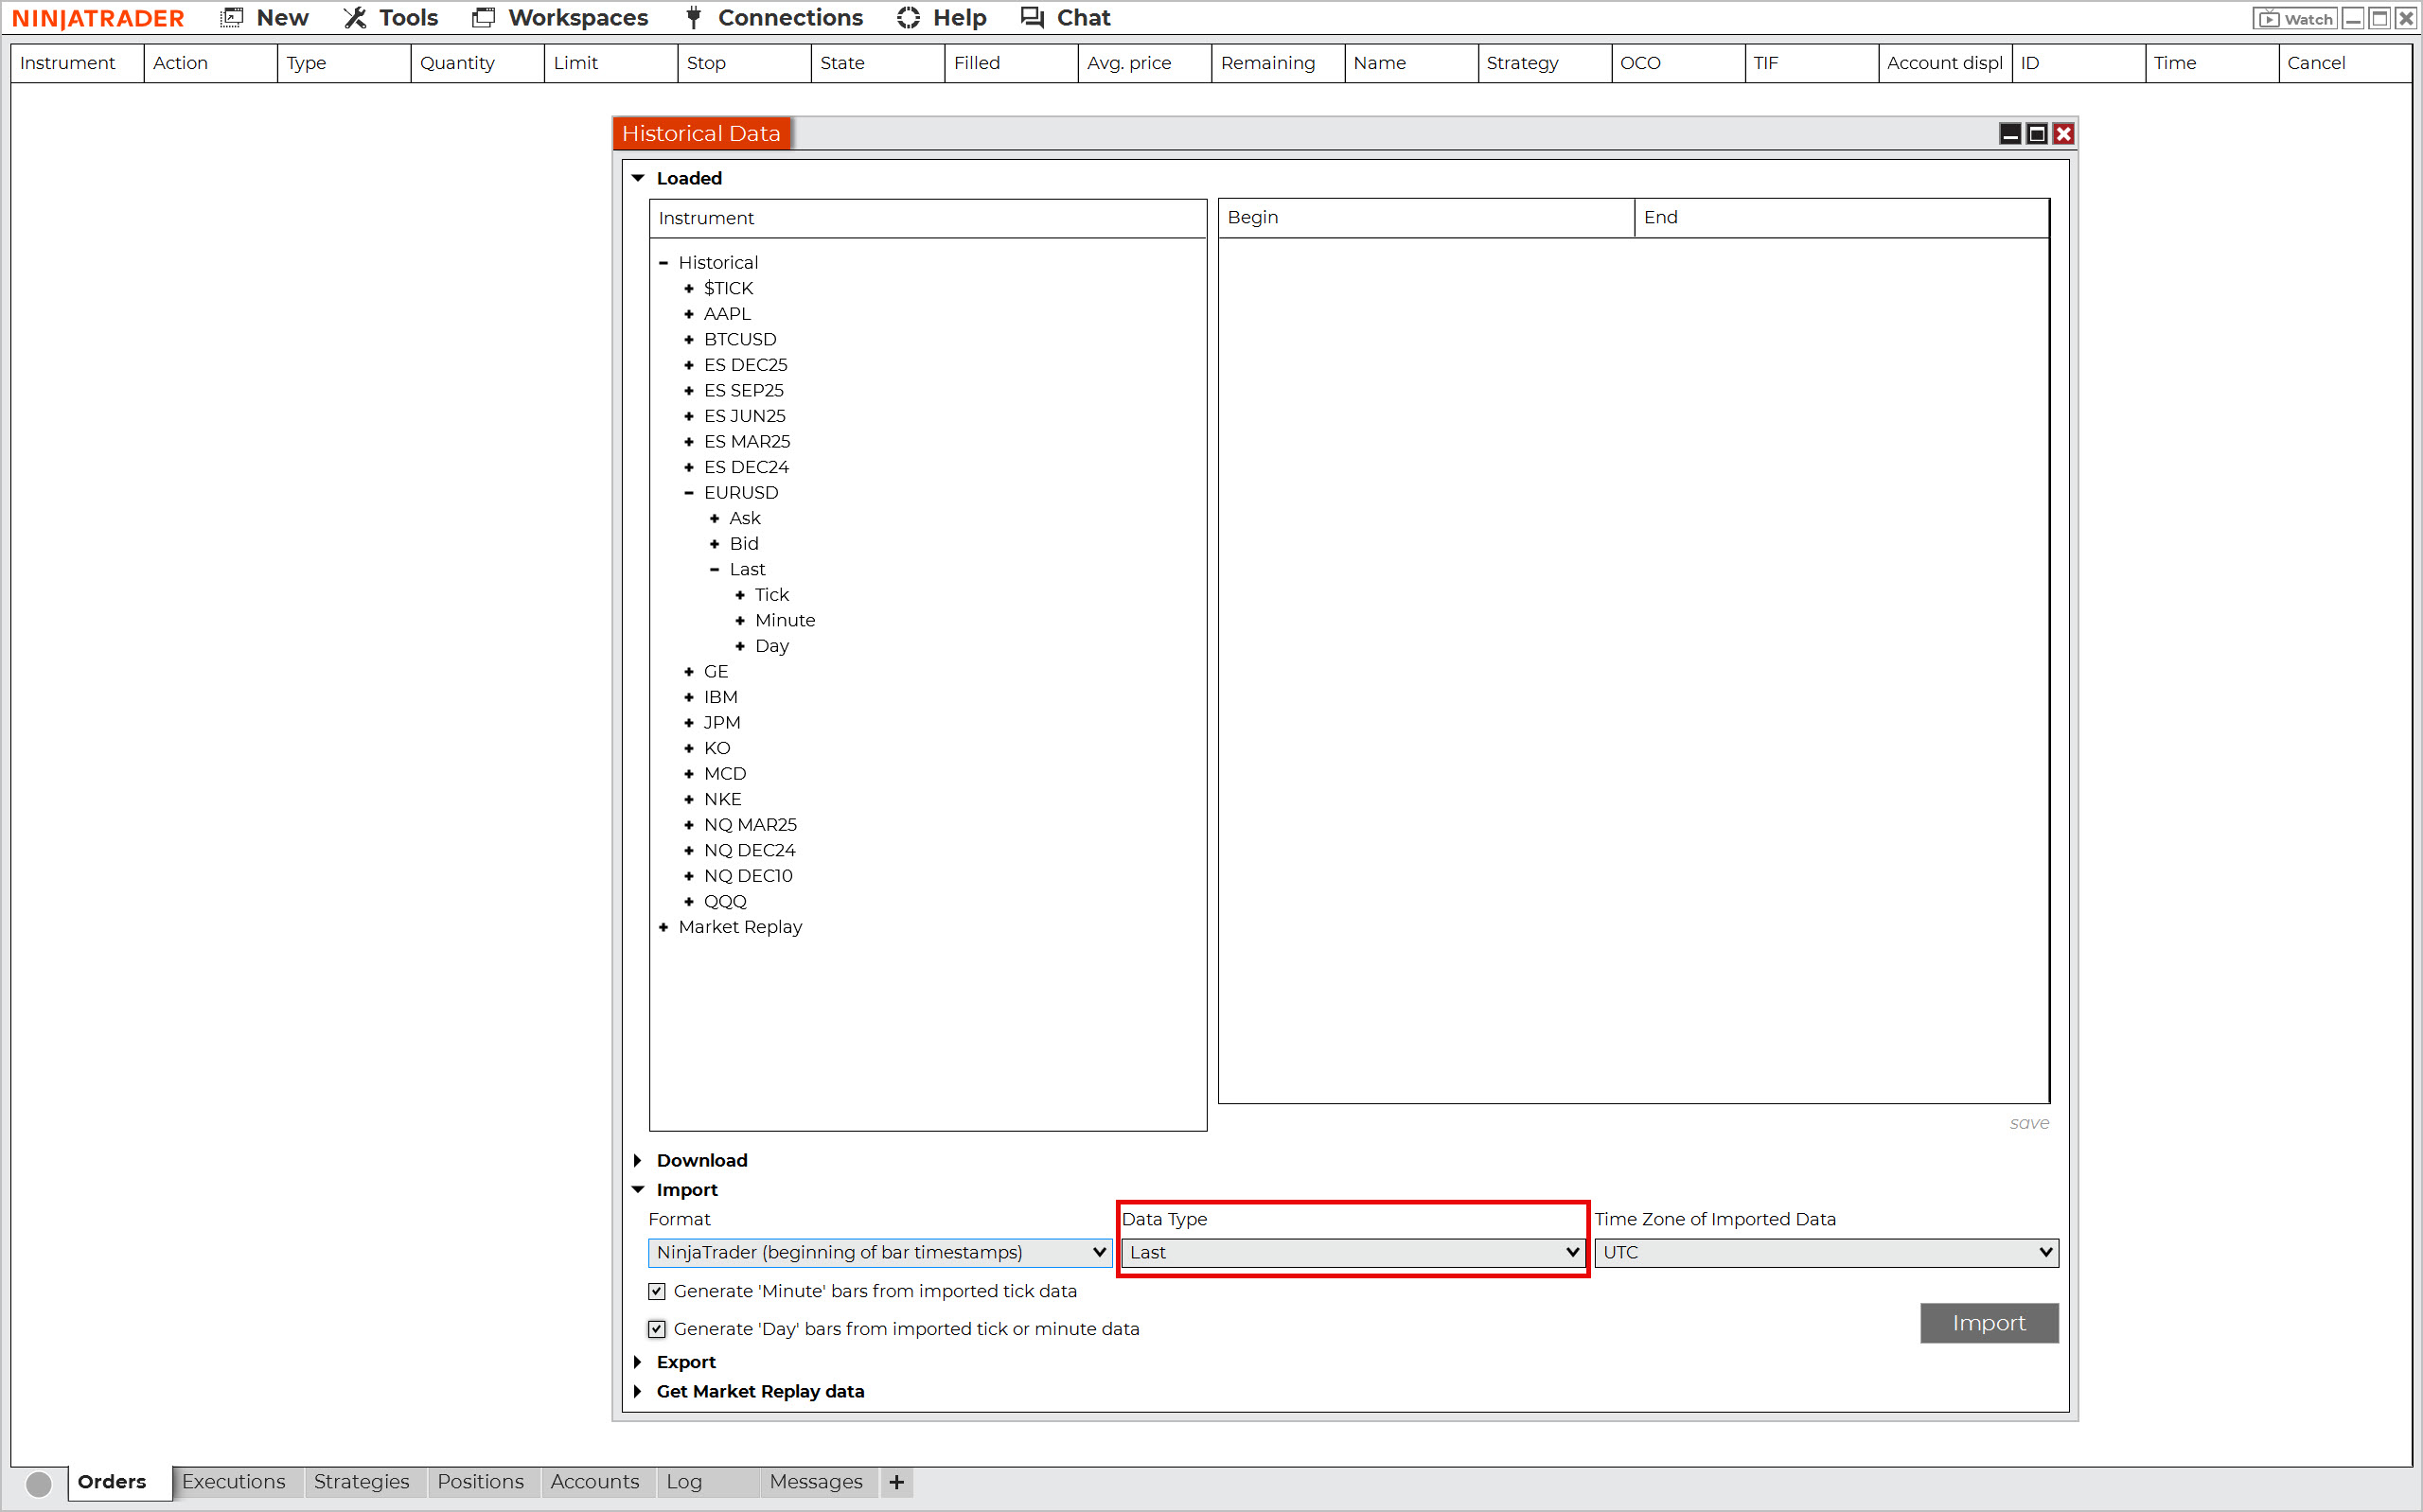
Note: Sometimes after importing data, you don’t see it right away in the Historical Data window. However, it will appear after you reopen the window.
Great! Your historical tick data is now ready for backtesting.
Trading Plan
If you want to backtest without first writing down the rules of your strategy, you are making a fundamental mistake. The hallmark of every serious trader who has ever made it big is the ability to keep detailed records. Without them, you will almost certainly lose track of what worked and what didn’t.
Therefore, before starting a backtesting session, take the necessary time to document the logic of your strategy and archive the record. If you are unsure what a good trading plan should contain, study the backtesting manual. It covers the creation of a trading plan in great detail and provides a perfect example of what it should look like.
Backtesting Spreadsheet
You should also approach collecting and documenting data during backtesting with seriousness. If you are backtesting automatically, the trading platform collects the data on executed trades for you. However, if you embark on traditional manual backtesting, data collection will be entirely up to you. For this purpose, you will need a so-called backtesting spreadsheet.
A backtesting spreadsheet is used to record, archive, and analyze executed trades, including many details related to them. It contains data such as the time and date of trade entries, entry and exit prices, initial stop-loss levels, information about realized profits or losses, and more. This topic is also discussed in detail in the aforementioned backtesting guide, so there is no need to repeat this information here.
However, to get a quick idea of what a well-designed backtesting spreadsheet should look like, check out the Backtesting Club Trading Journal.
Manual Backtesting of Strategies in NinjaTrader
When it comes to manual backtesting of trading strategies in NinjaTrader, you have two options:
- Manual backtesting using the Candle by Candle method.
- Manual backtesting using the replay tool.
Let’s see which one is more suitable for you.
Manual Backtesting Using the Candle by Candle Method
Suppose your strategy uses only one time frame. In that case, you can use the simplest method of backtesting, i.e., revealing the chart candle by candle (bar by bar).
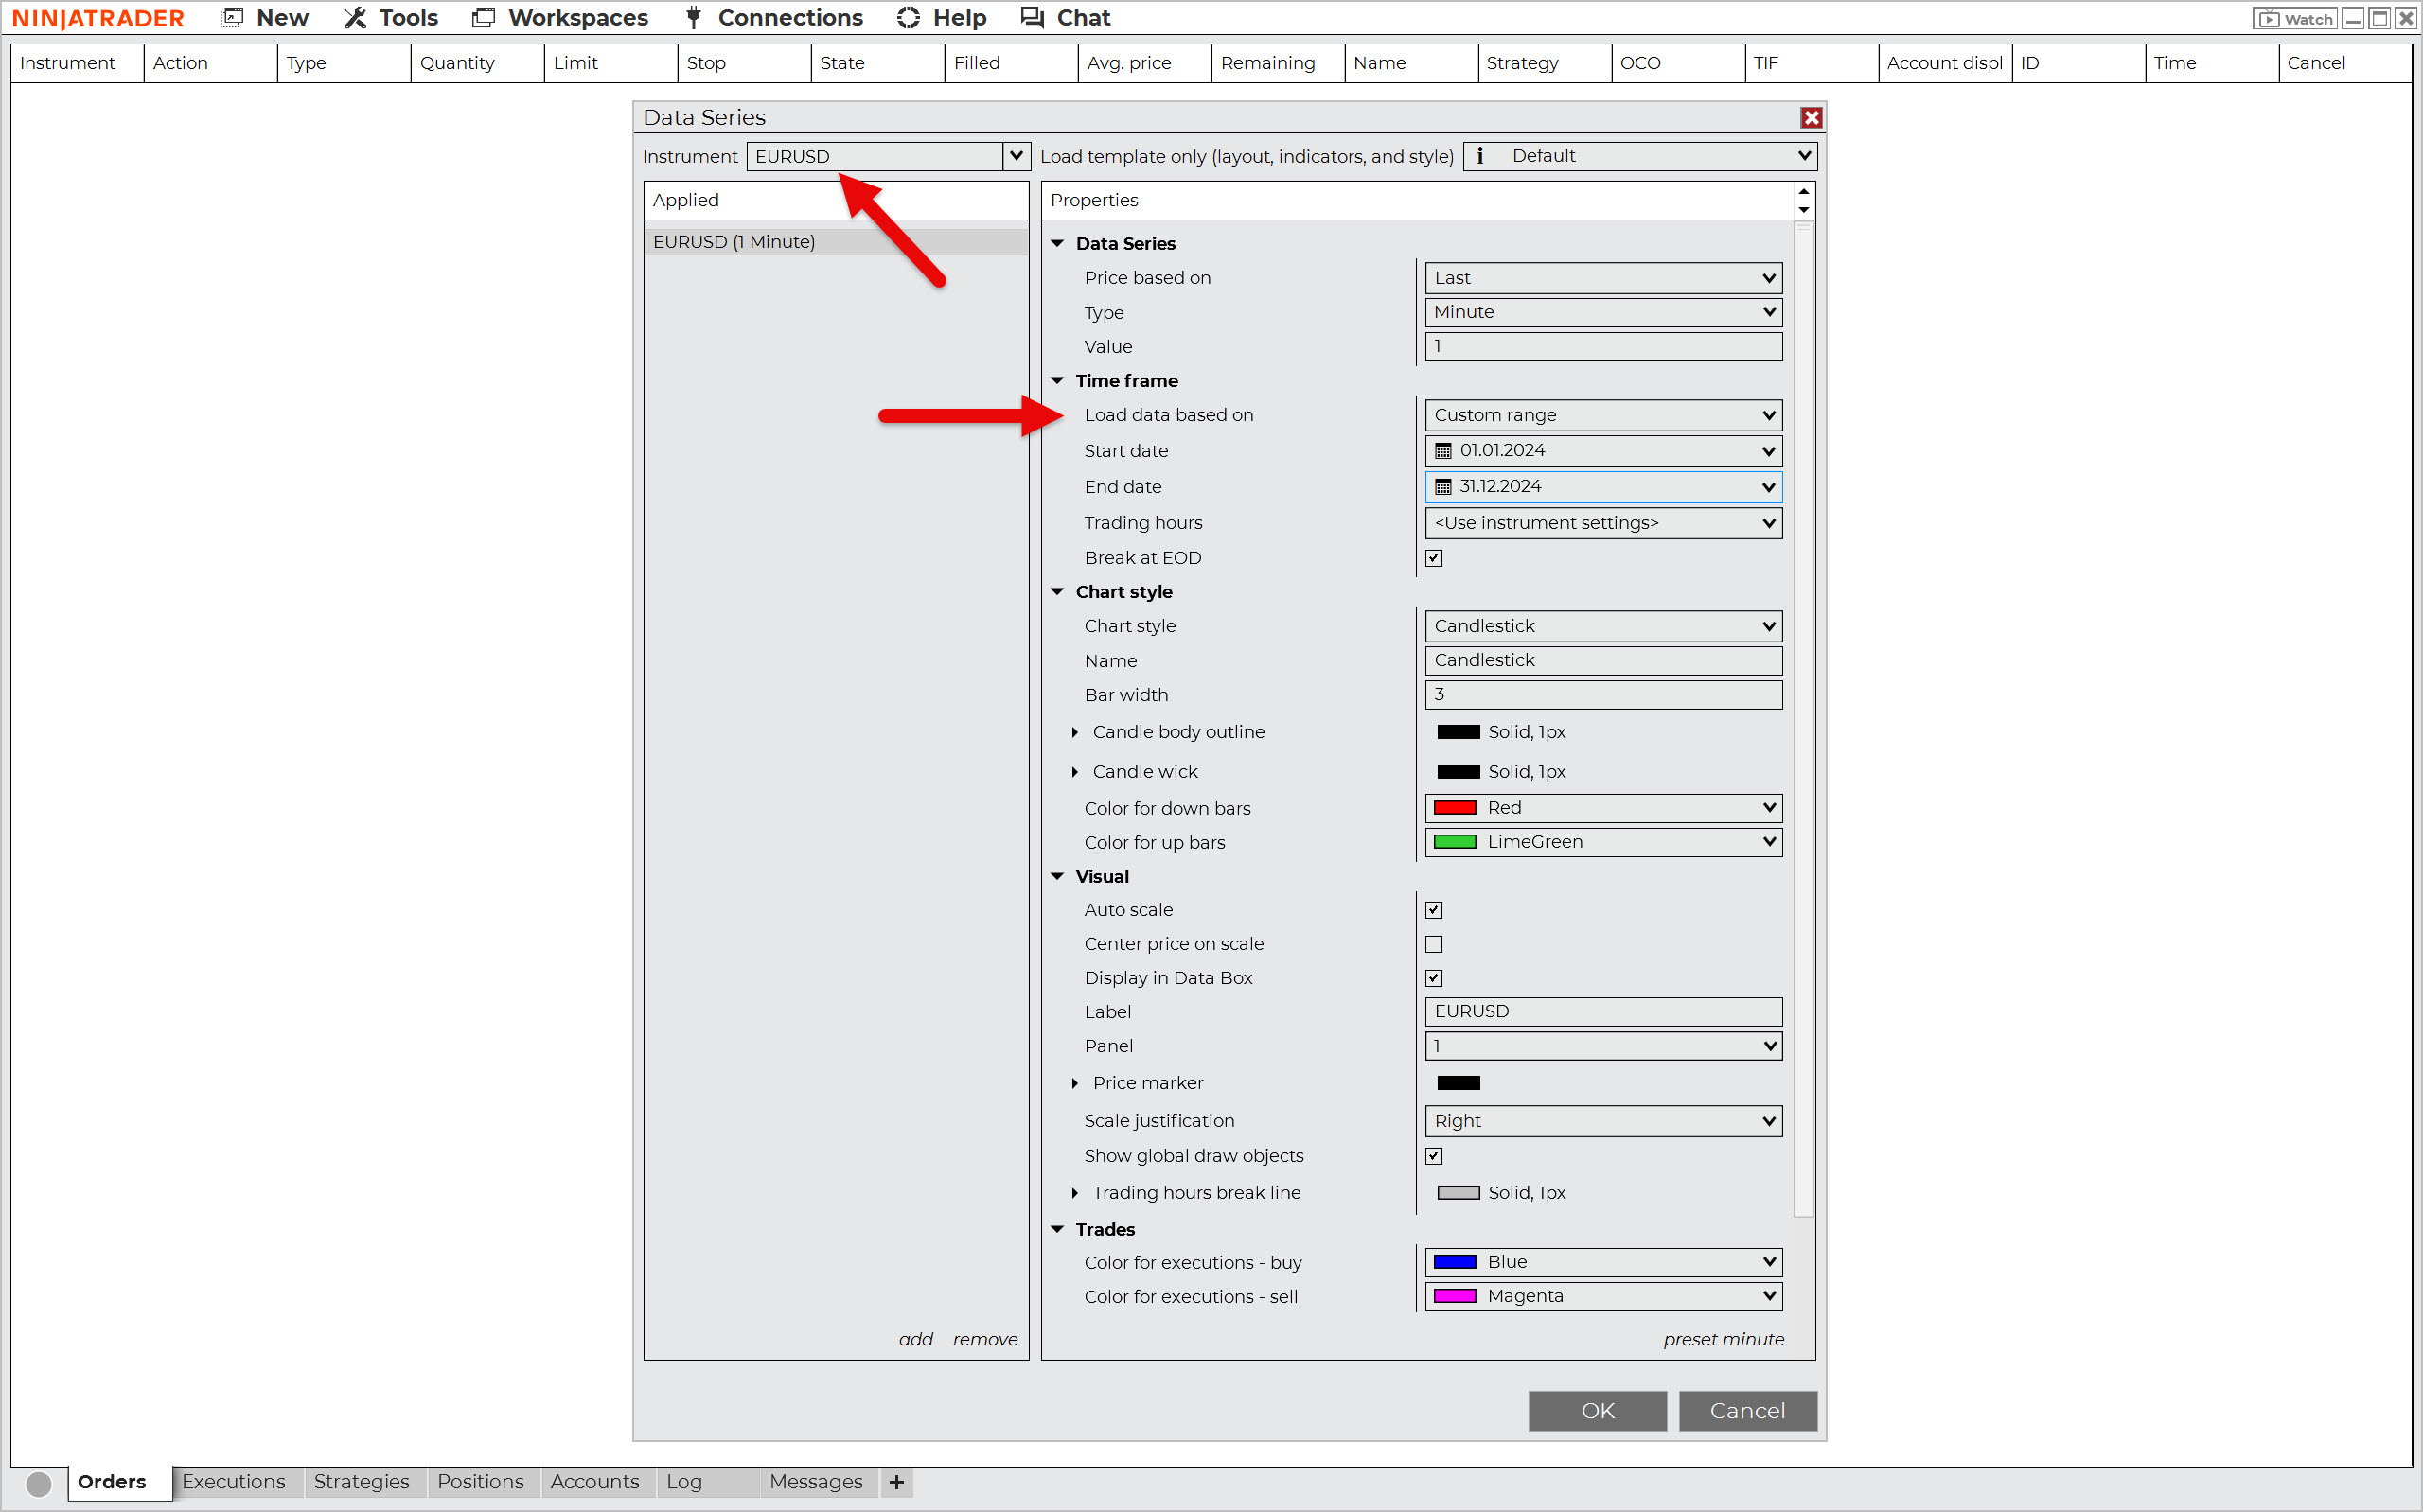
In the NinjaTrader main panel, go to New > Chart.
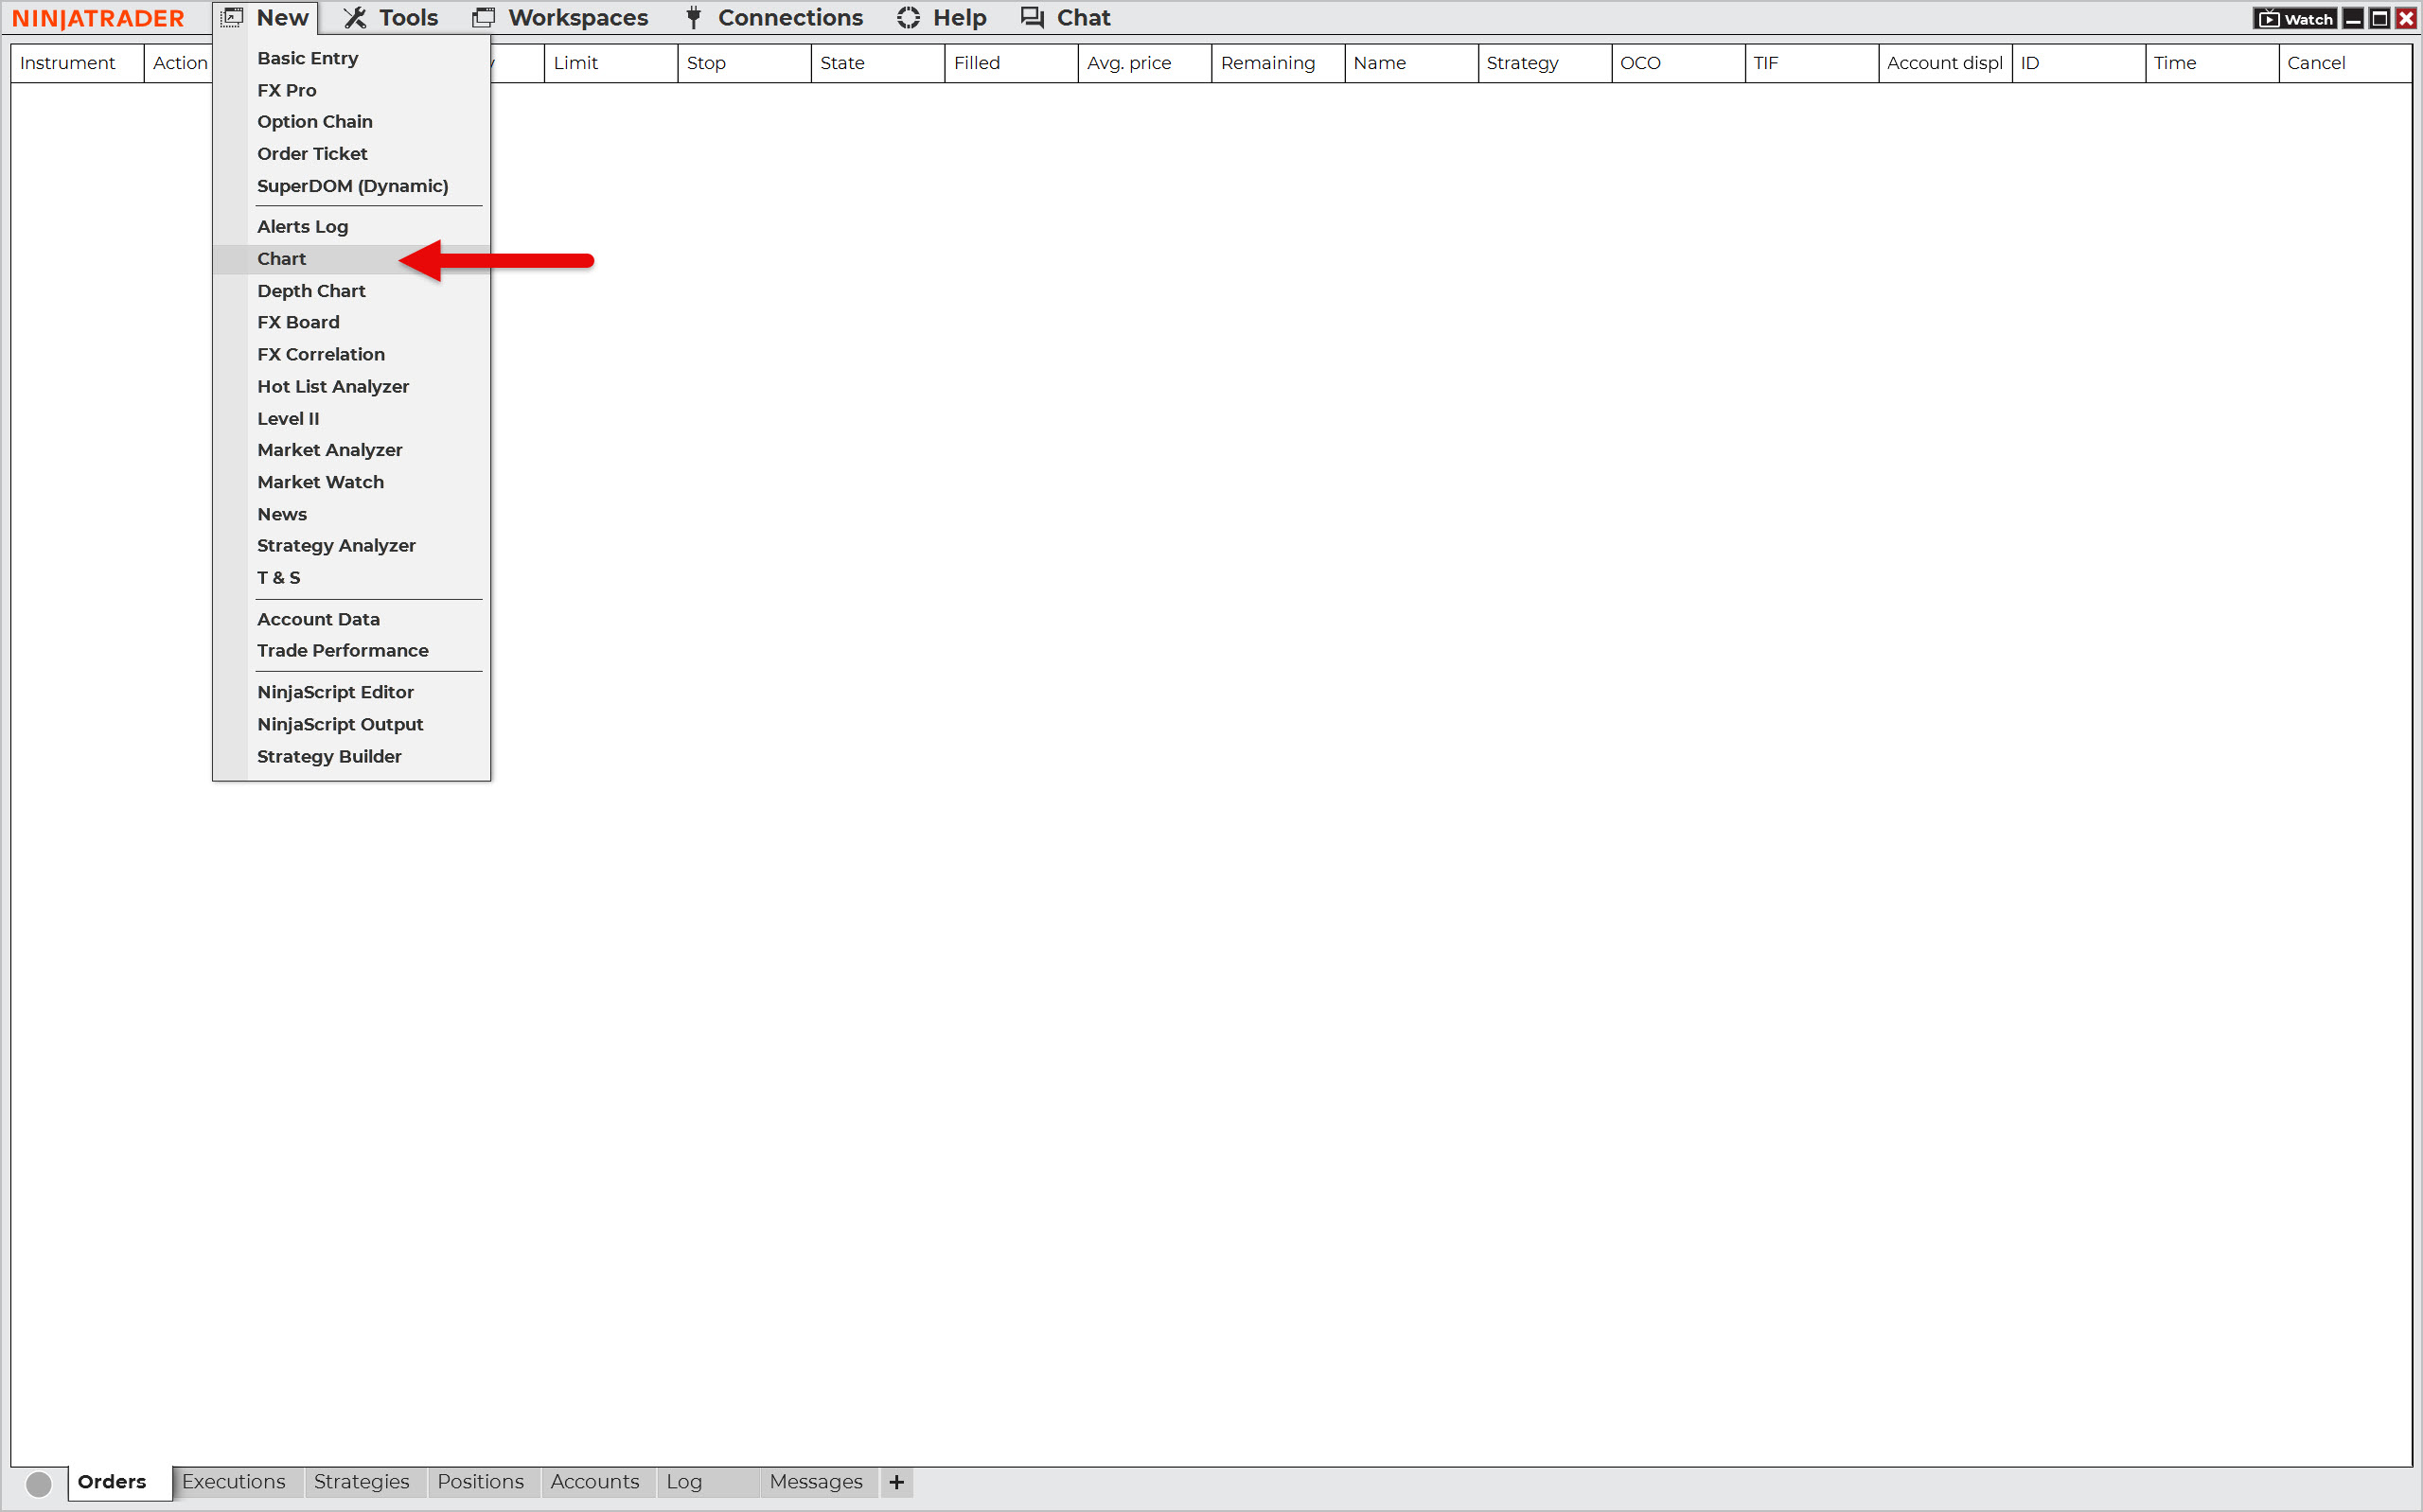
The Data Series window will open, which is used to set up the chart. Select the market (instrument), choose the time frame, and the period for which the backtest will be performed.
Keep in mind that you always need to load a deeper data history than the one you are going to backtest. Therefore, choose the time span according to the data history you need for analysis.
For example, suppose your strategy works with hourly candles and a 200-period moving average. In that situation, you will need to add nine days (200/24 = 8.333) to the start date of the backtested period.
In this example, we will create a 1-minute EURUSD chart with one year of history.
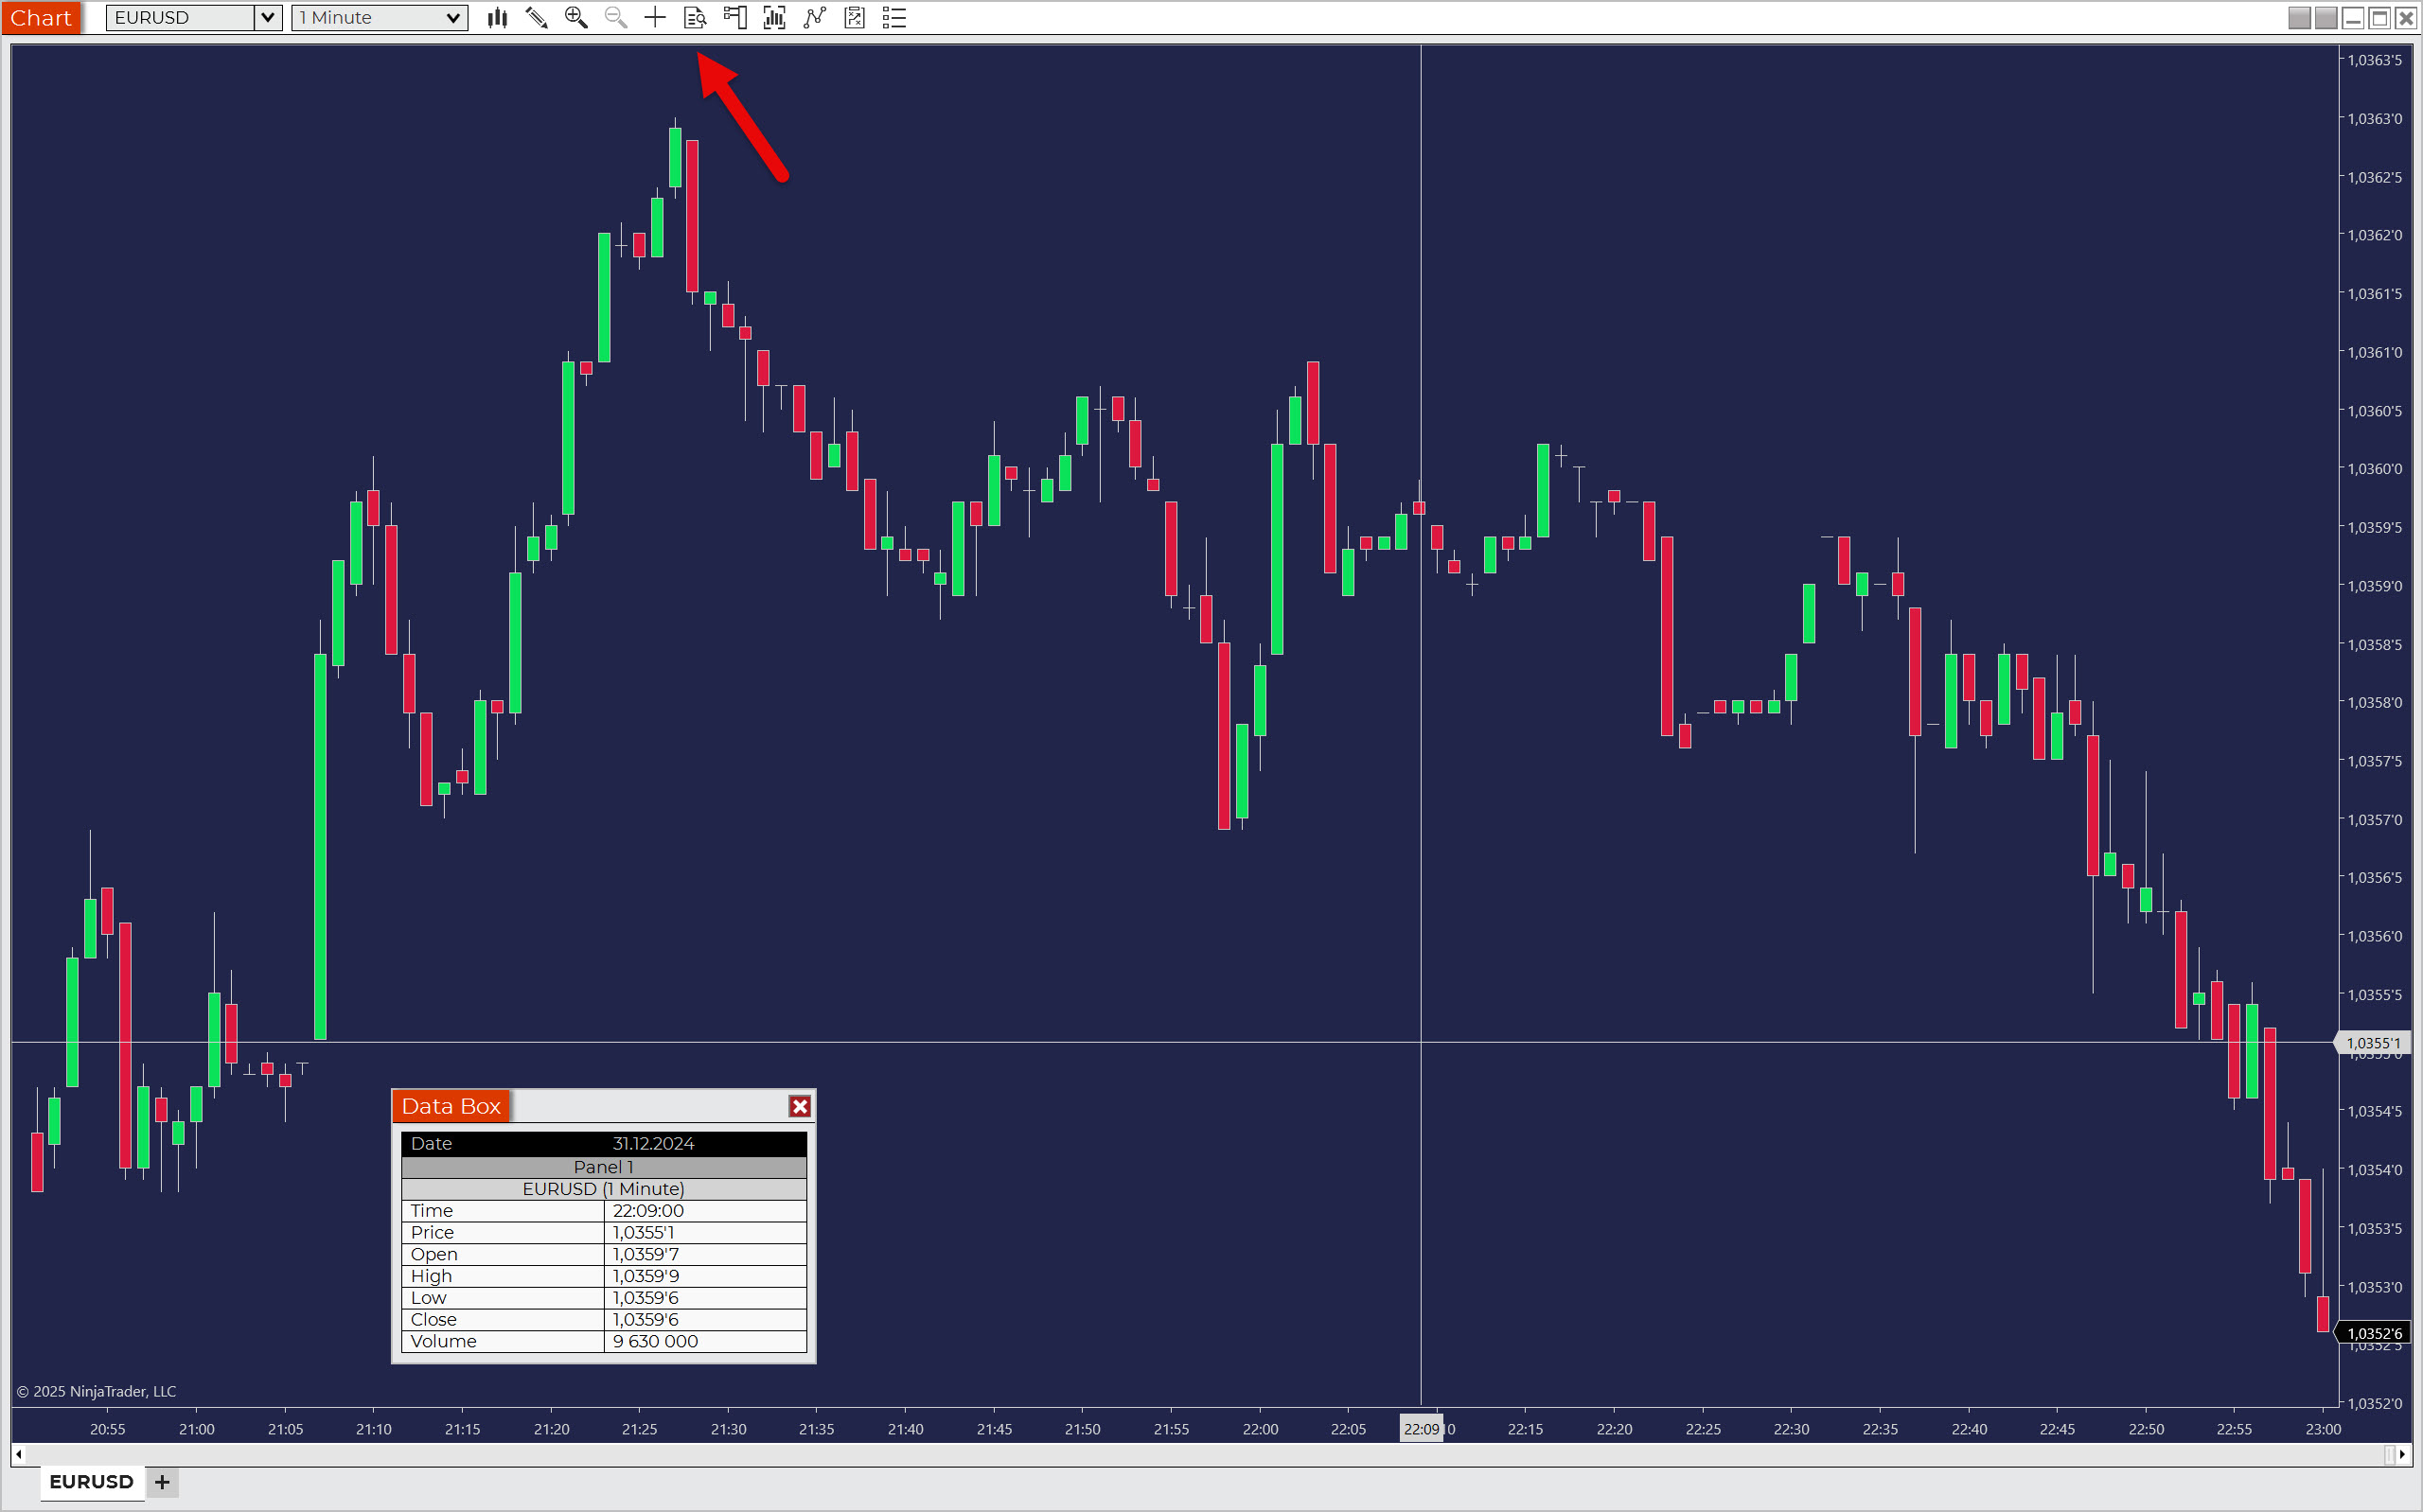
To avoid having to laboriously read the data from the chart, open the Data Box window by clicking on the icon indicated by the arrow in the screenshot below.
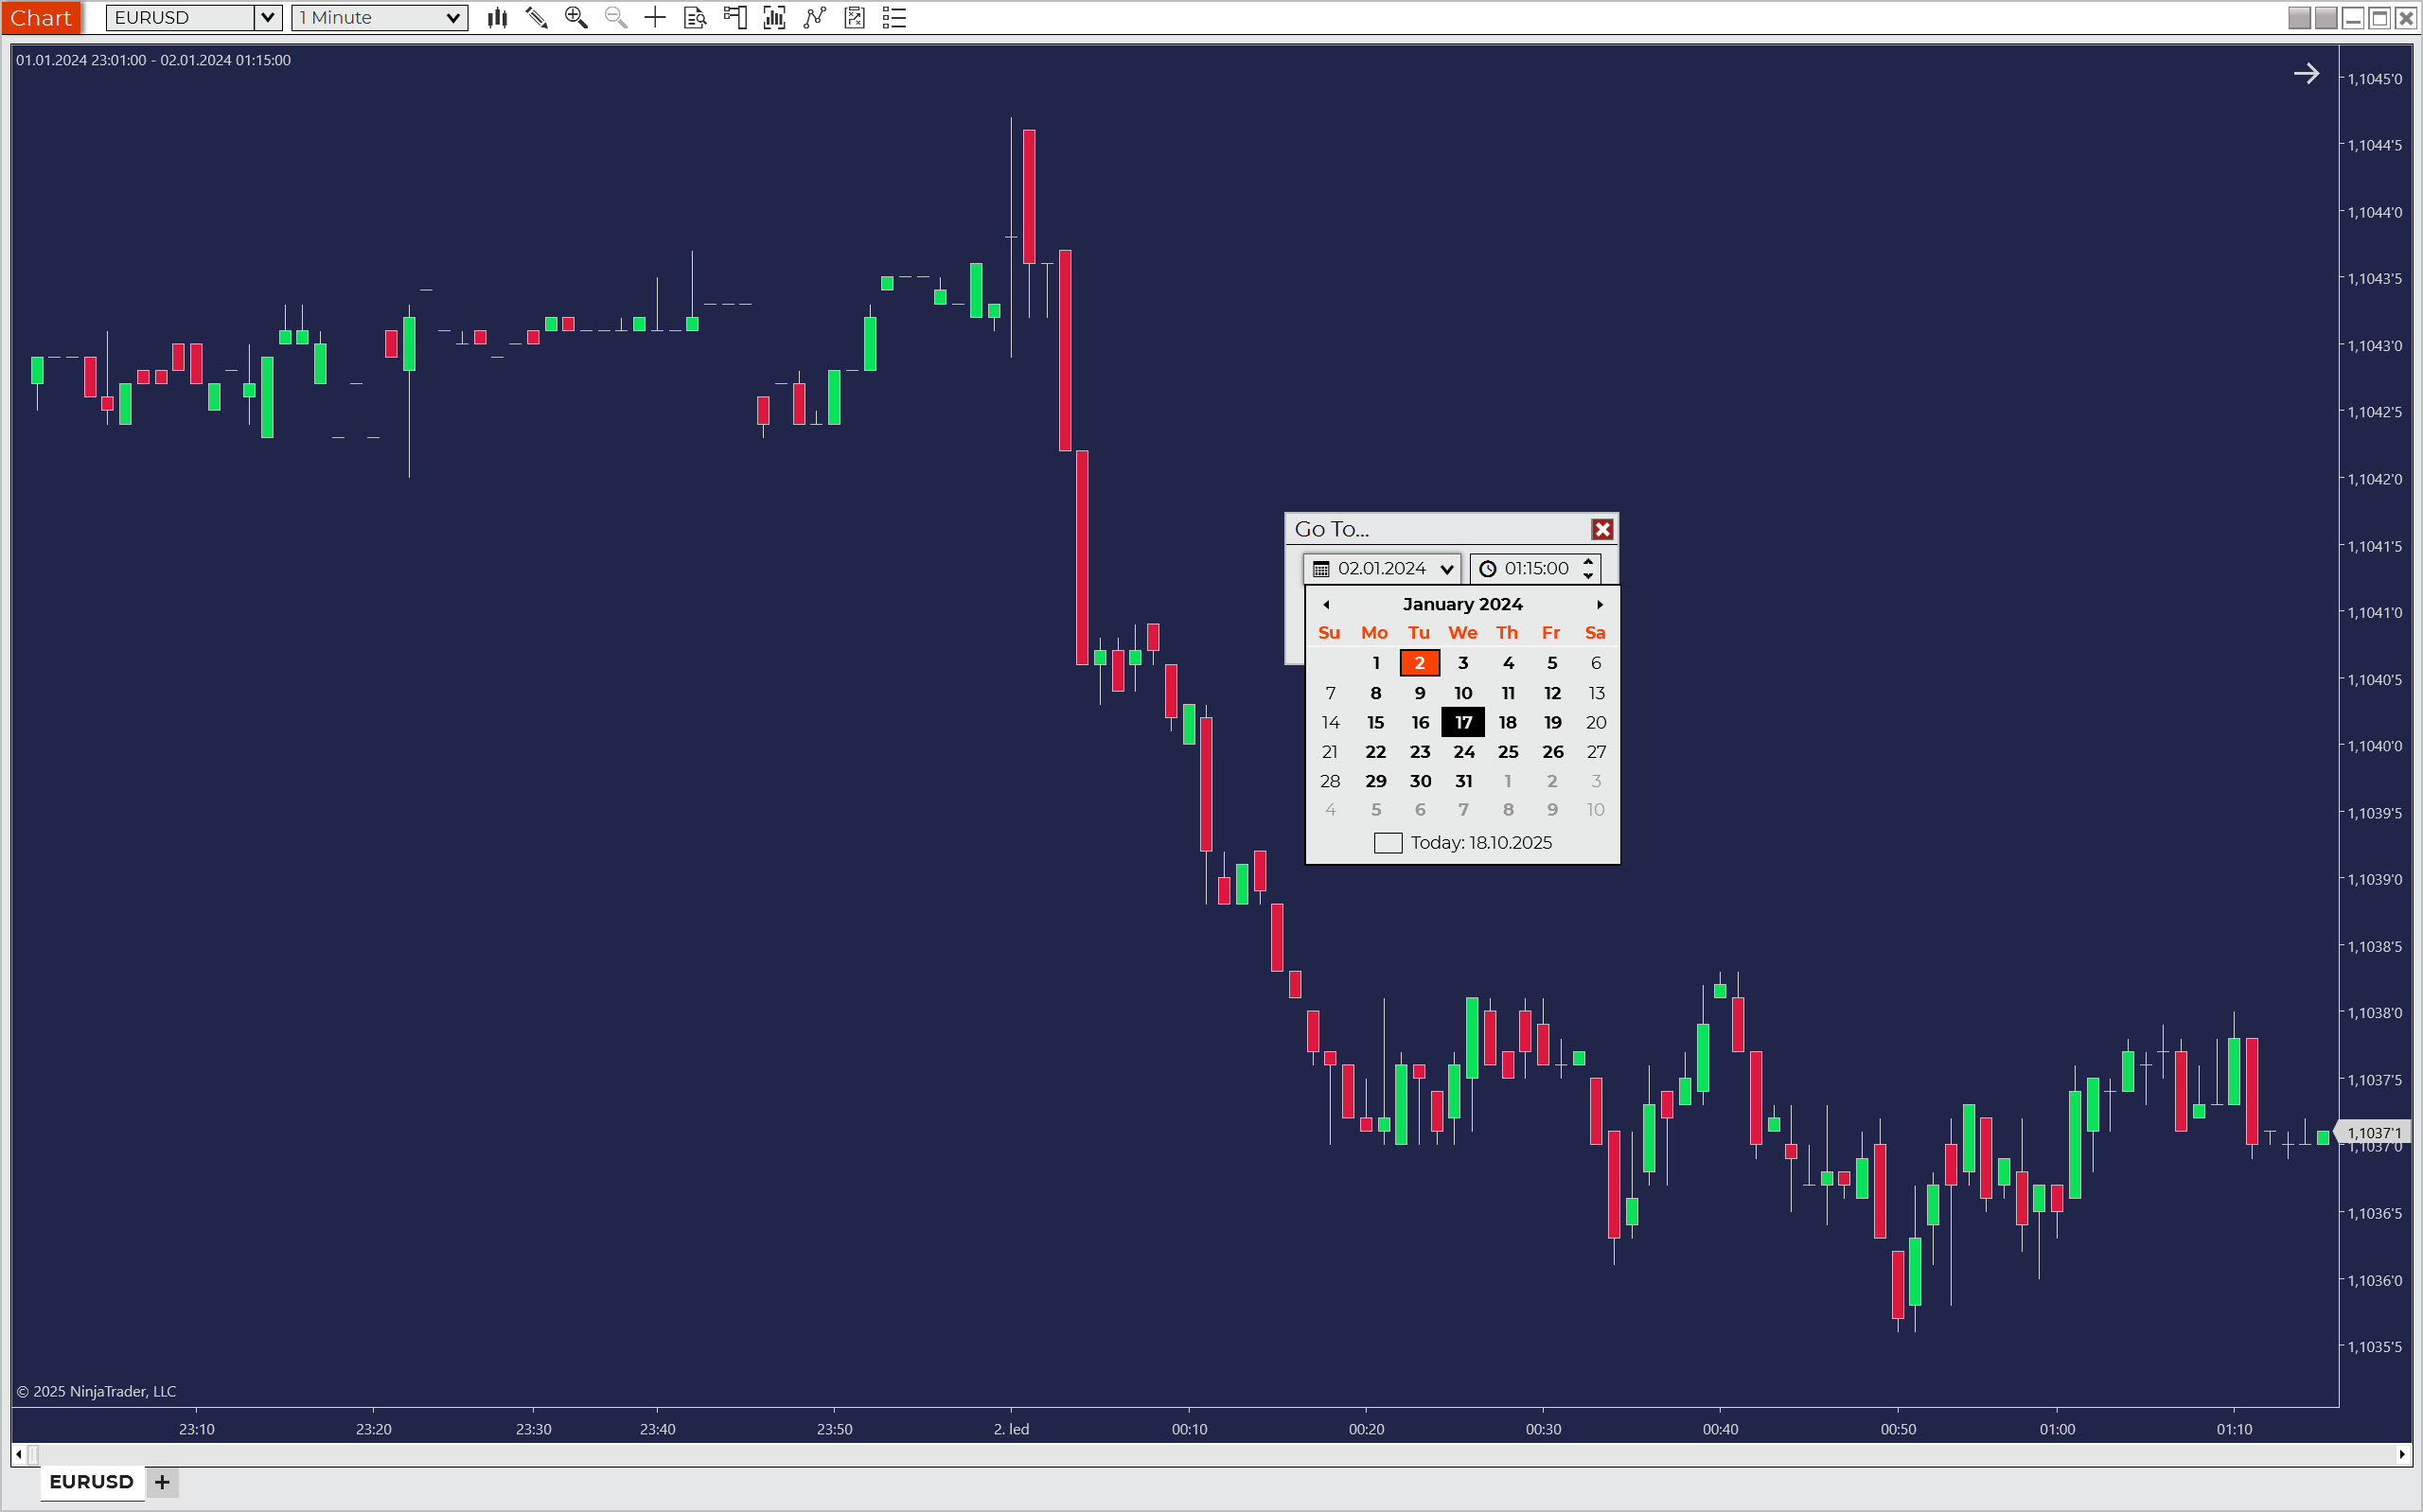
Now you need to move to the beginning of the period where you want to start backtesting. There are two ways to do this:
- Move to the very beginning of the chart – Press the Home key on your keyboard.
- Move to a specific date and time – Right-click on the scrollbar and select Go To.
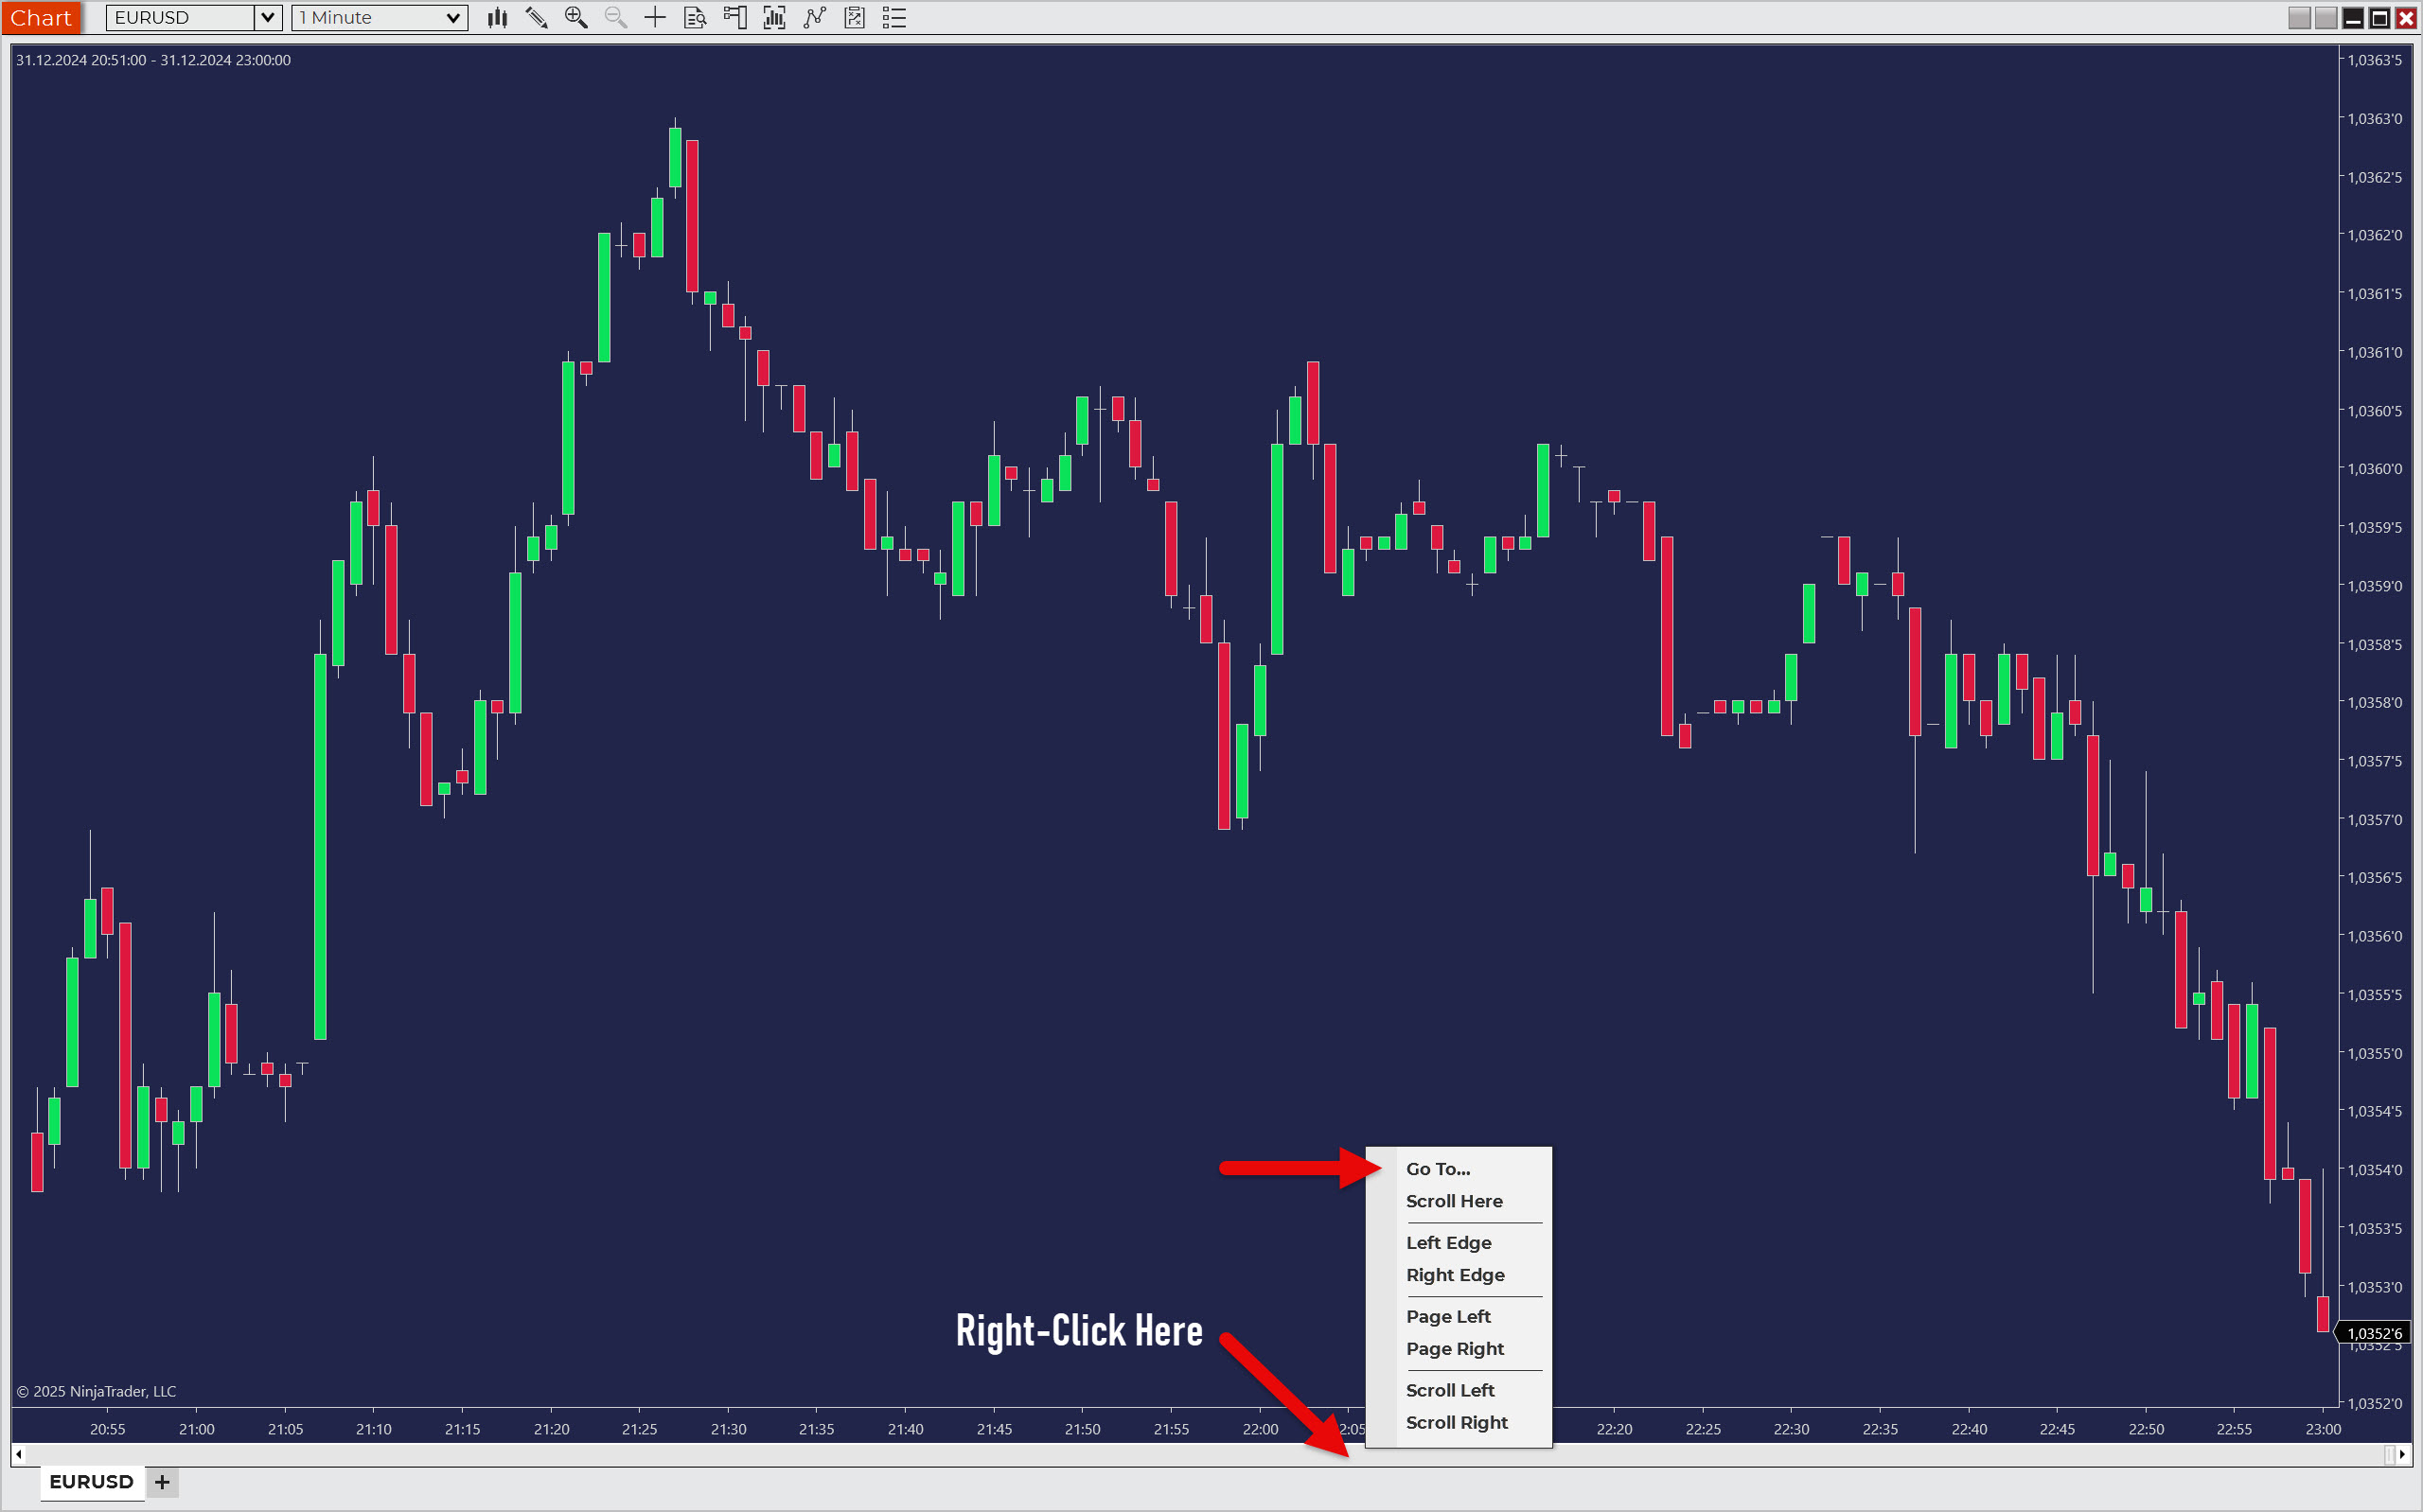
Once you are in the right place on the chart, start backtesting by revealing candle after candle by pressing the Right key.
As the entry and exit conditions of your strategy occur, record the trades in your backtesting spreadsheet.
Manual Backtesting Using the Replay Tool
The Replay tool is needed wherever you need to manually backtest more than one time frame or market. As a rule, you will use it for complex strategies that work with elements such as divergence, multi-timeframe analysis, and the like.
Start by opening the windows of all the charts you want to replay. You already know how to do this from the instructions for the previous method.
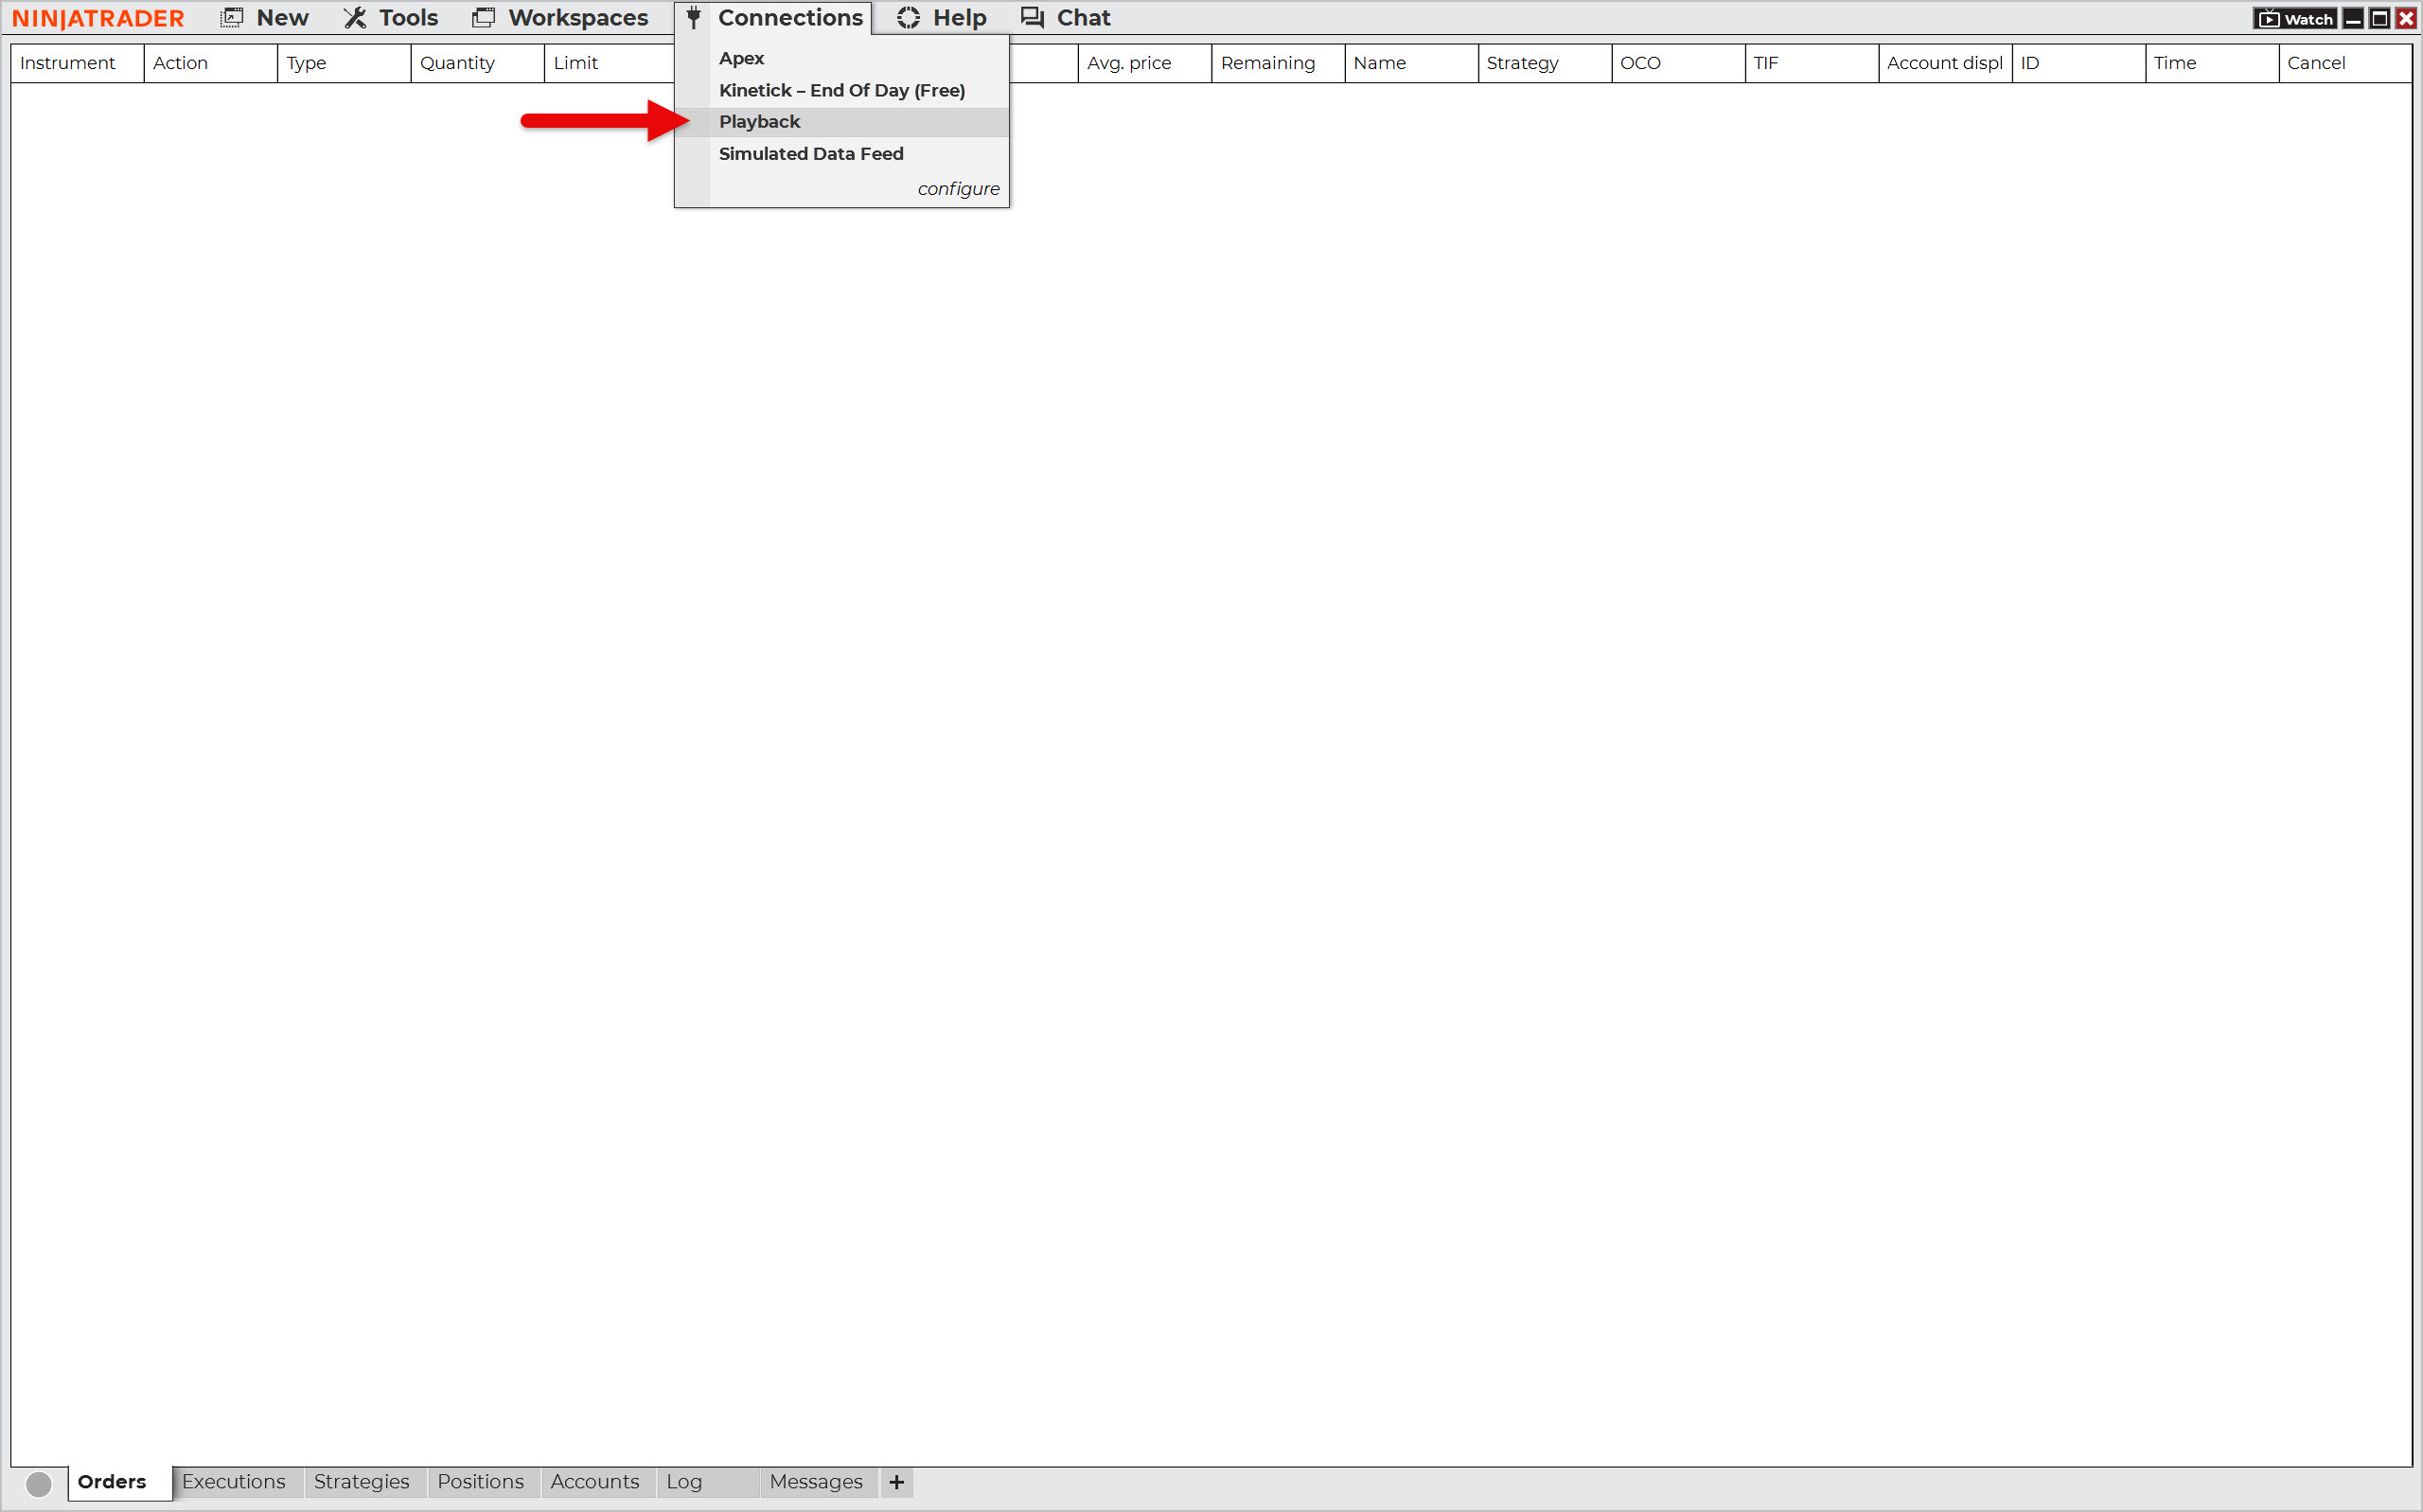
Next, select Connections > Playback from the main panel. This will open the familiar Historical Data window.
Since we have already downloaded the historical data for playback, continue by pressing the Continue button.
In the Playback window, first select whether you want to replay Market Replay Data or Historical Data. Then choose the period to playback. This will move the chart to the beginning of the period you have defined.
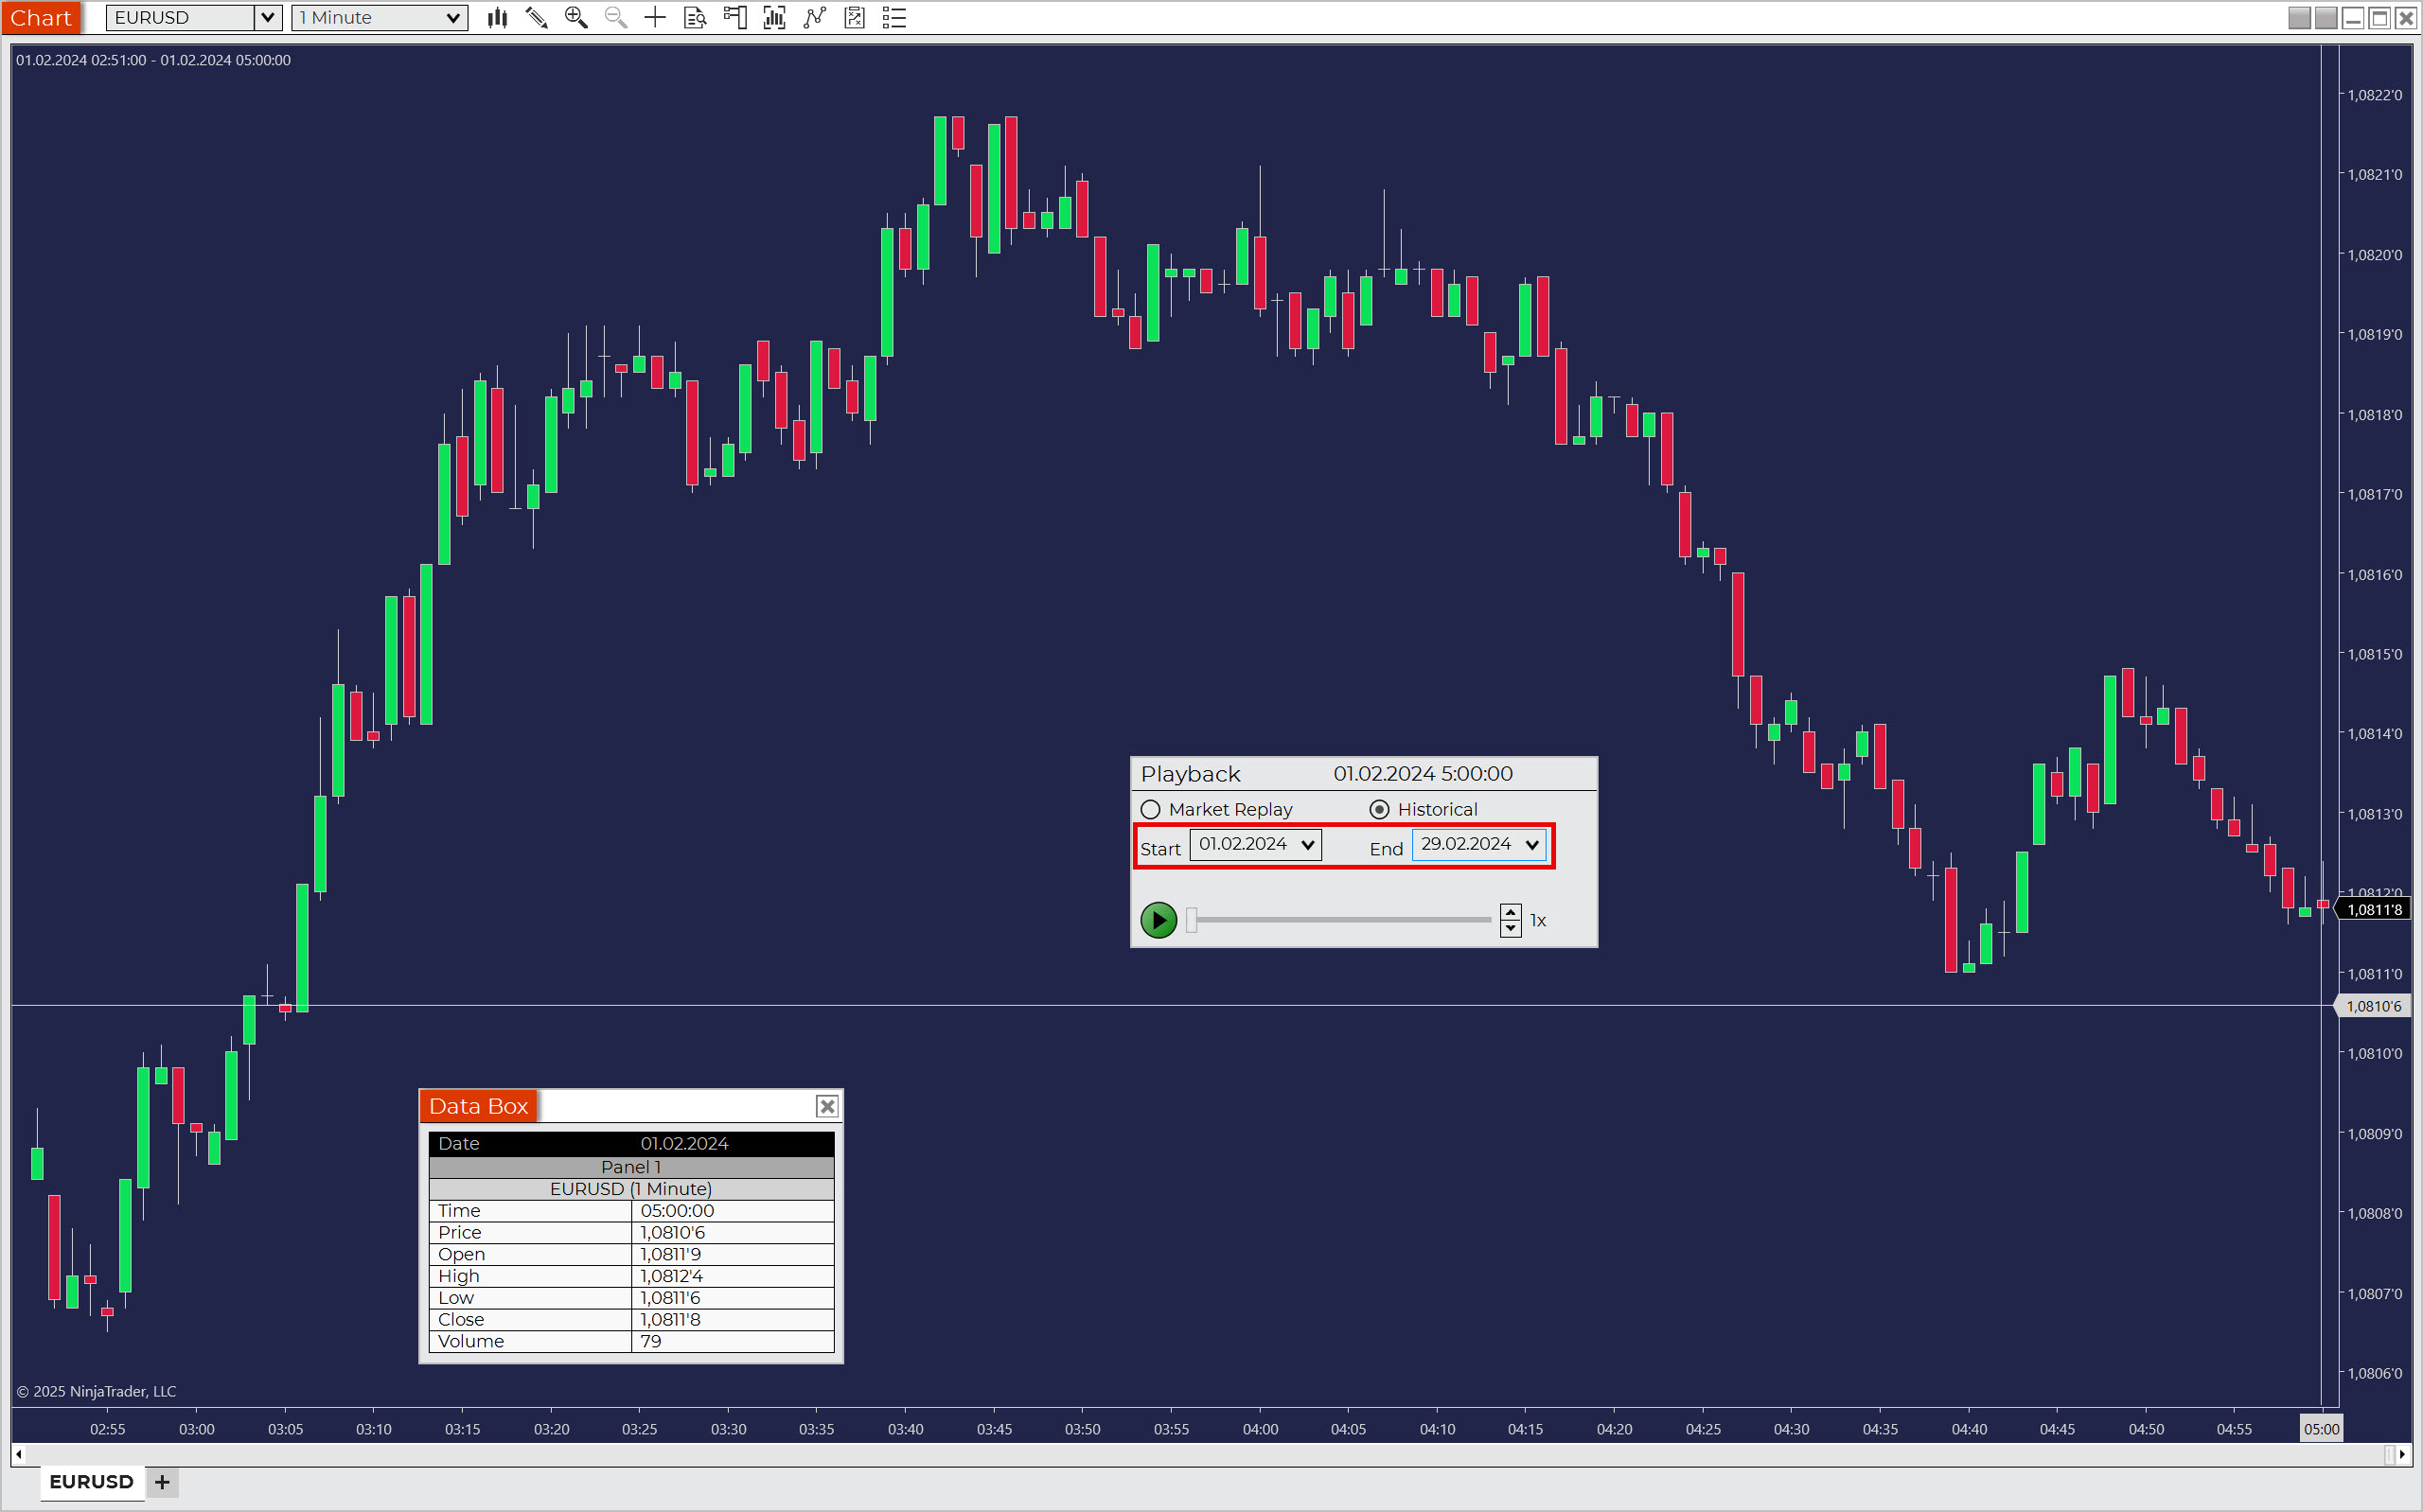
Tip: Do not select an unnecessarily long period so as not to overload your PC’s RAM.
If you need the chart to start at a specific point, use the Go To function. Right-click on the replay tool and select Go To…
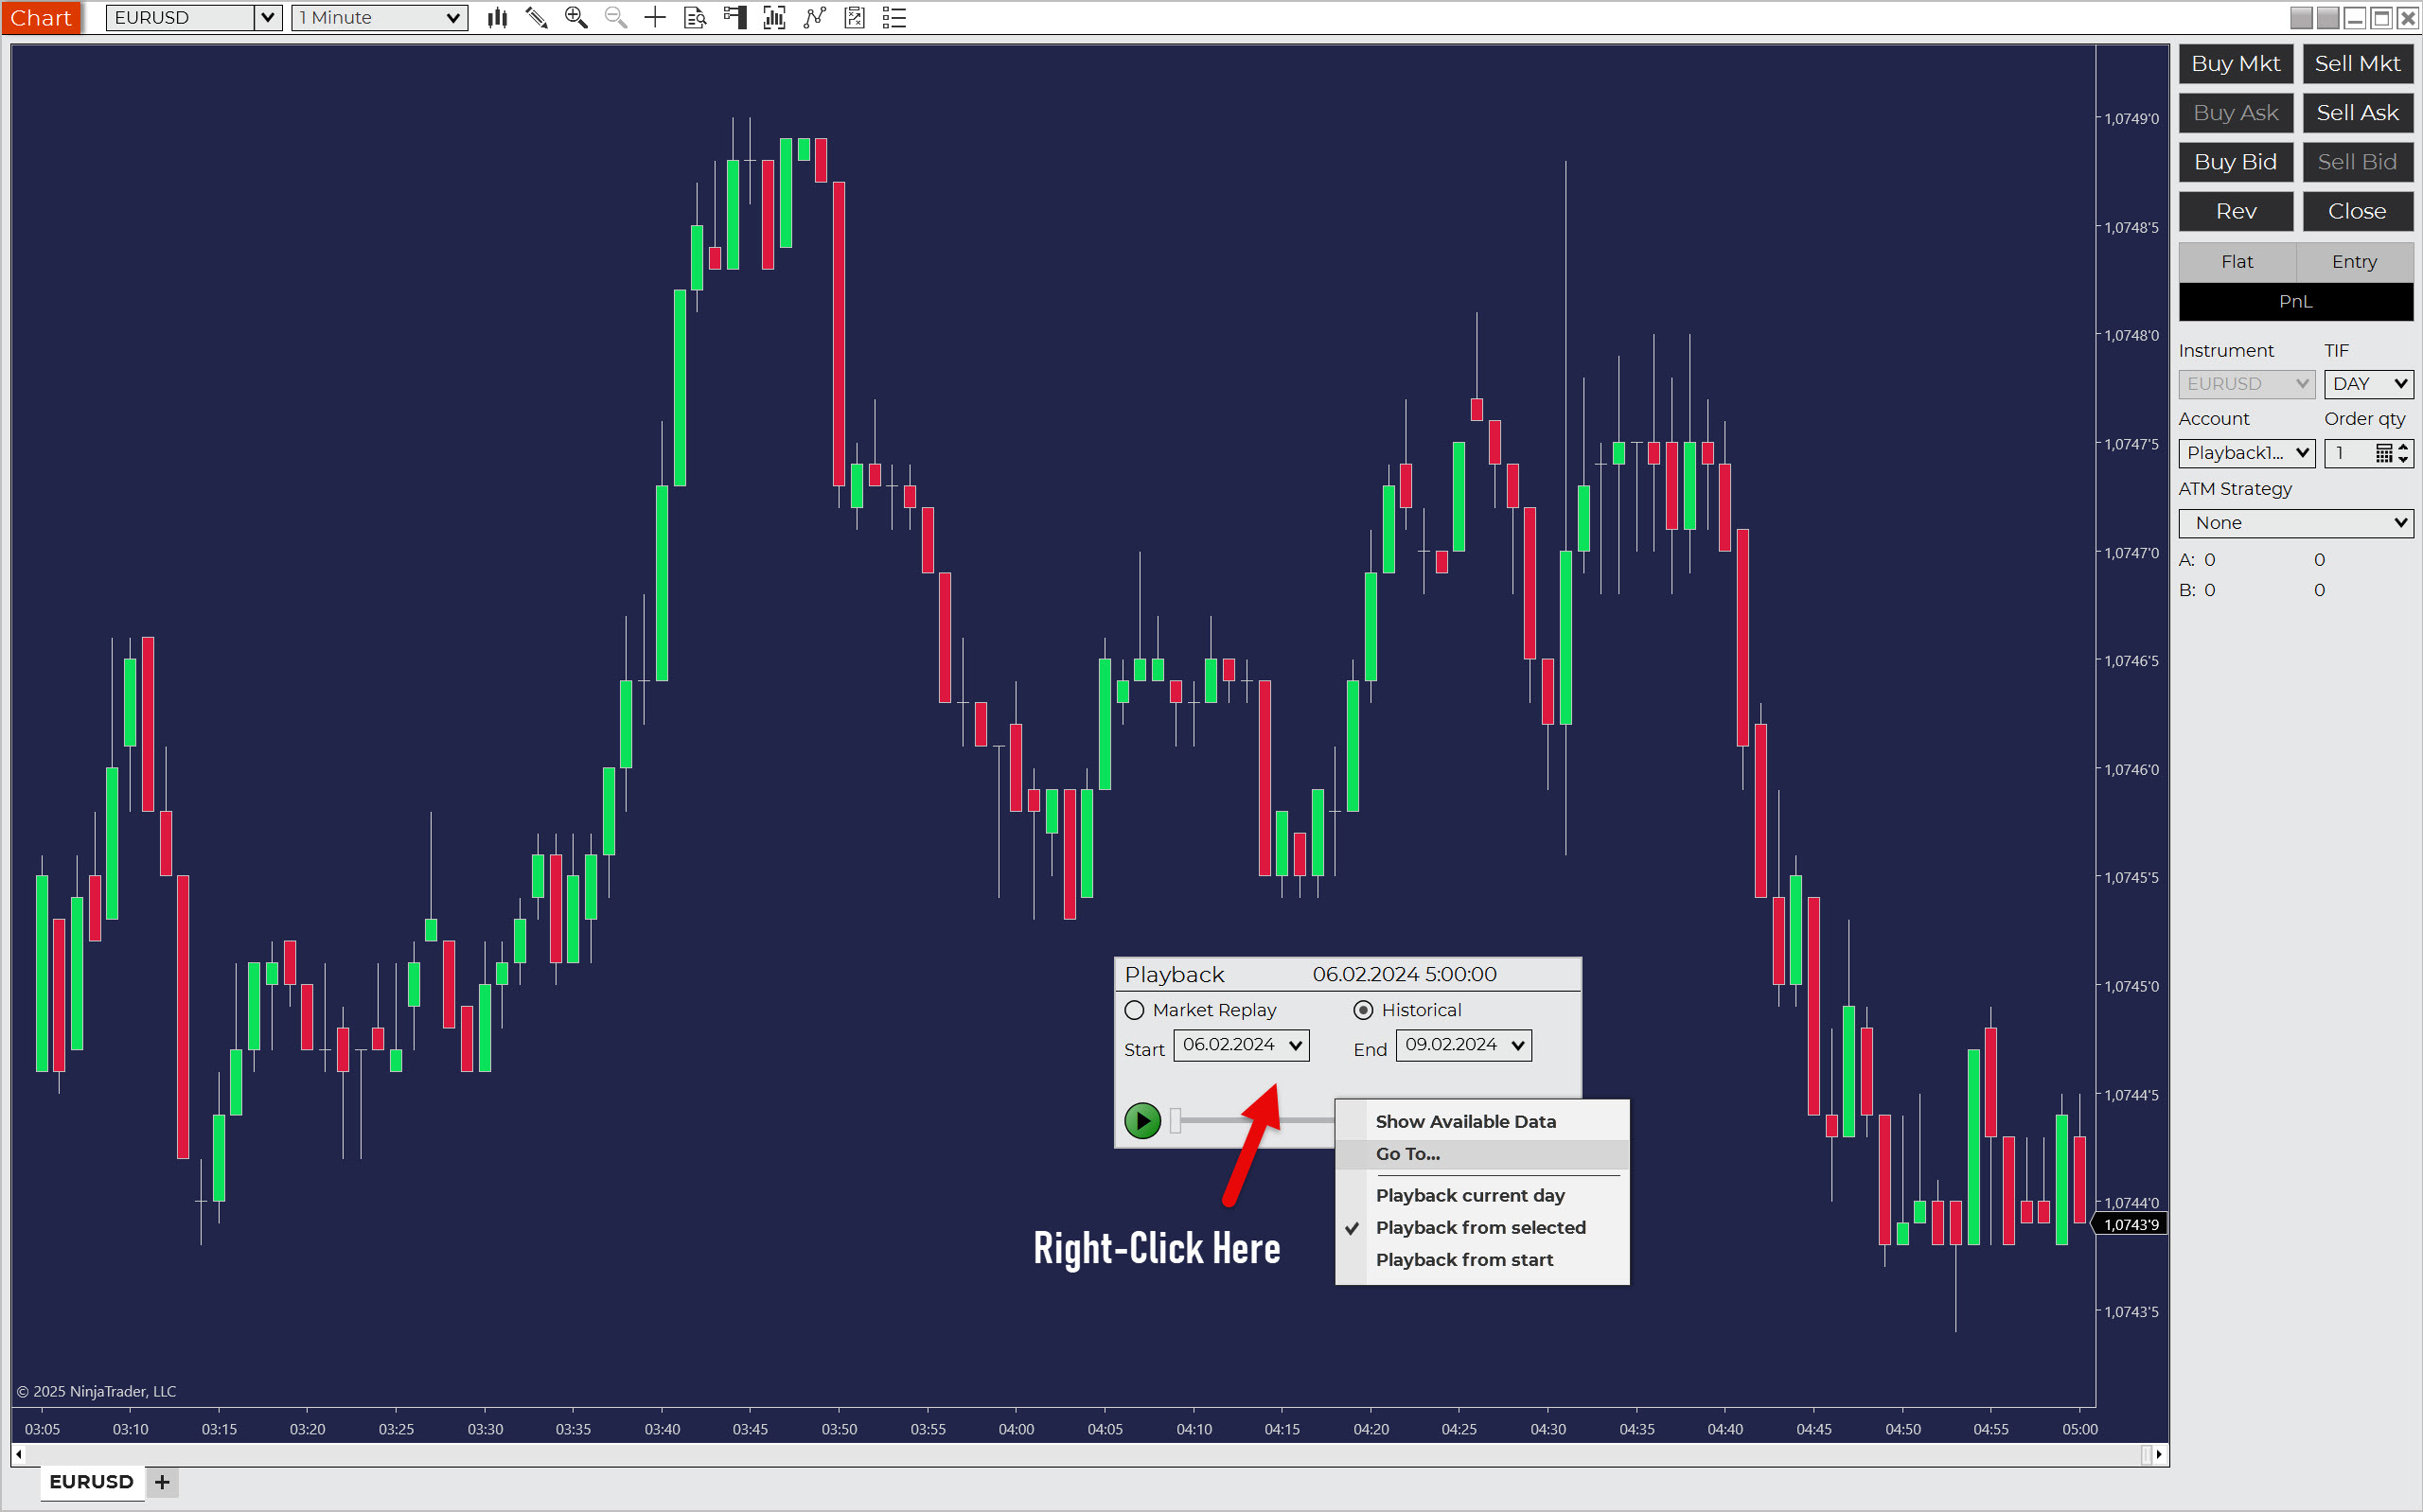
Now just press the Play icon and your backtesting session will begin.
Choose the playback speed at your discretion.

Note: Replaying in NinjaTrader works by updating the price every second (if a change has occurred). Not tick-by-tick. Therefore, the platform is not a true simulator of a real market environment like Sierra Chart, for example.
During playback, you can use Chart Trader to simulate trades as if they were taking place in a live market. However, don’t forget to collect data on executed trades in your backtesting spreadsheet, as only this will provide a truly in-depth understanding of your strategy.
Automated Backtesting in NinjaTrader
NinjaTrader is truly a universal trading platform, so it’s no surprise that it can also handle automated backtesting. Once you have your historical data ready, there’s only one thing you need: NinjaTrader’s automated trading strategy.
A NinjaTrader automated trading strategy, also known as a NinjaTrader trading bot, is a set of rules converted into source code using the NinjaScript programming language. NinjaTrader then uses this algorithm either to perform automated backtesting or to execute trades directly.
How to Get a NinjaTrader Trading Robot
There are several ways to obtain a trading robot. Here are your options:
- Program your own NinjaTrader trading strategy in NinjaScript Editor.
- Create your own strategy using the built-in Strategy Builder.
- Create a strategy using artificial intelligence tools such as ChatGPT.
- Purchase a ready-made NinjaTrader automated trading strategy. The NinjaTrader Ecosystem is a good place to start looking.
- Download a ready-made free automated trading strategy from the NinjaTrader Ecosystem or another source (forums, websites).
- Use the automated trading strategies that are already in the platform.
Each of these options is certainly very interesting and would definitely deserve a separate article. For this reason, this NinjaTrader backtesting guide will not delve into detail about them, except for the last one, which we will now explore.
Utilizing Built-in NinjaTrader Strategies
To demonstrate how to perform automated backtesting in the NinjaTrader platform, we will utilize algorithms that are already built into the platform. Specifically, you will see an example using automated MA crossover strategies. Here is the procedure.
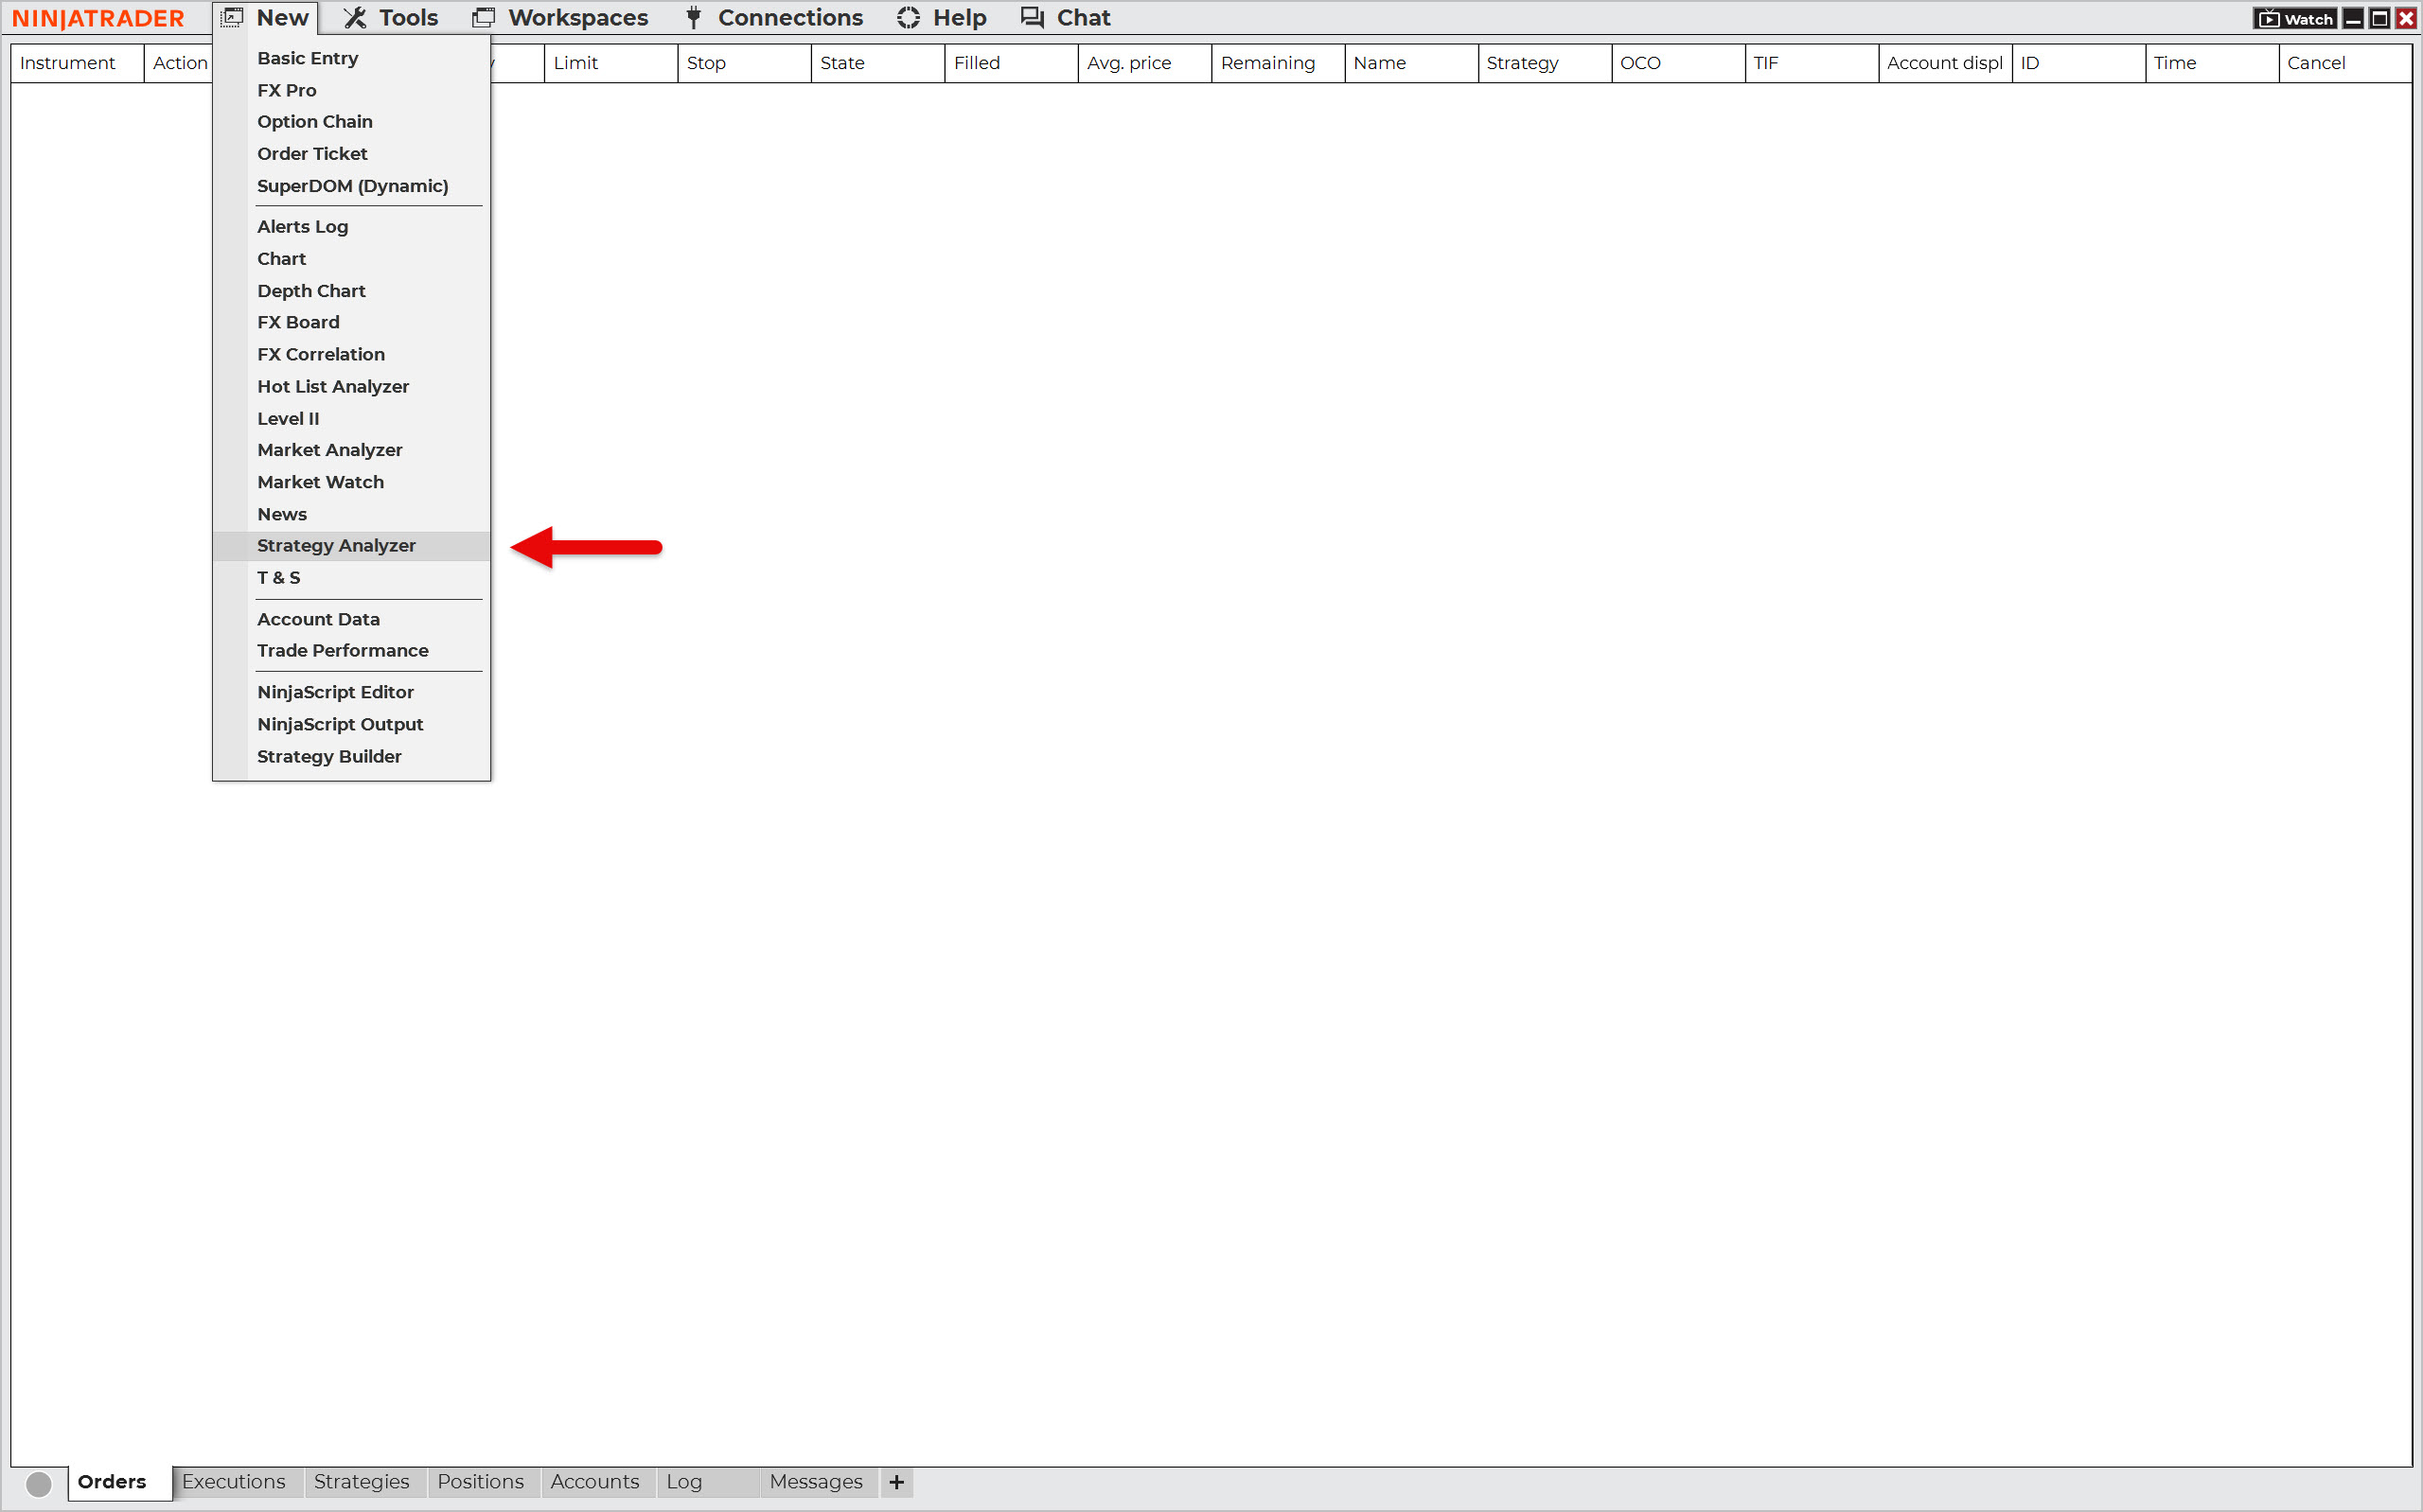
In the NinjaTrader main panel, select New > Strategy Analyzer.
On the right side of the Strategy Analyzer window, you will find settings that determine how the automated backtest should be performed. In the General section, select the Sample MA crossover strategy.
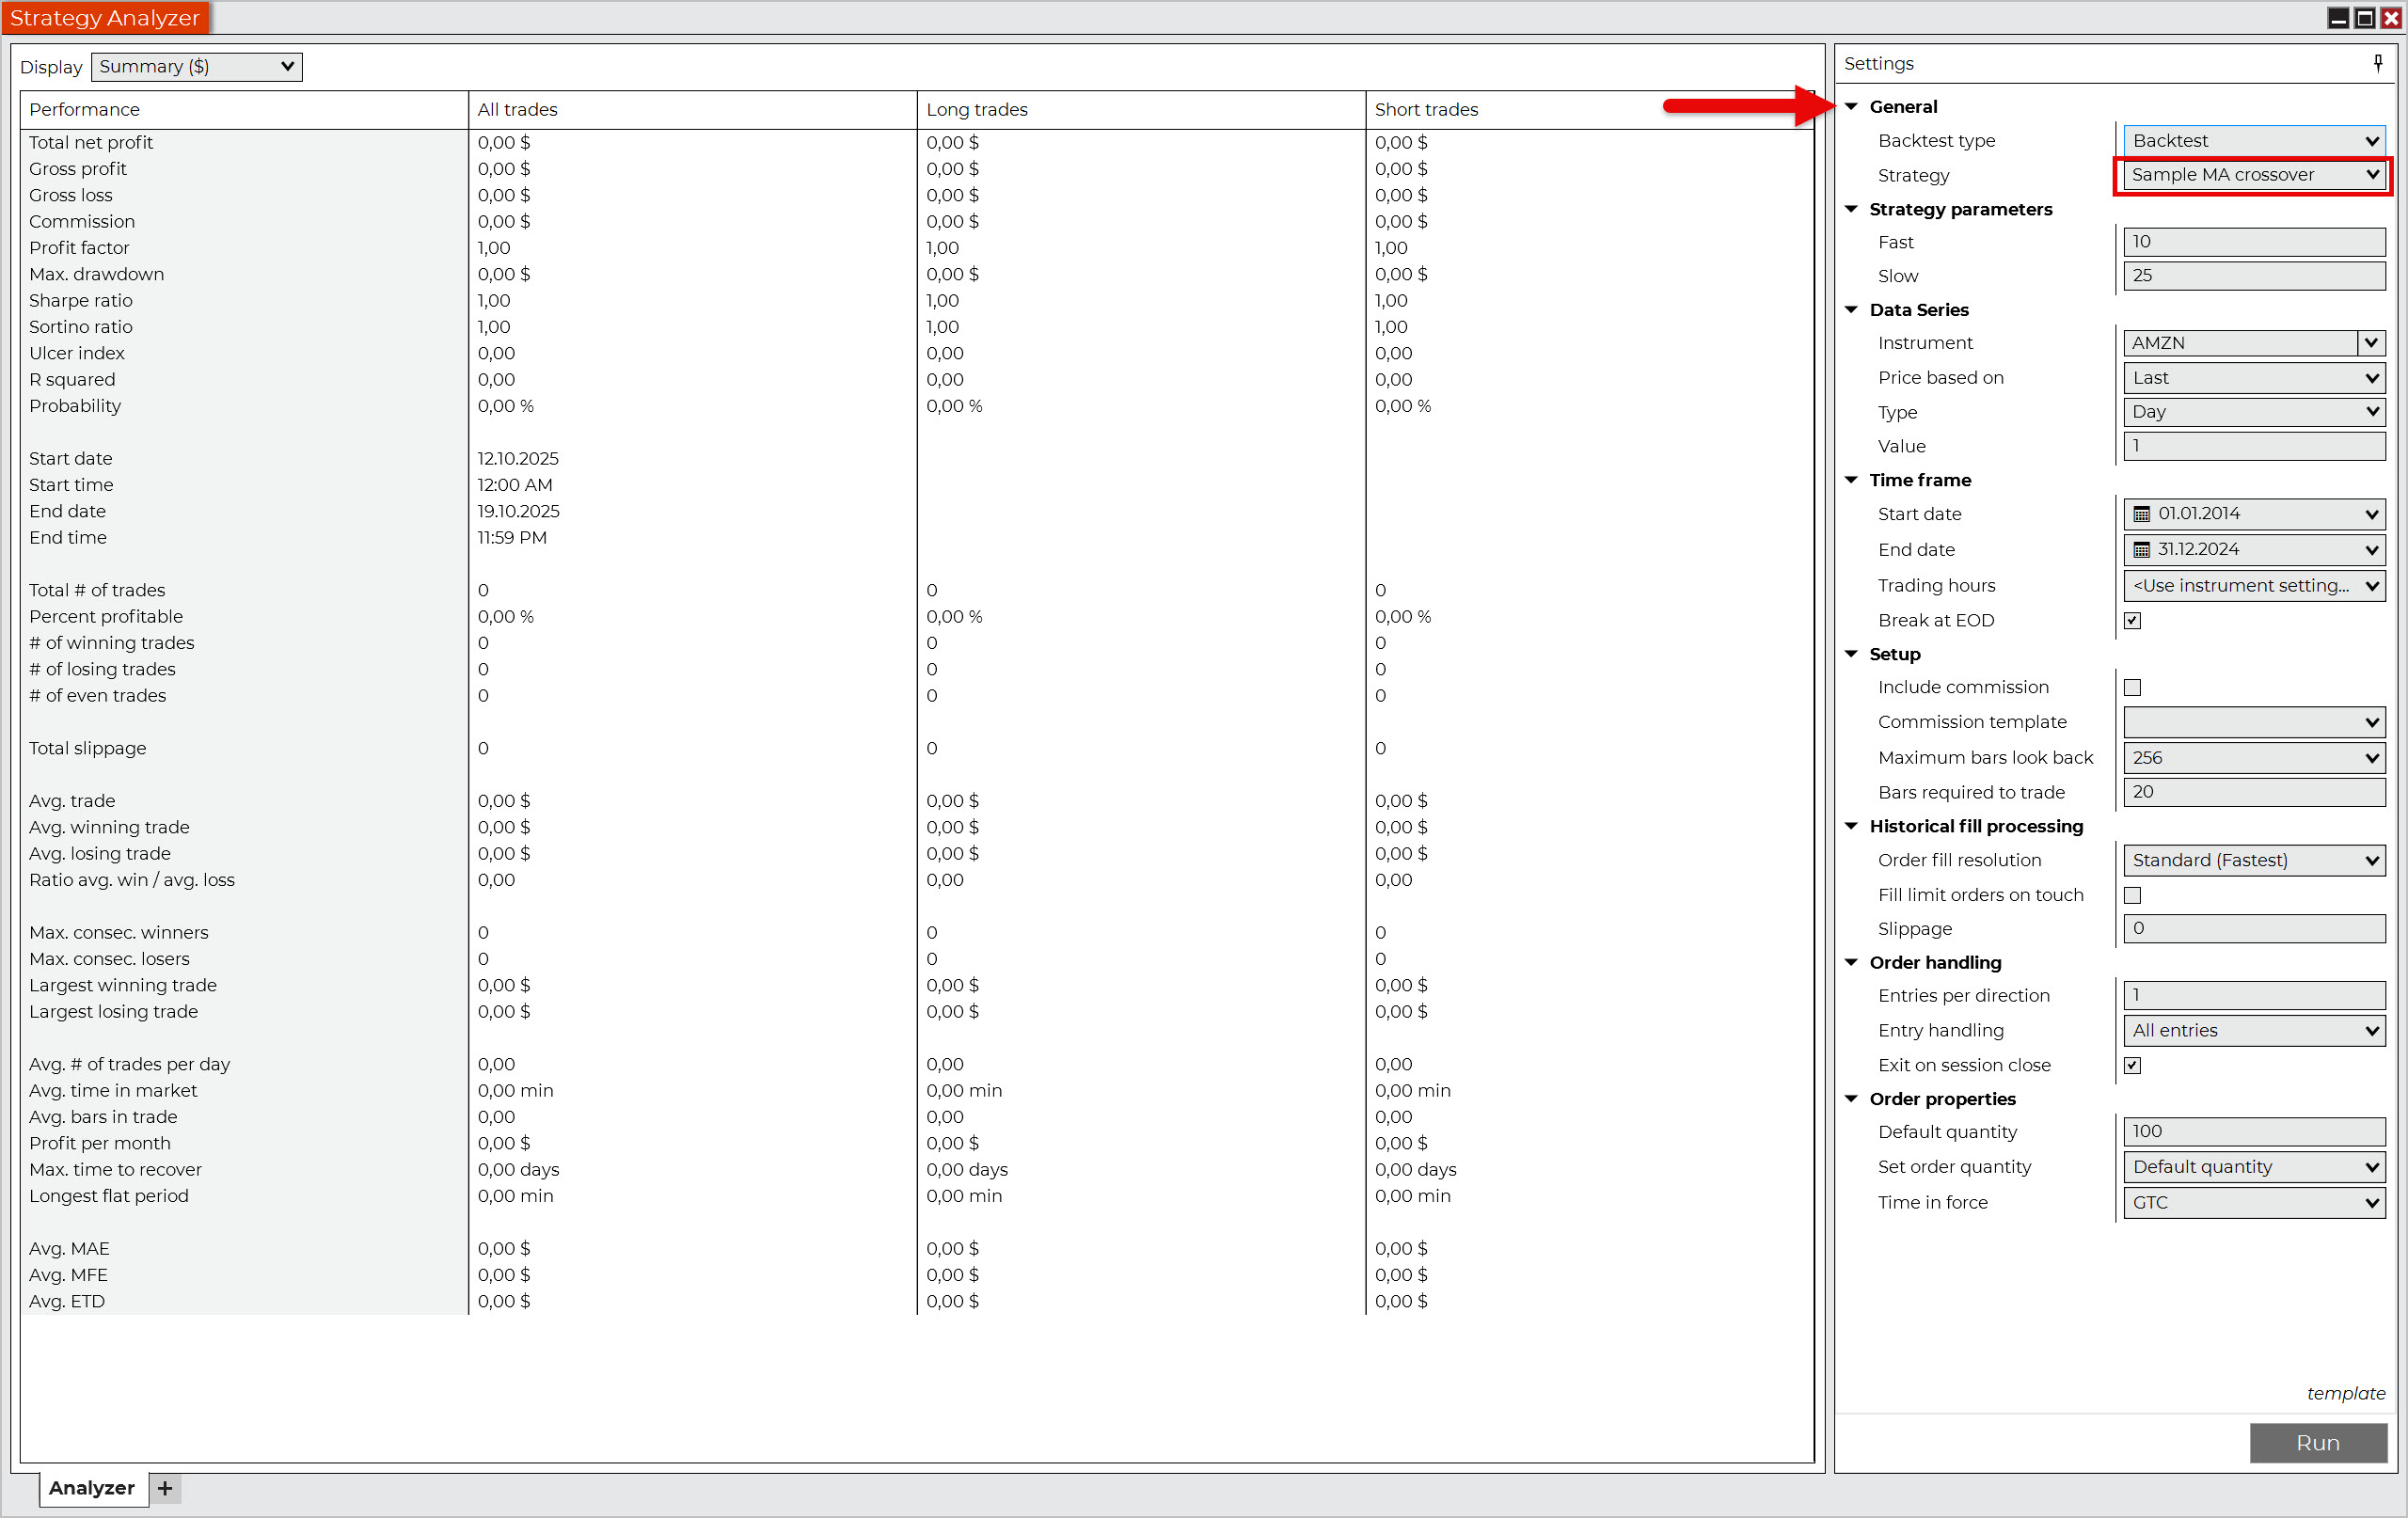
As you can see, there is also a Backtest Type setting that allows you to choose between a classic backtest and several types of optimization. However, in this guide, we are only interested in backtesting, so leave the default setting at Backtest.
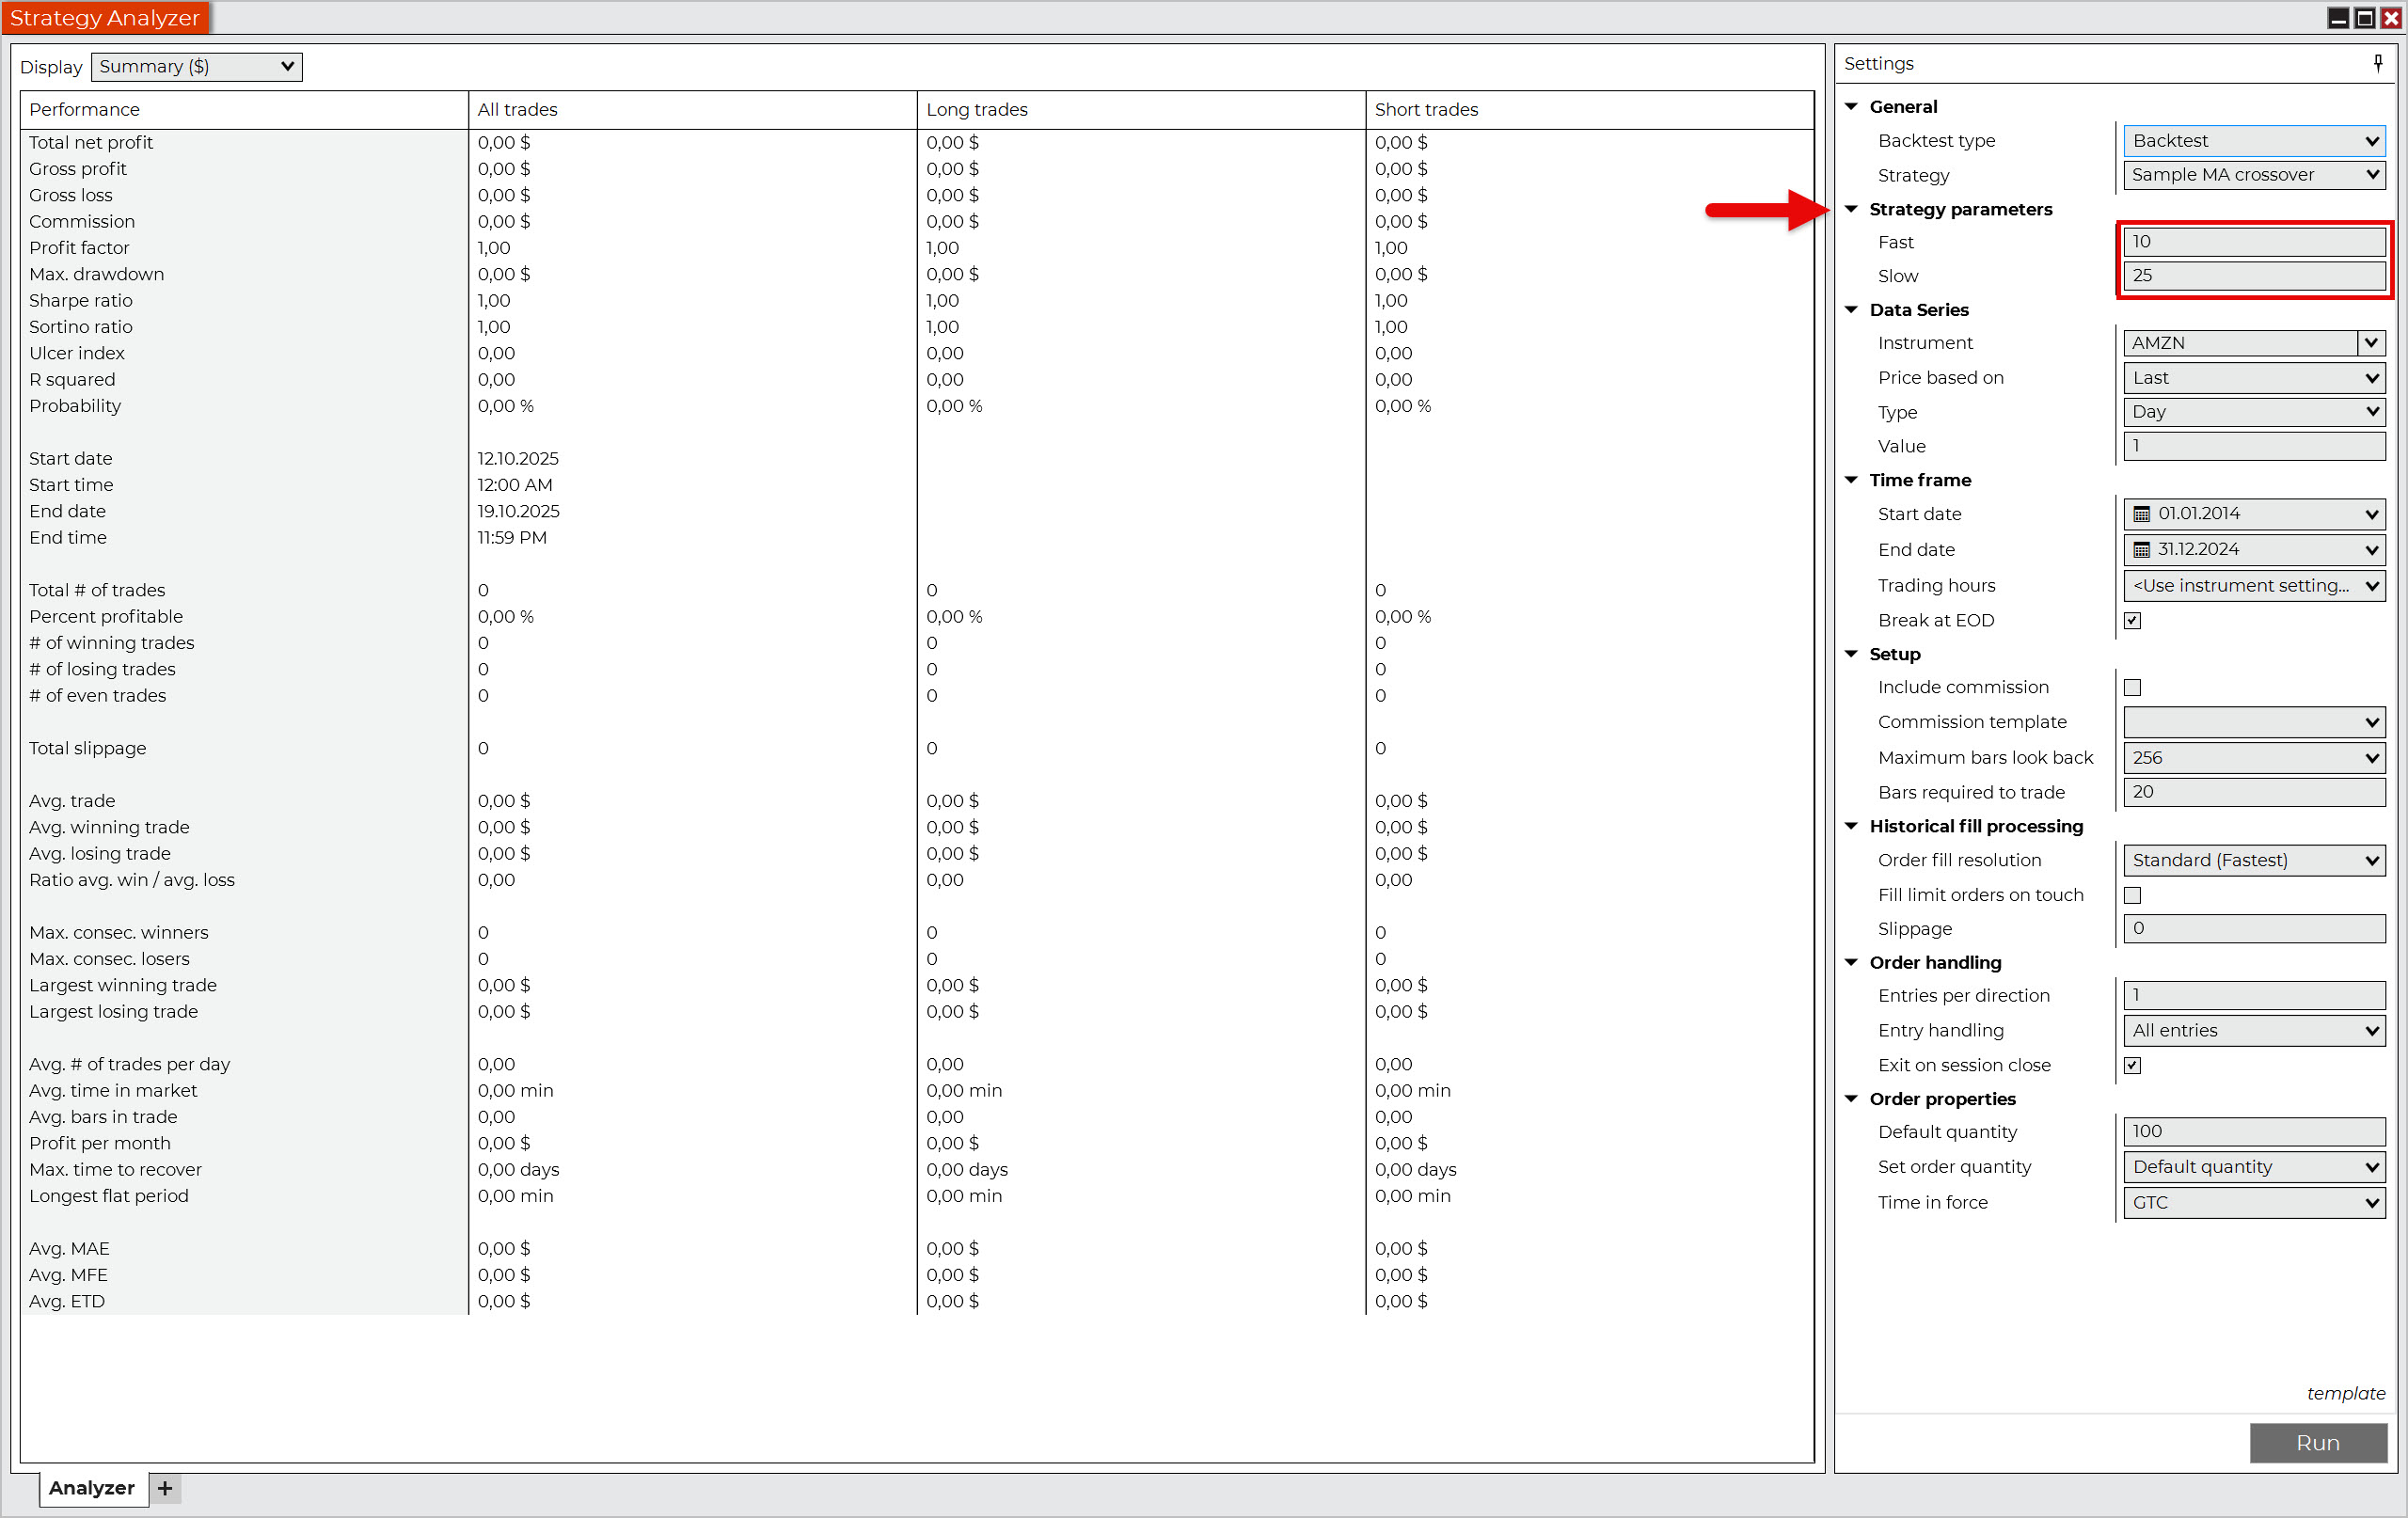
Next, you need to set the strategy parameters. This part is always different, as it is up to the developer to decide what can be set. In our example, we can set the period of the fast and slow simple moving averages.
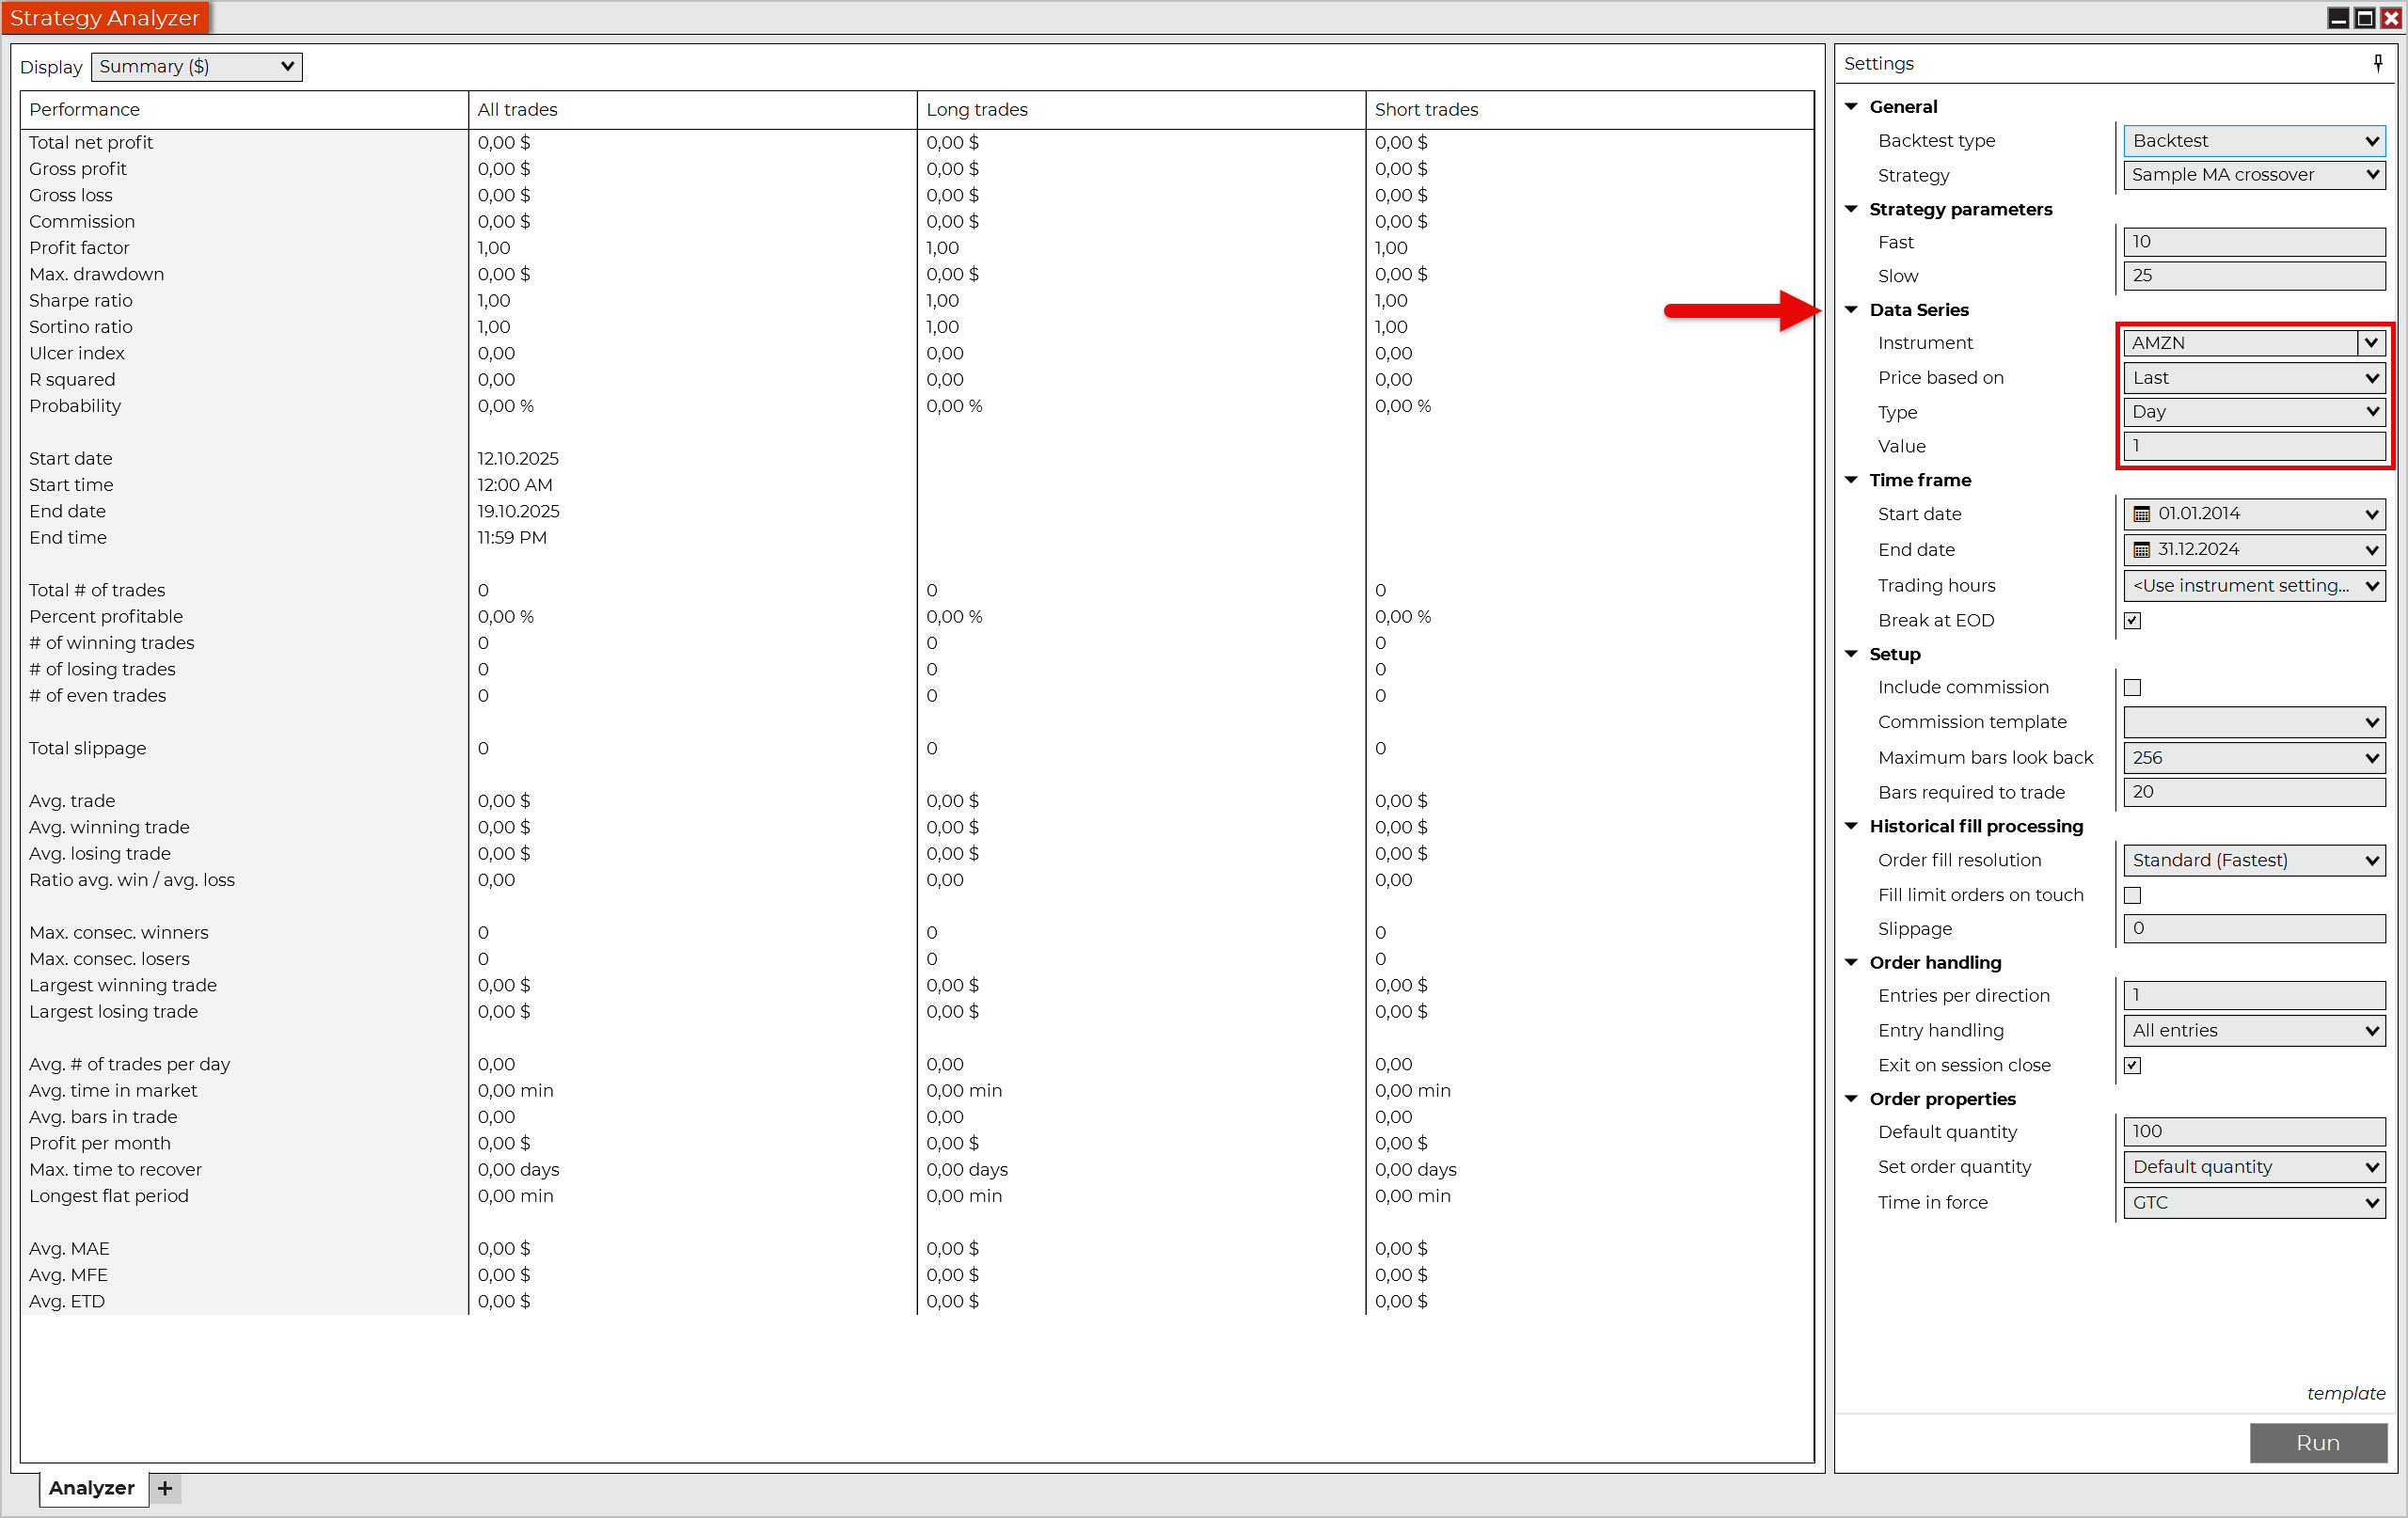
In the Data Series section, select the instrument (market) you want to backtest and the time frame (chart) that the strategy should use.
To make your backtest more realistic, you can adjust the backtest results by accounting for brokerage commissions. To do this, select the Include commission option and choose a commission template from the preset options or create your own.
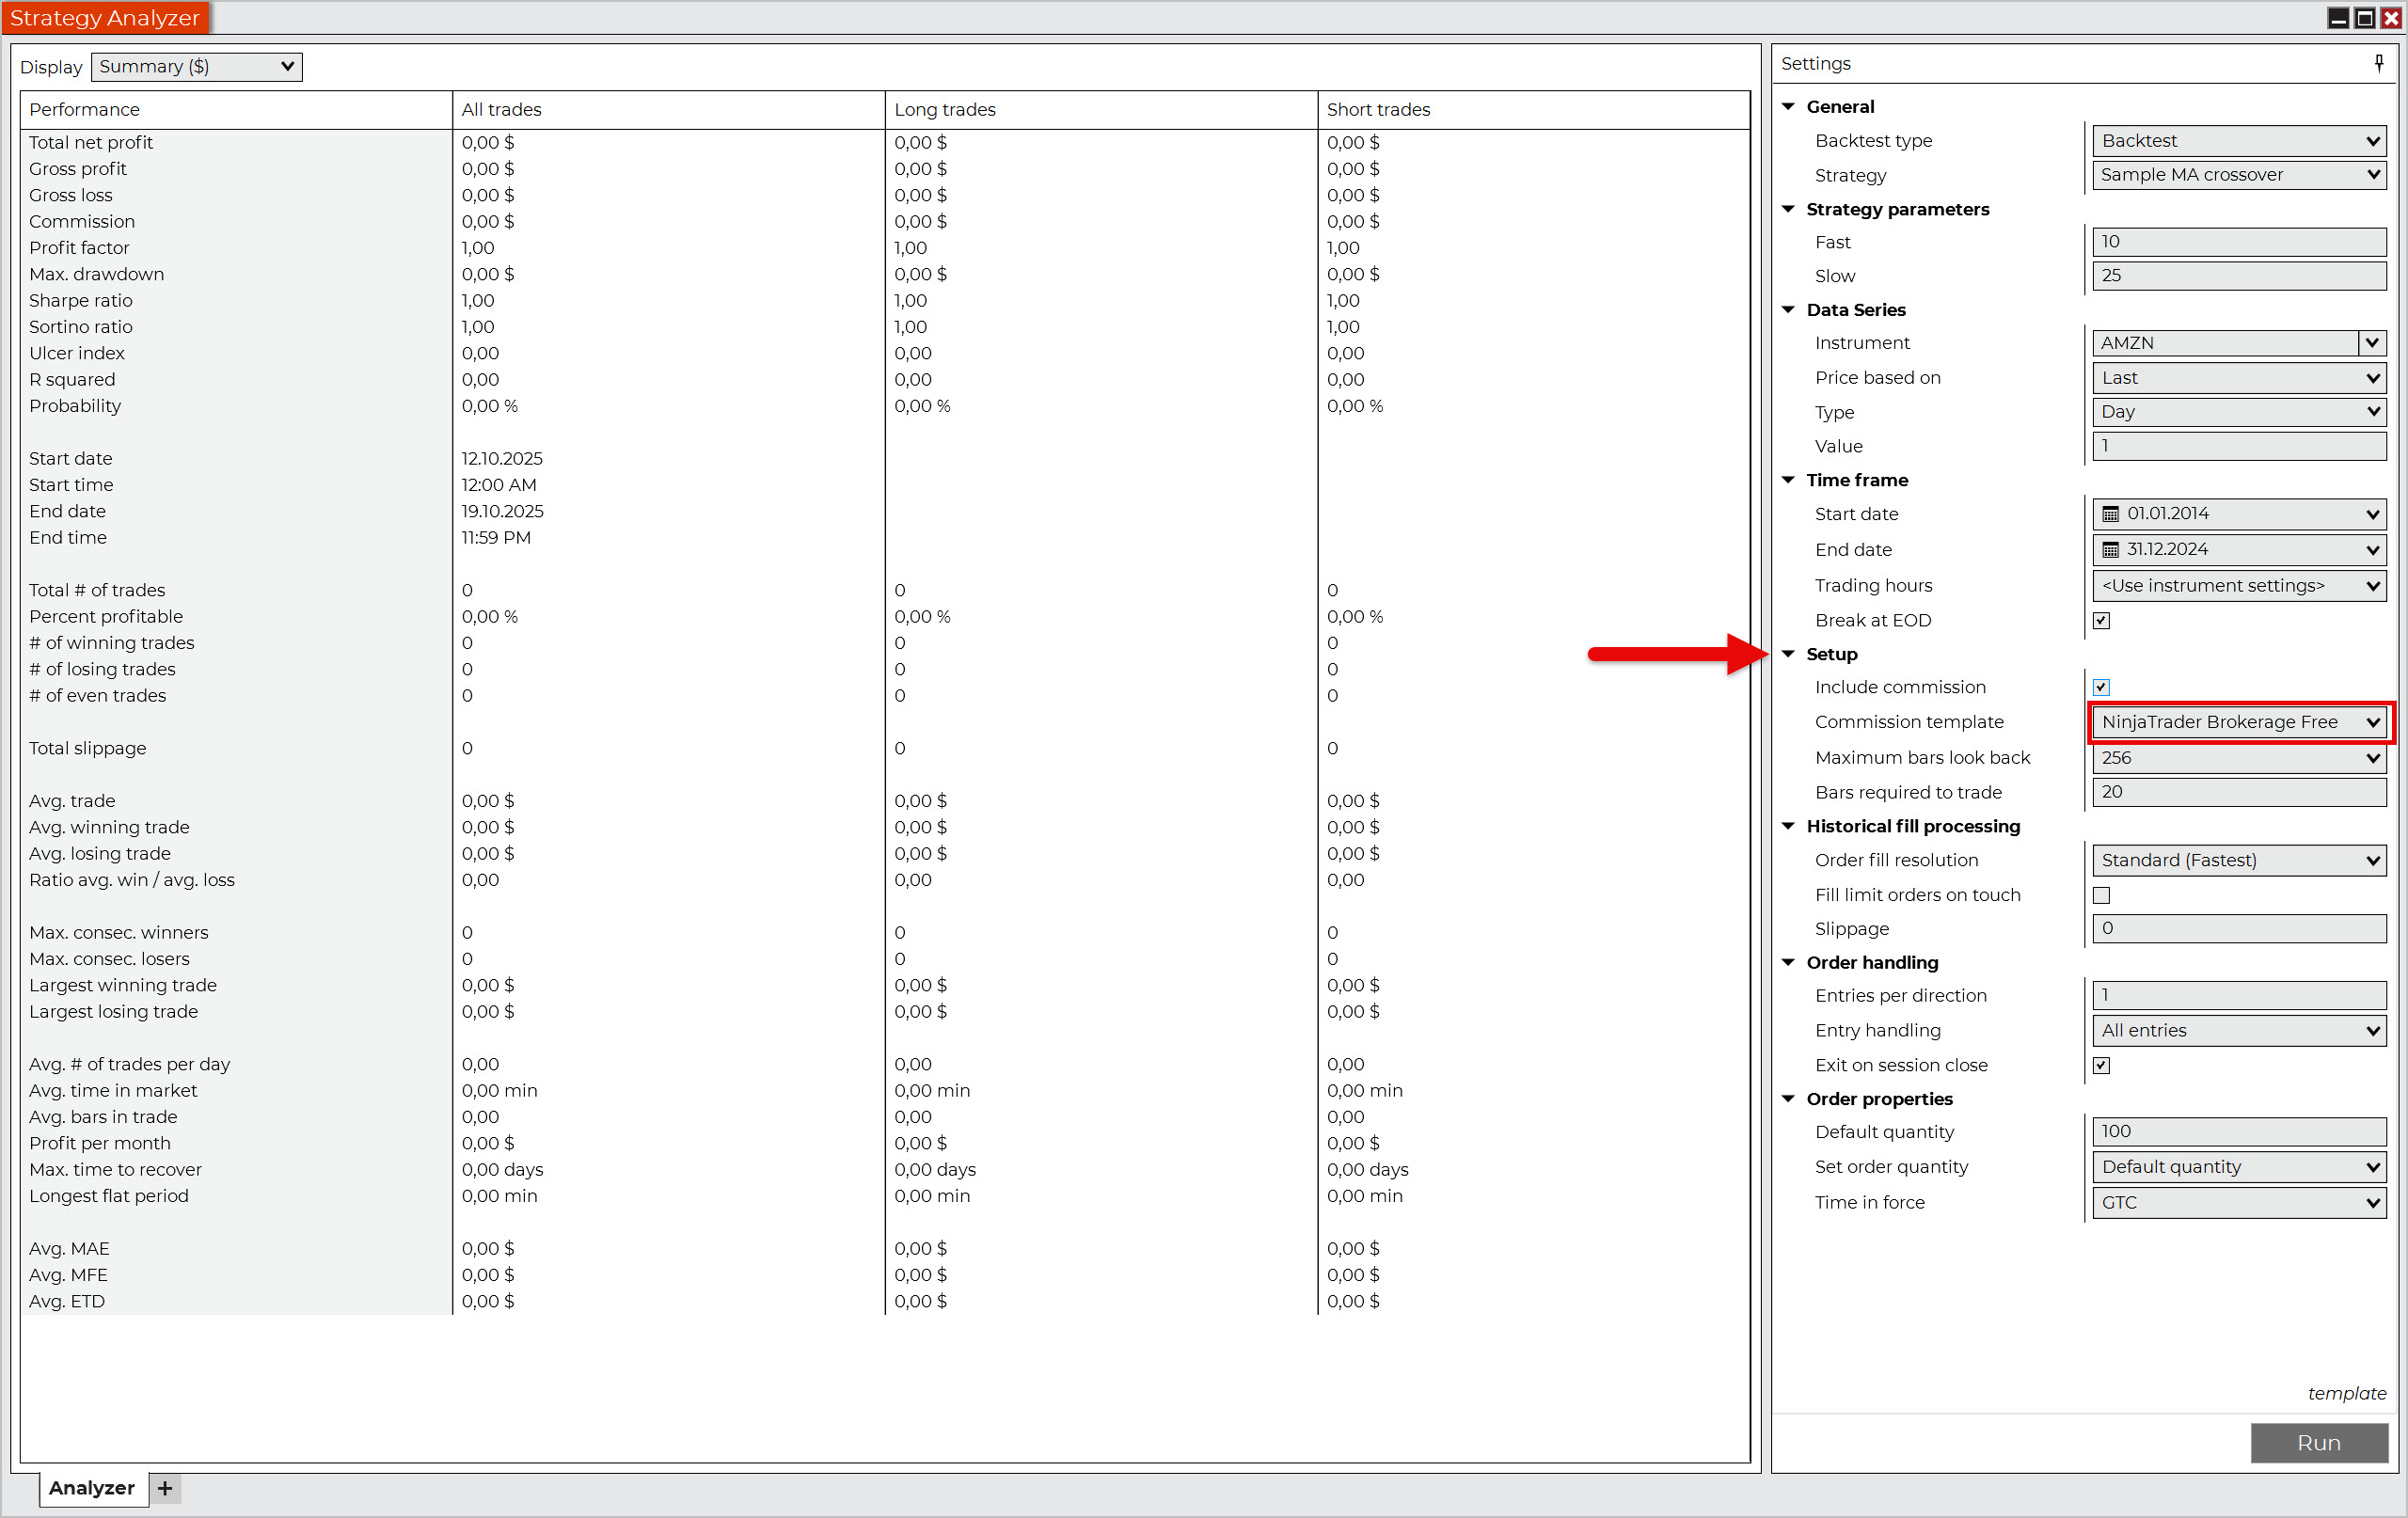
At your discretion, you can also select the execution slippage. NinjaTrader expects you to enter this value in ticks. Since we are backtesting the AMZN stock in our example, one tick corresponds to one cent.
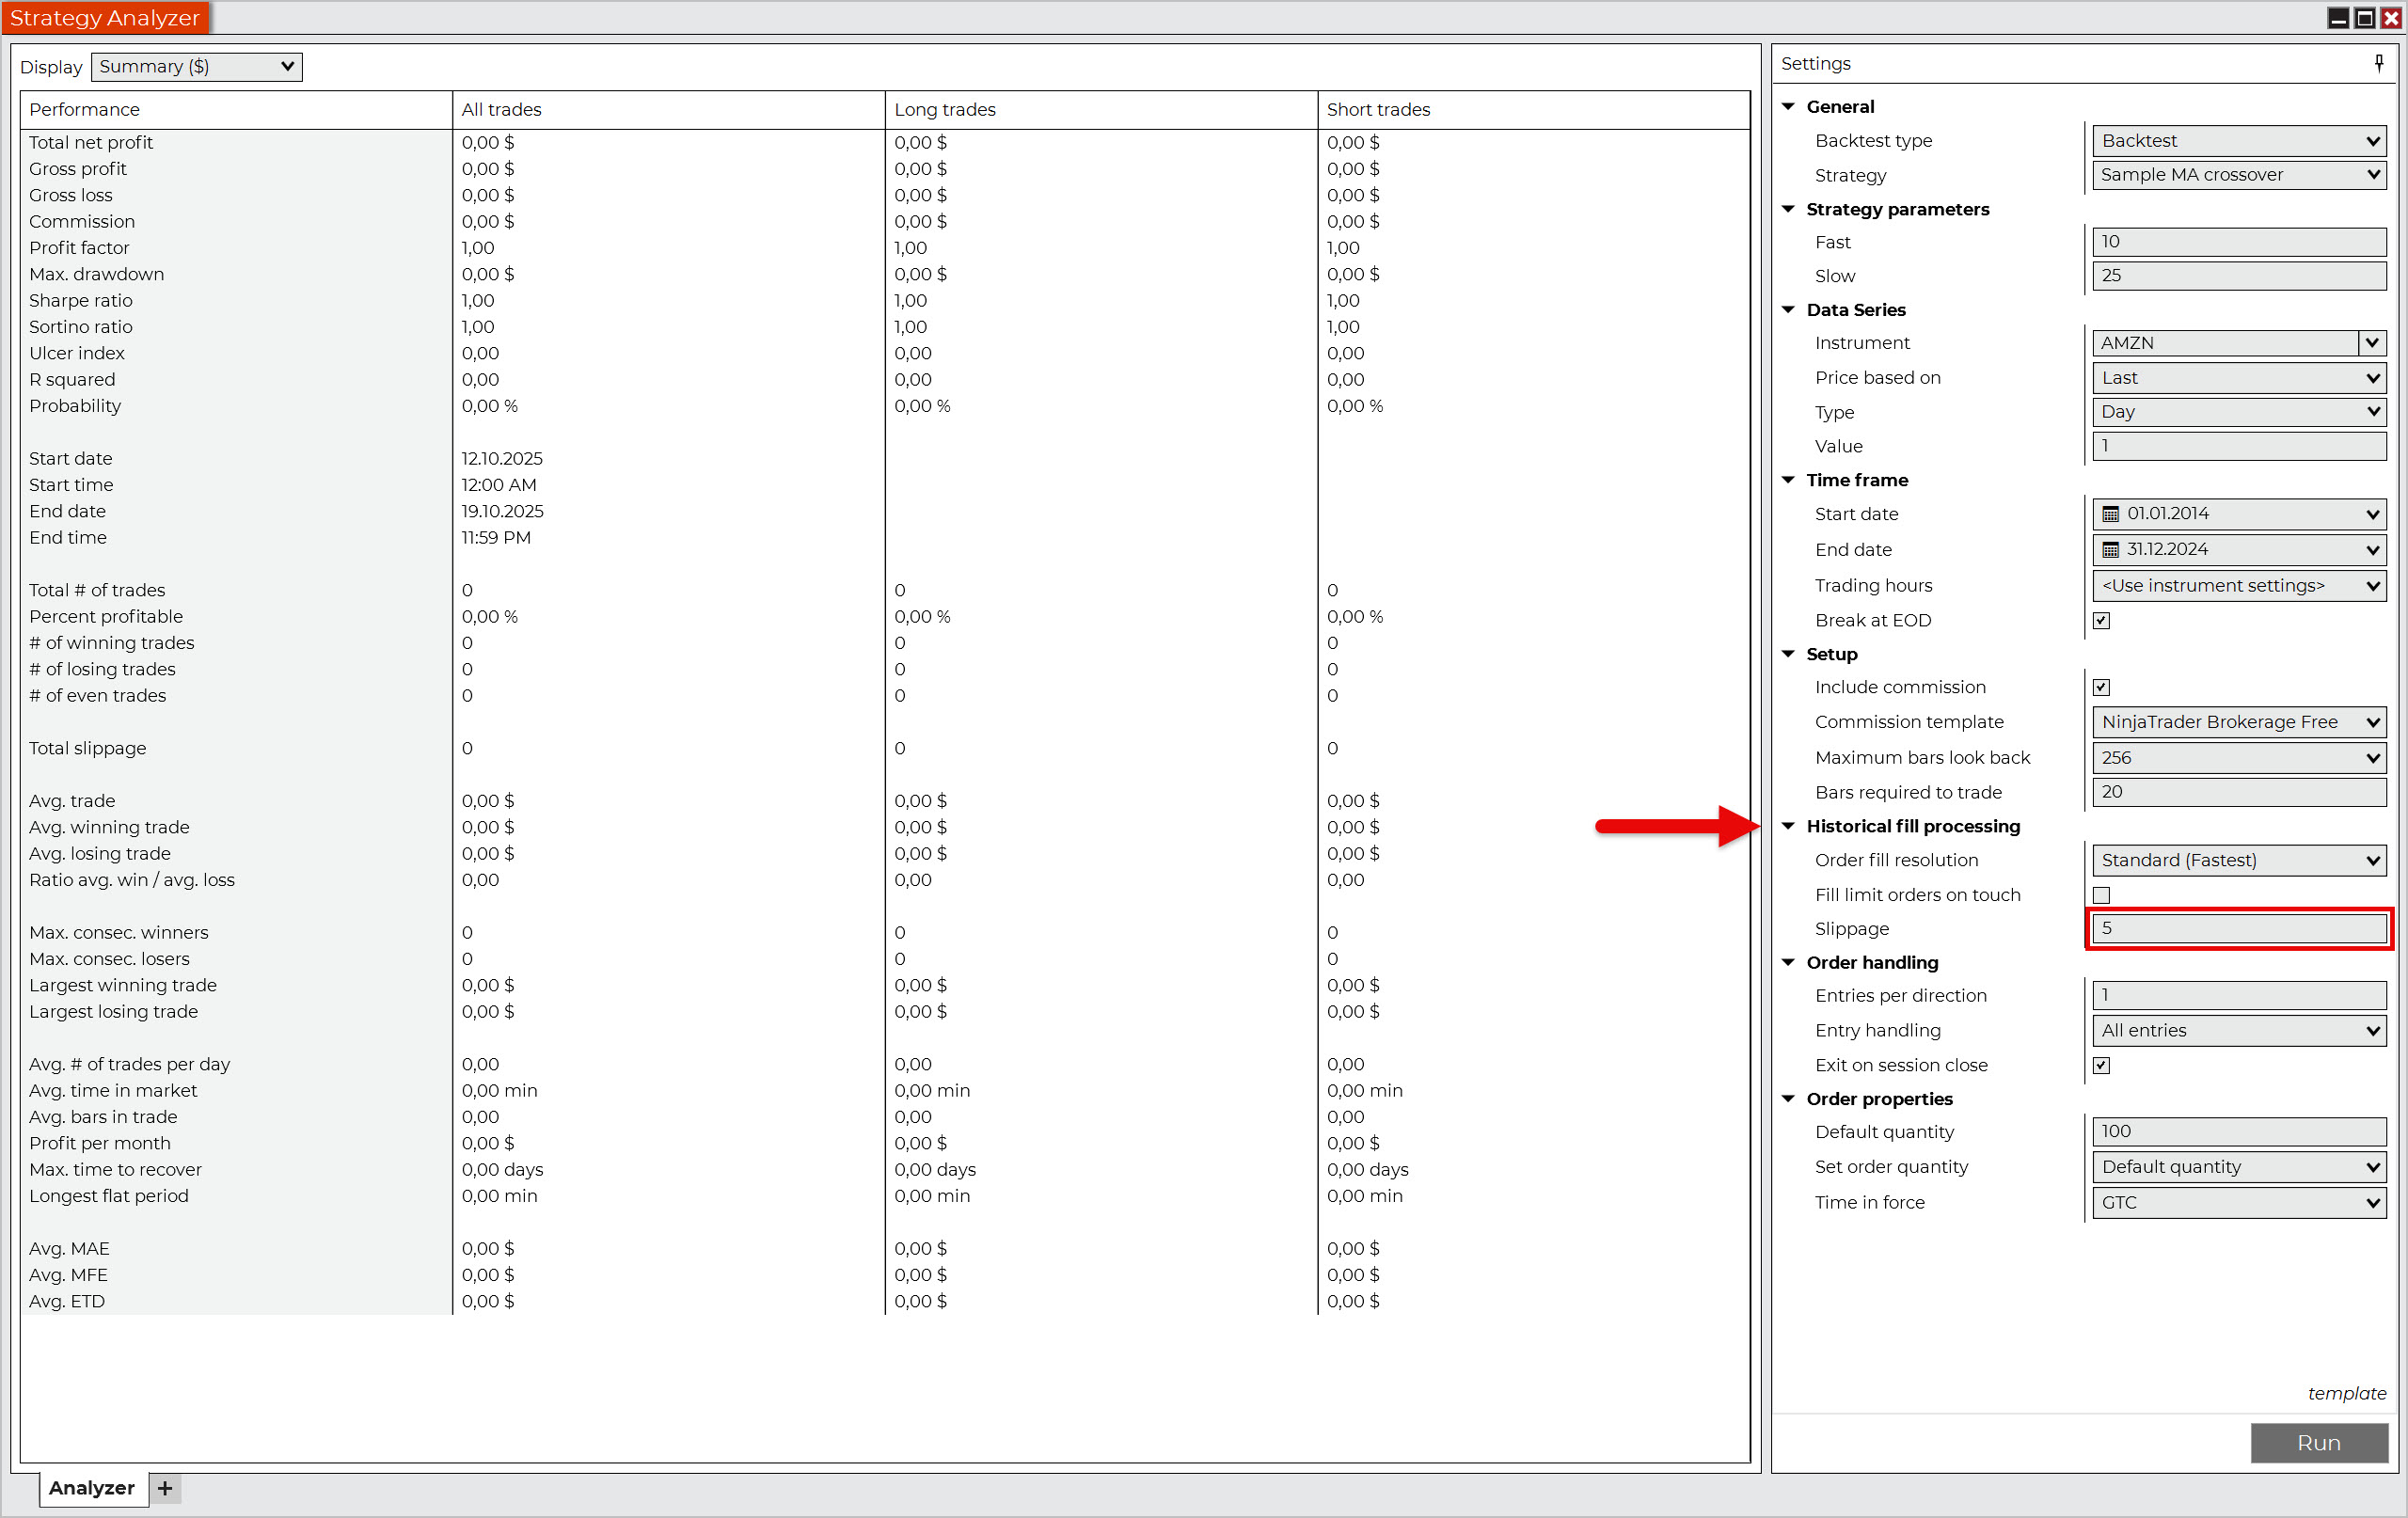
Leave the Order handling setting as it is, because it suits the nature of the strategy.
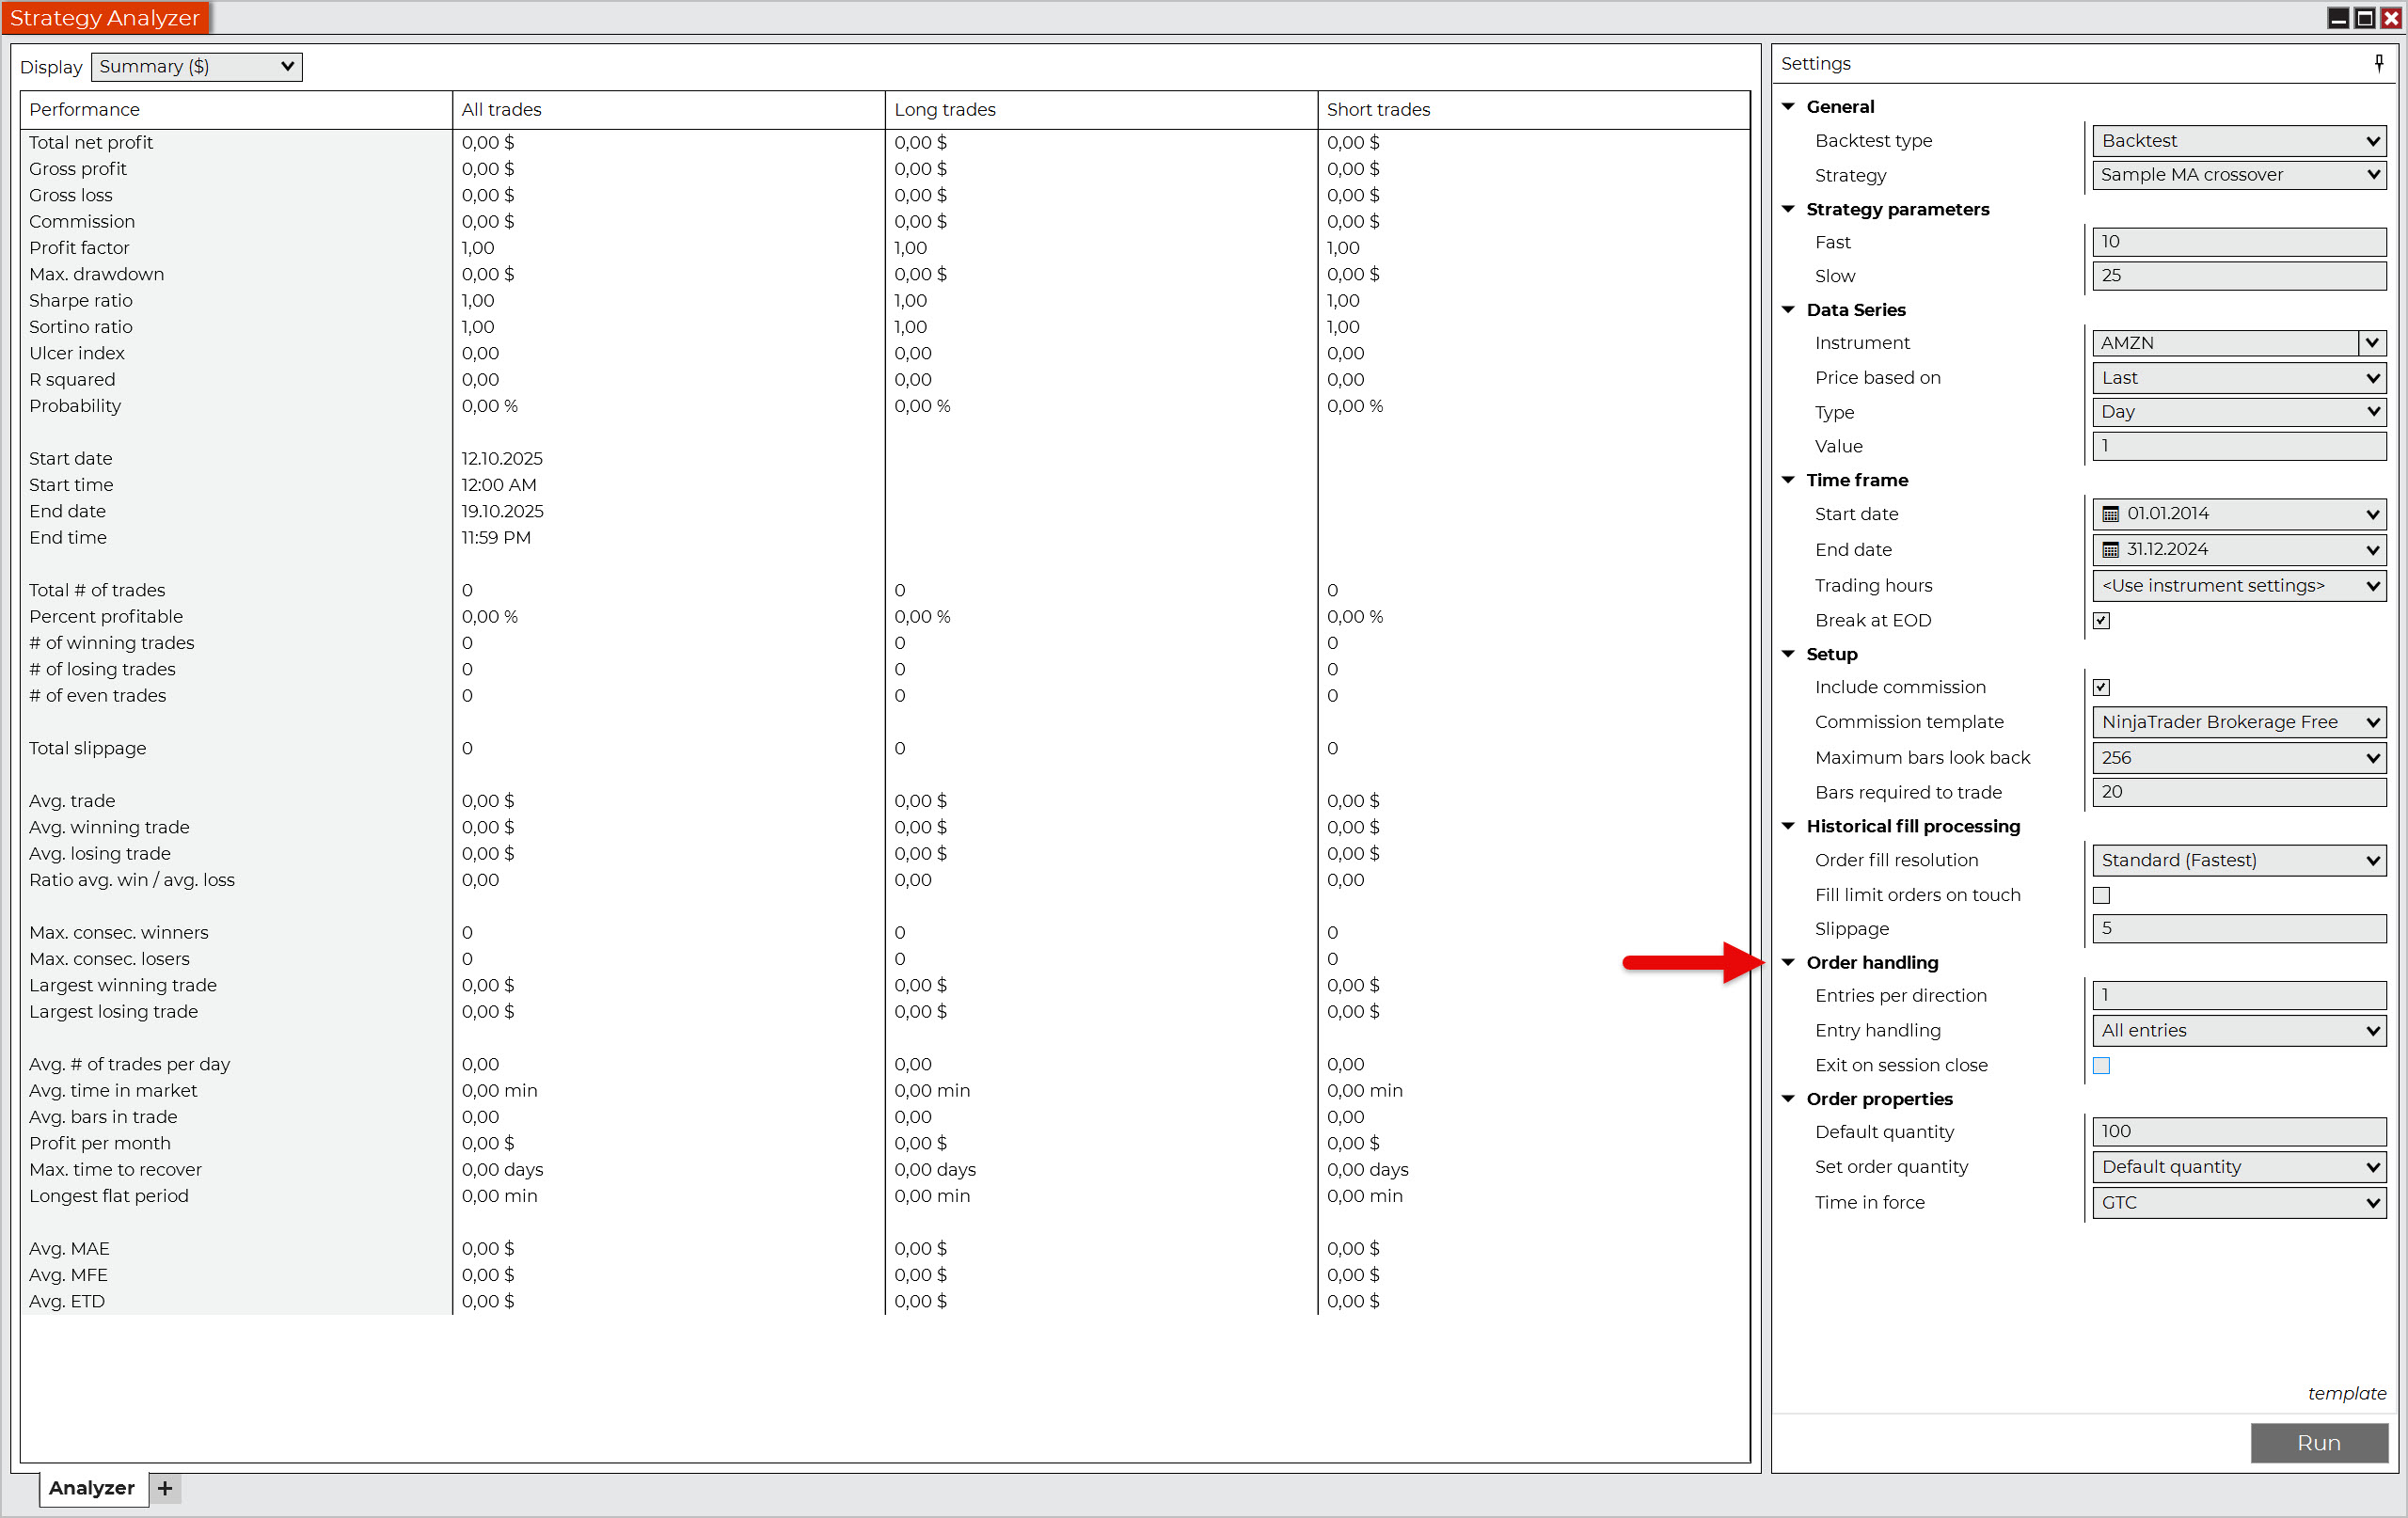
In the last section, Order properties, set the Set order quantity parameter to Default quantity, as we want to determine ourselves how many shares the strategy will buy or short. Then select the default quantity. In this case, it is 100 shares.
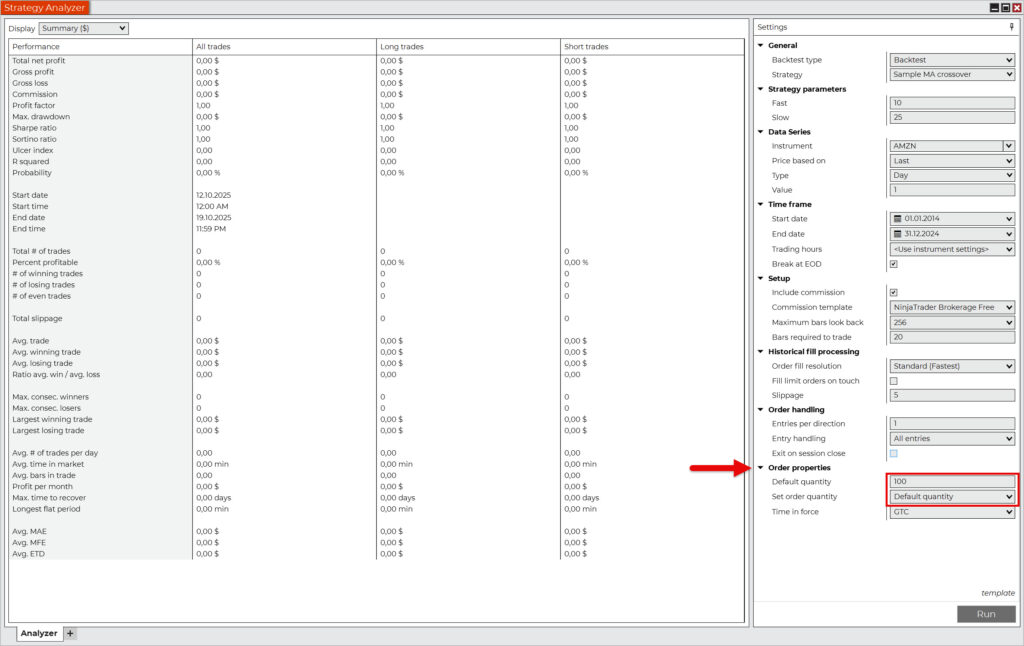
Now you are ready to start the automated backtest of your strategy by pressing the Run button.
The NinjaTrader backtesting engine is quite efficient and can process data quickly. So even if you don’t have the fastest PC, you don’t have to worry that the backtesting process will take forever. Testing a simple strategy with parameters like in our example usually takes only a few seconds.
Once the automated backtesting process is complete, the platform generates a report consisting of the following sections:
- Summary: Displays all statistics and performance metrics.
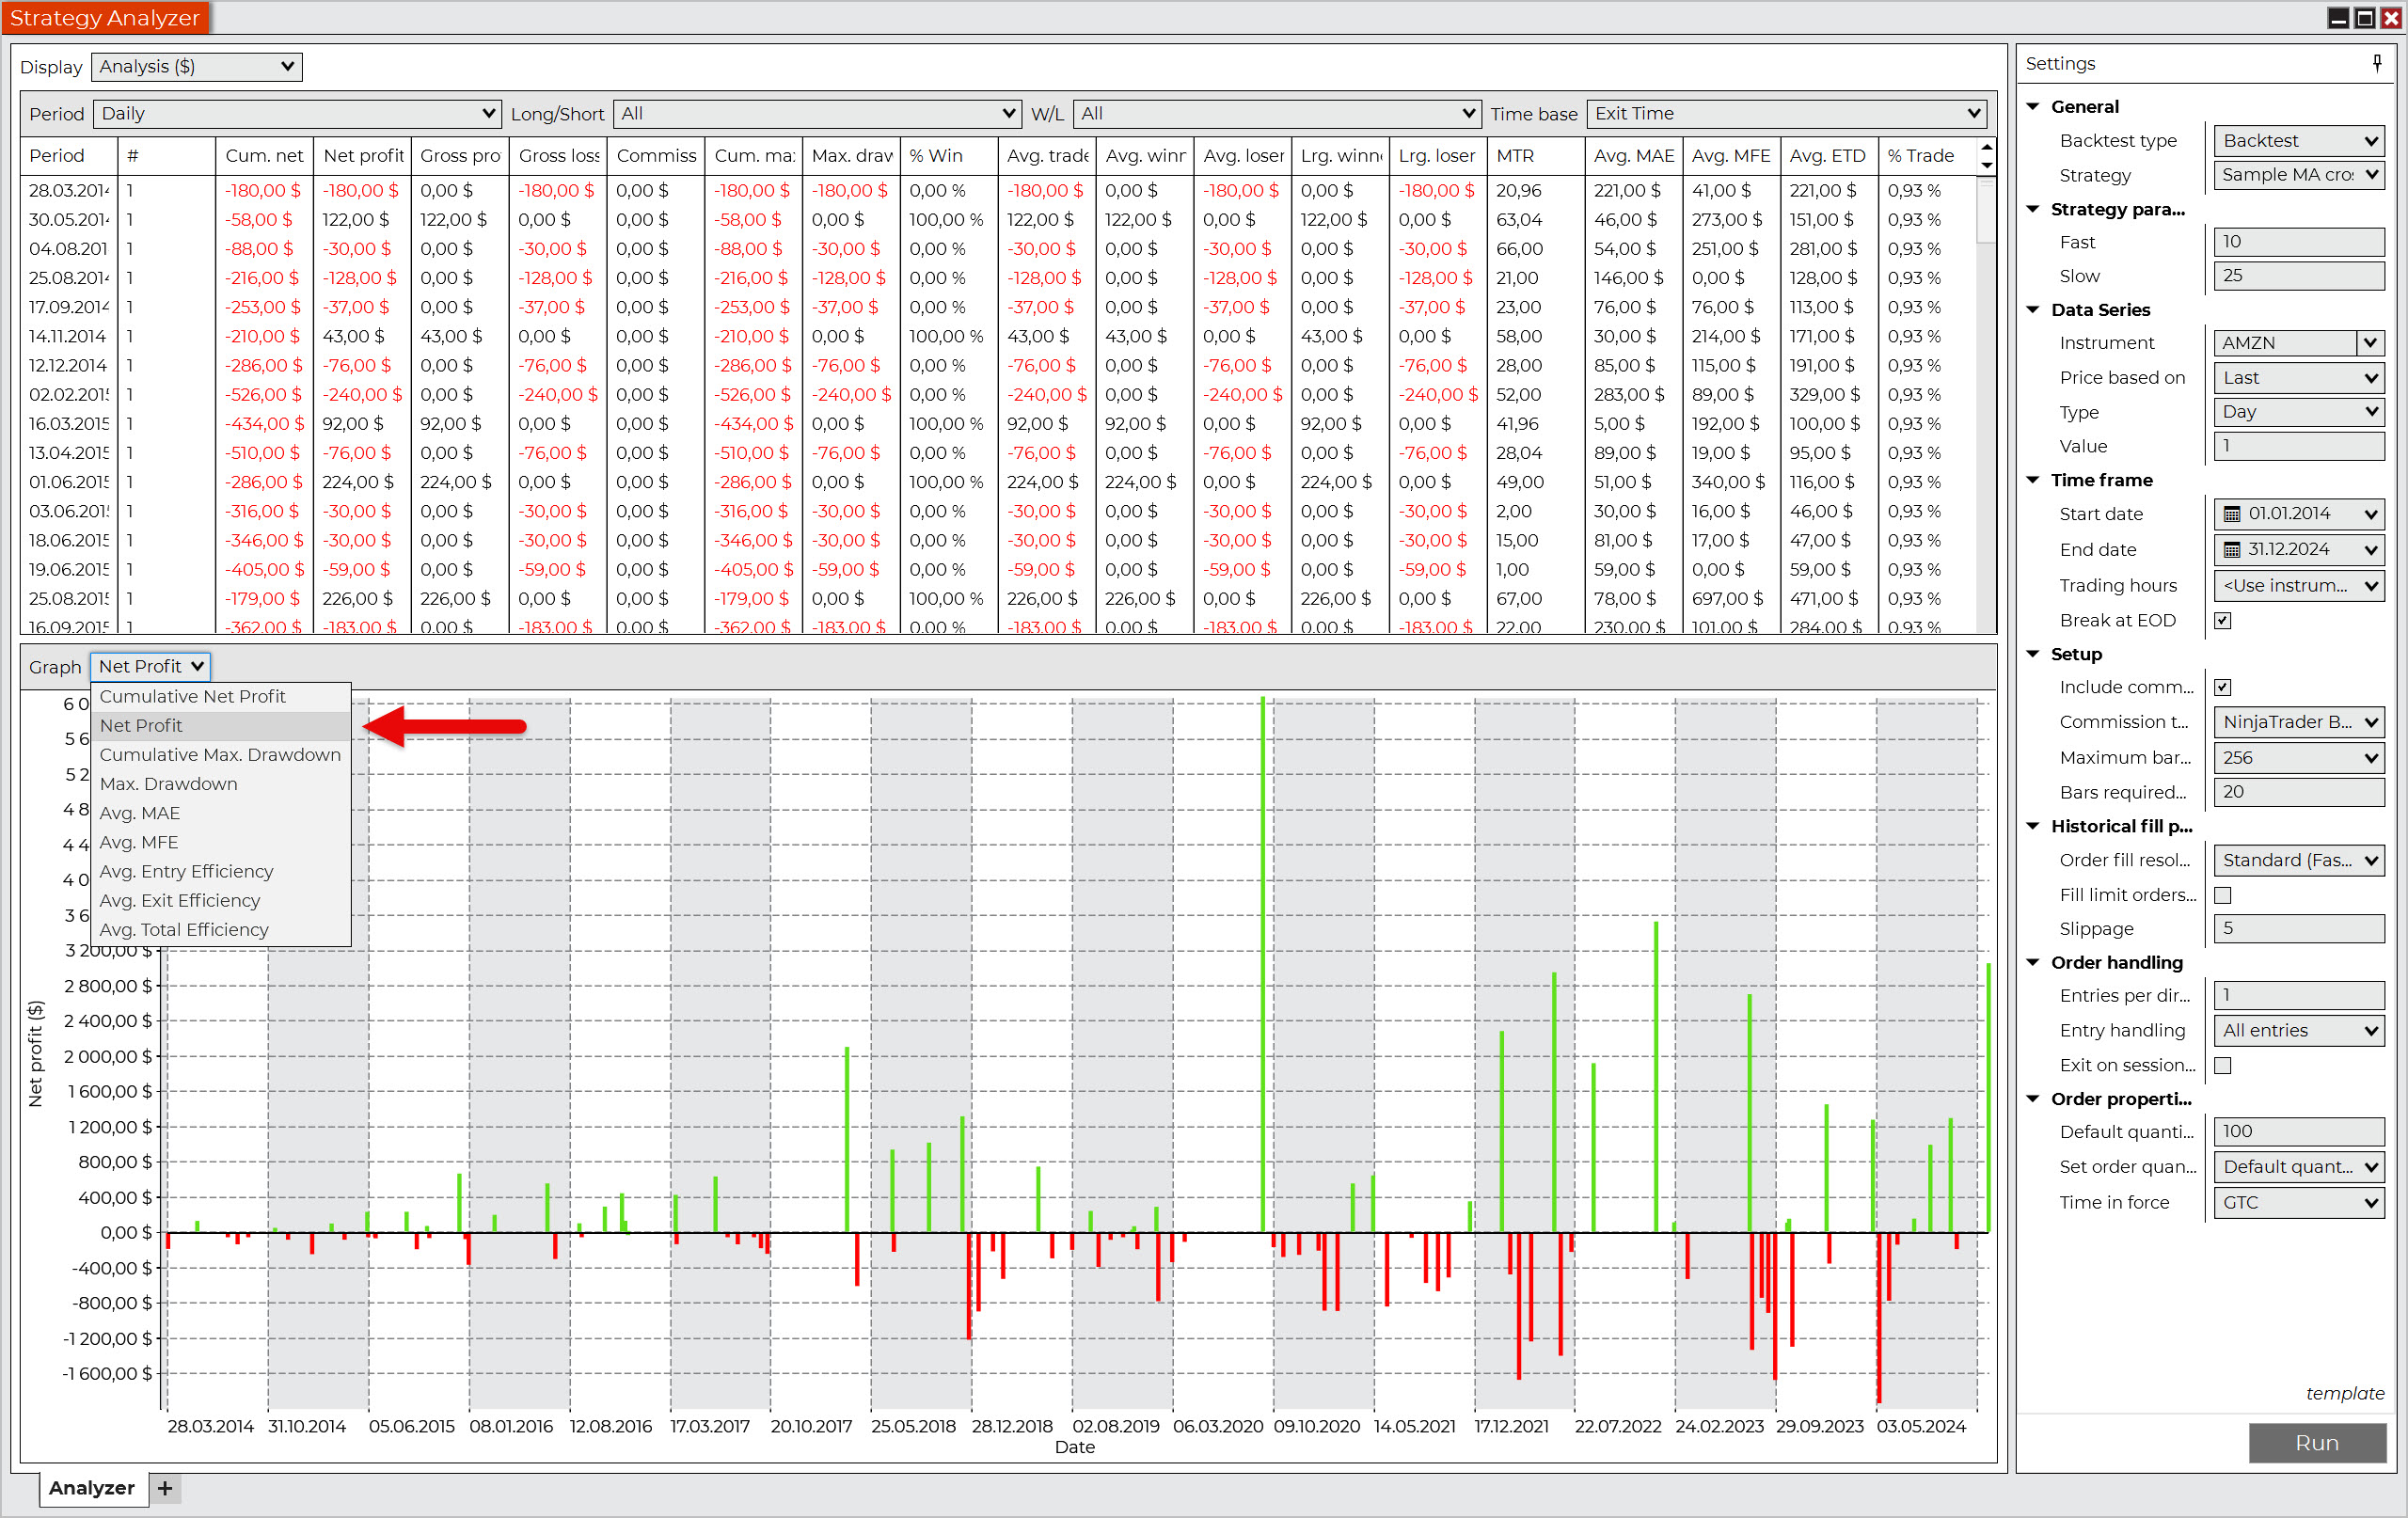
- Analysis: Displays data and charts based on various filters.
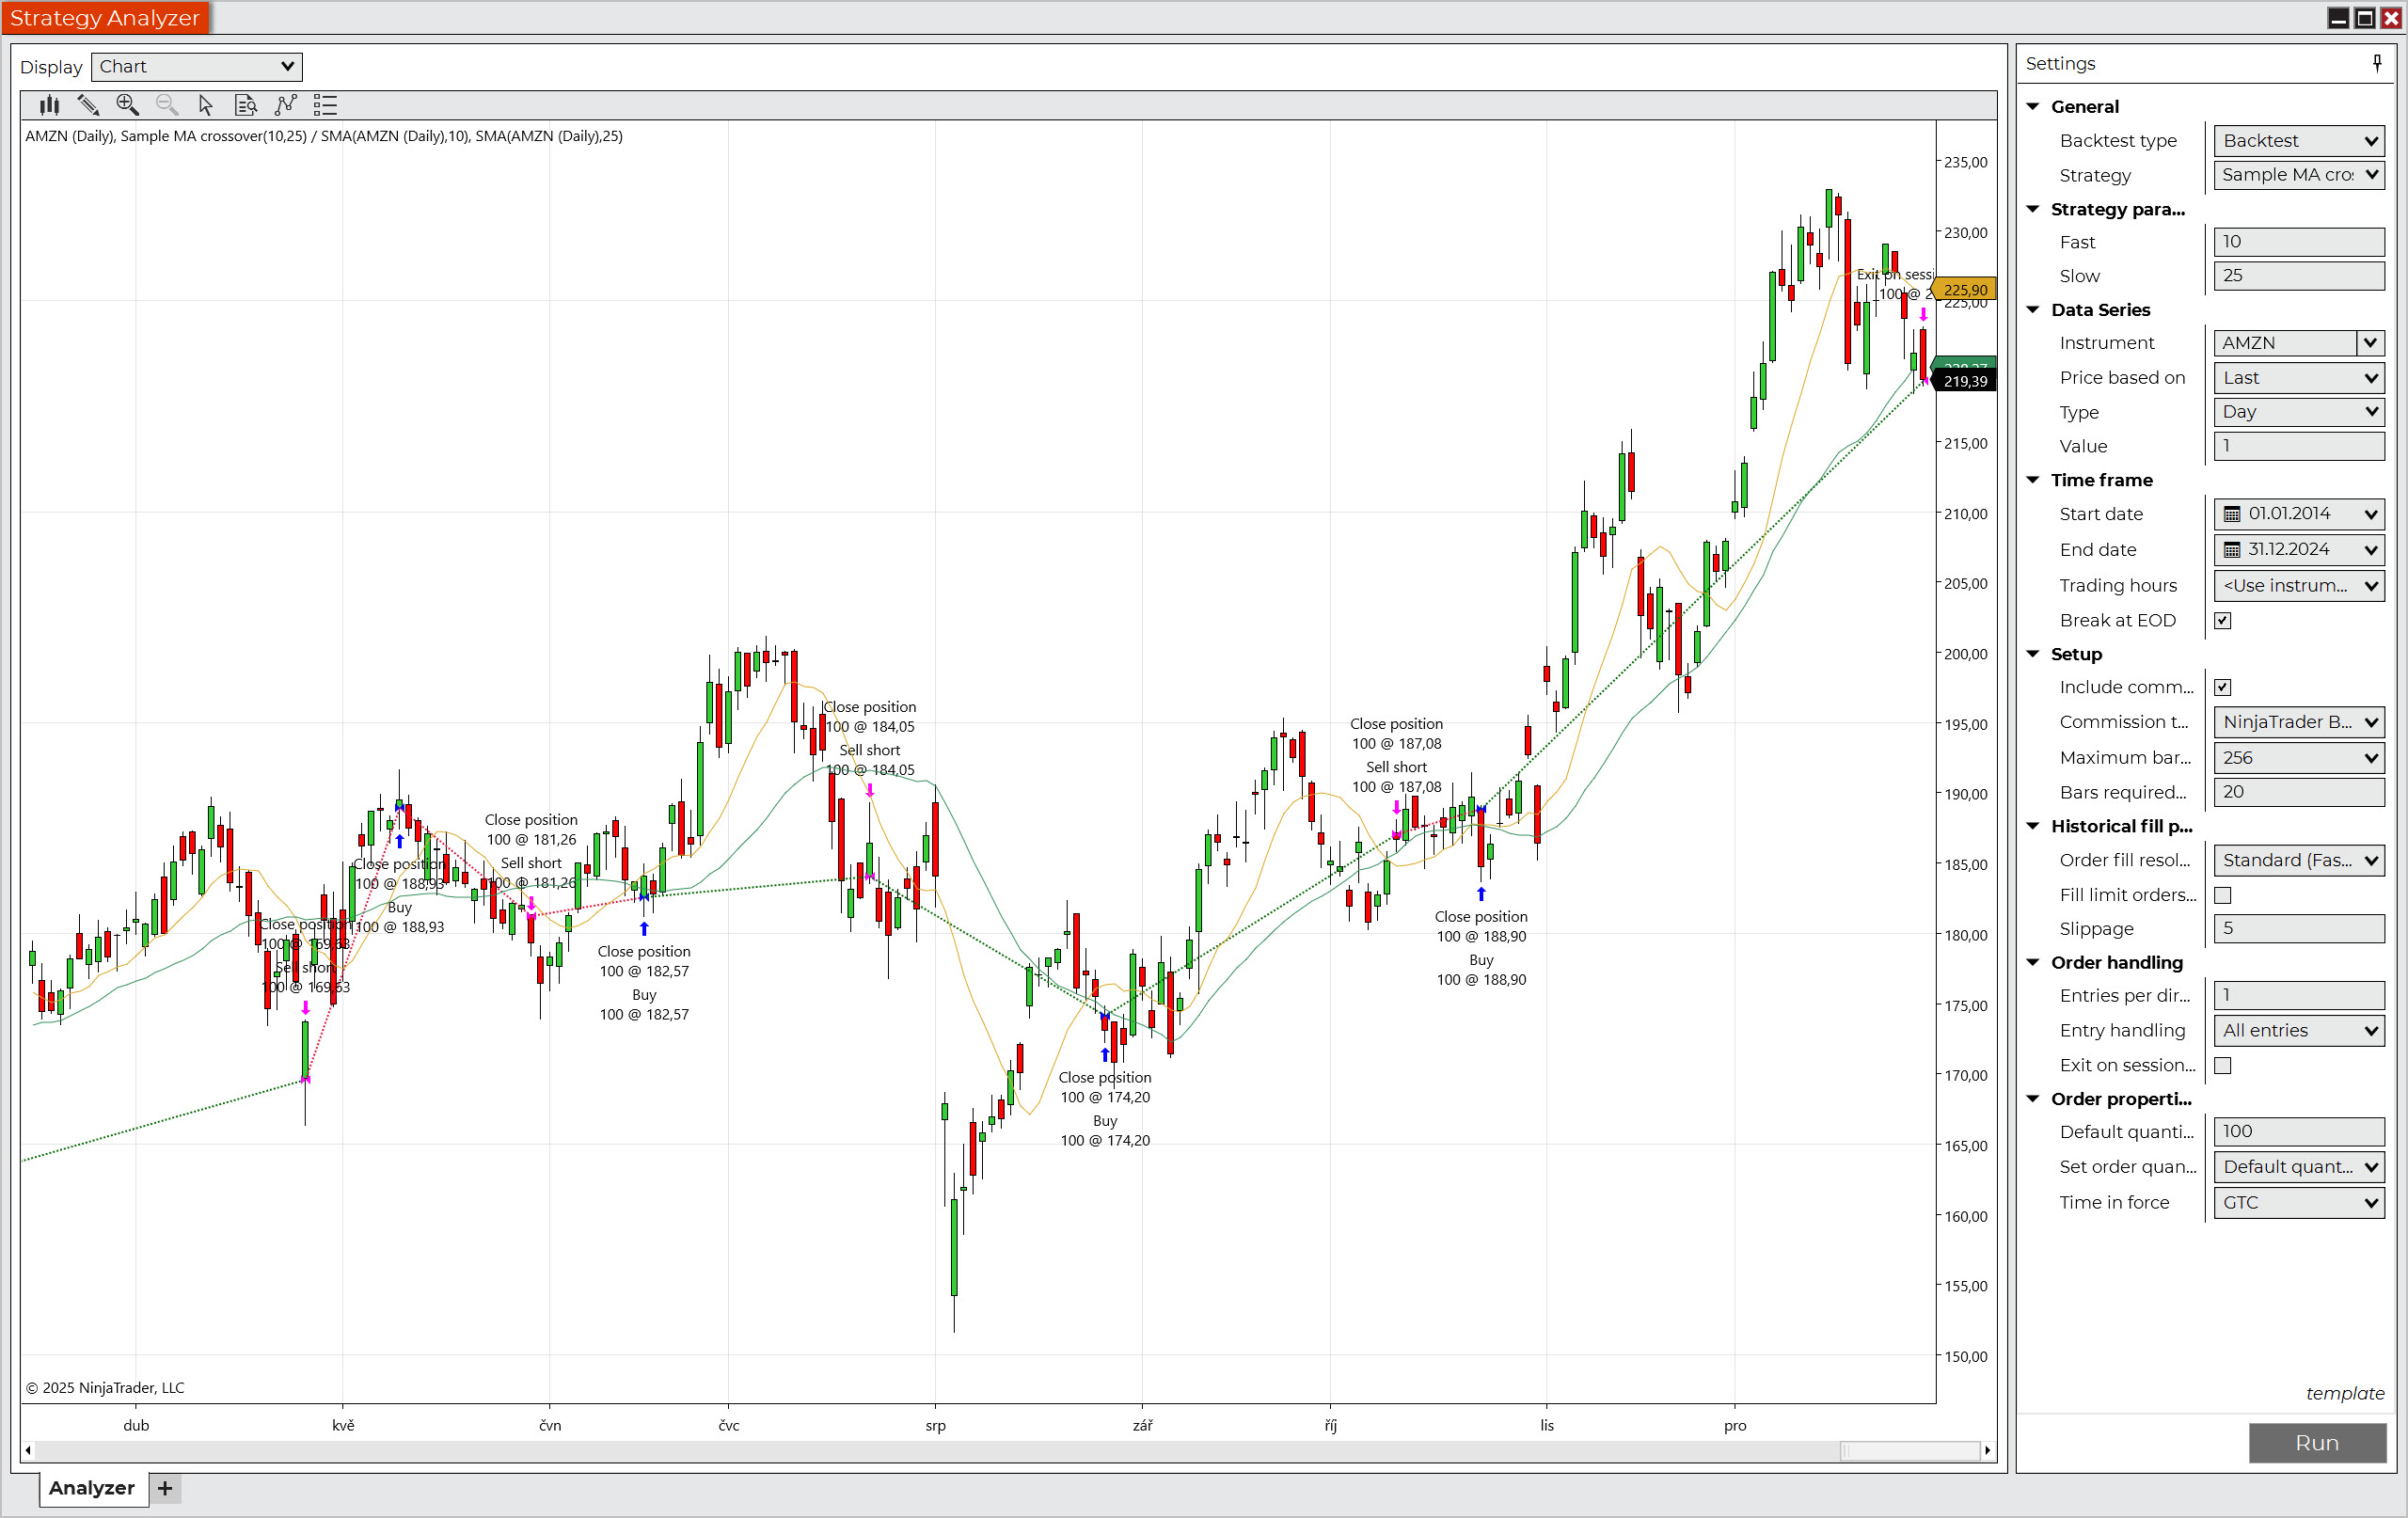
- Chart: Displays a price chart with executed orders marked. Very useful for checking the logic of the strategy.
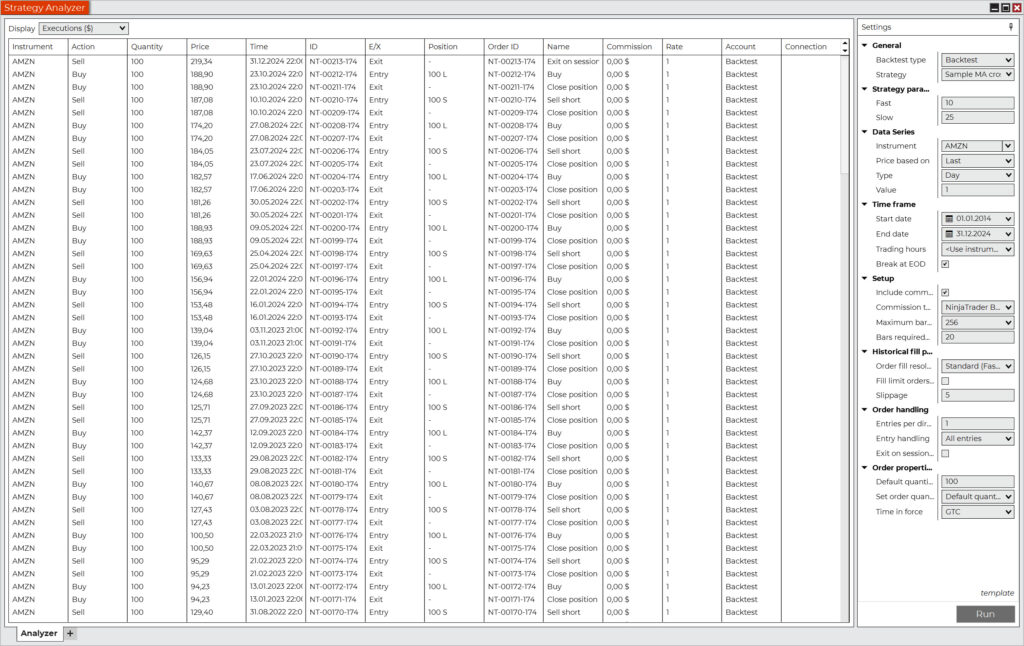
- Execution: List of individual entries and exits.
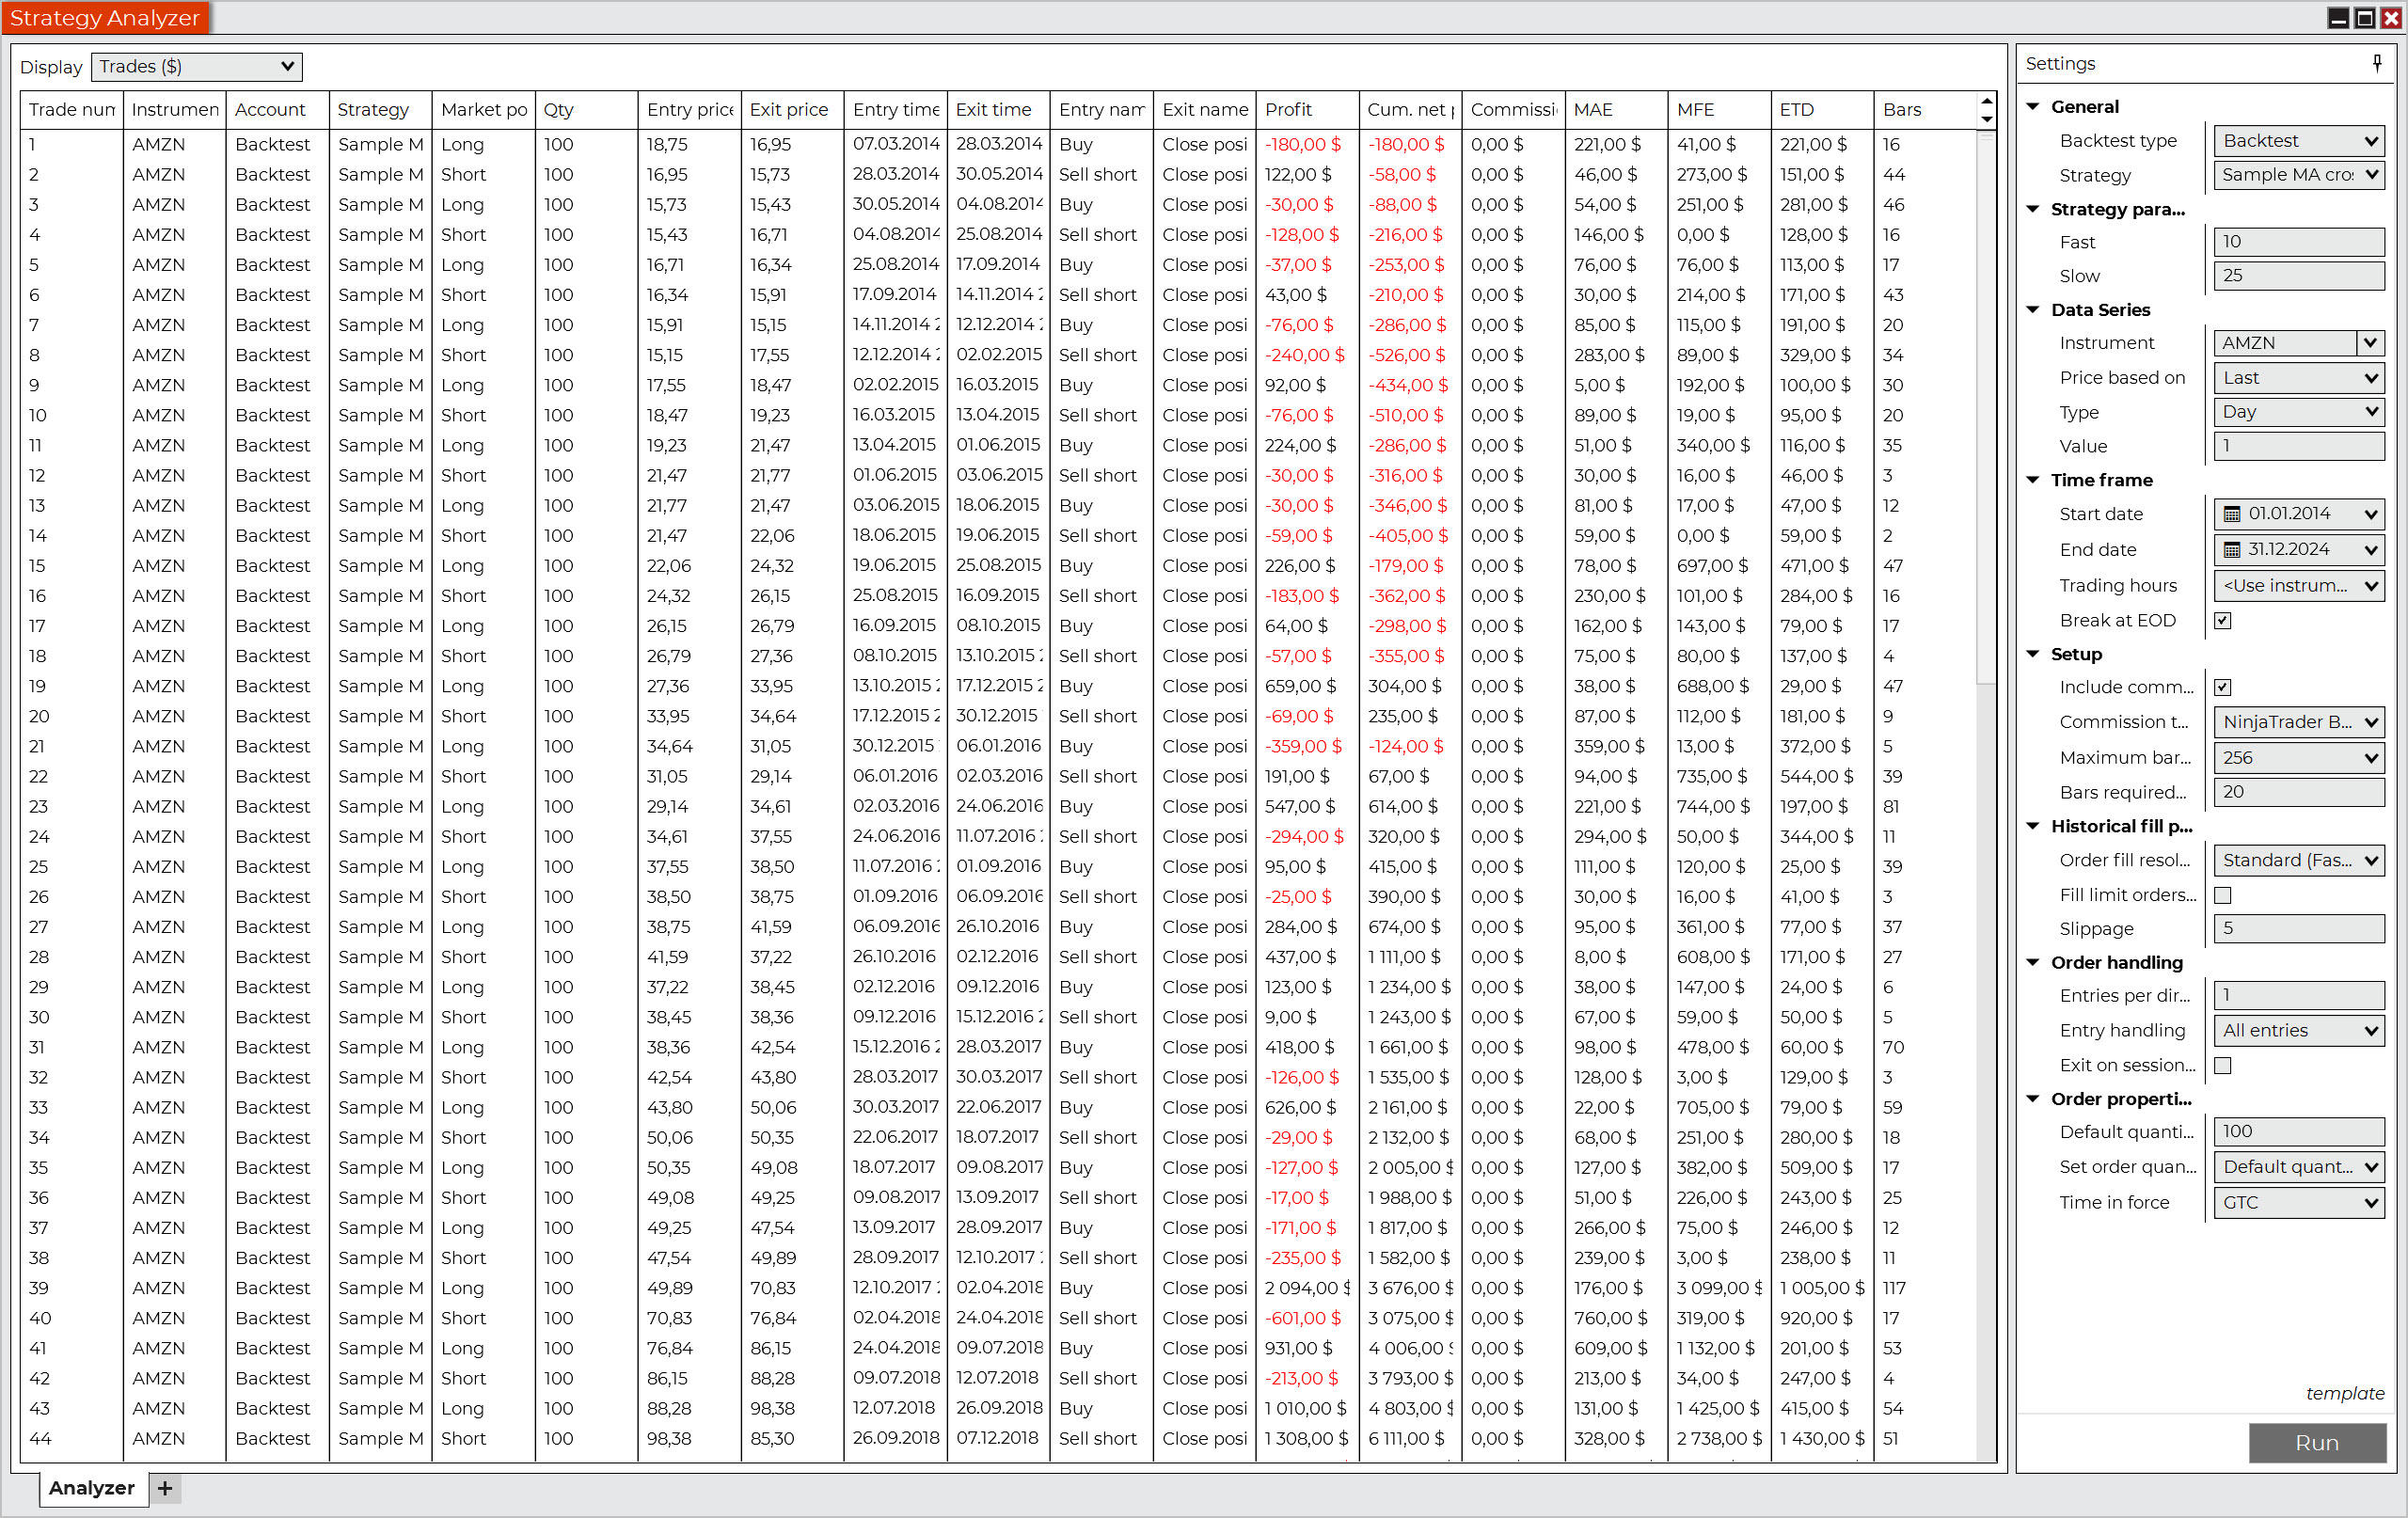
- Trades: List of individual trades.
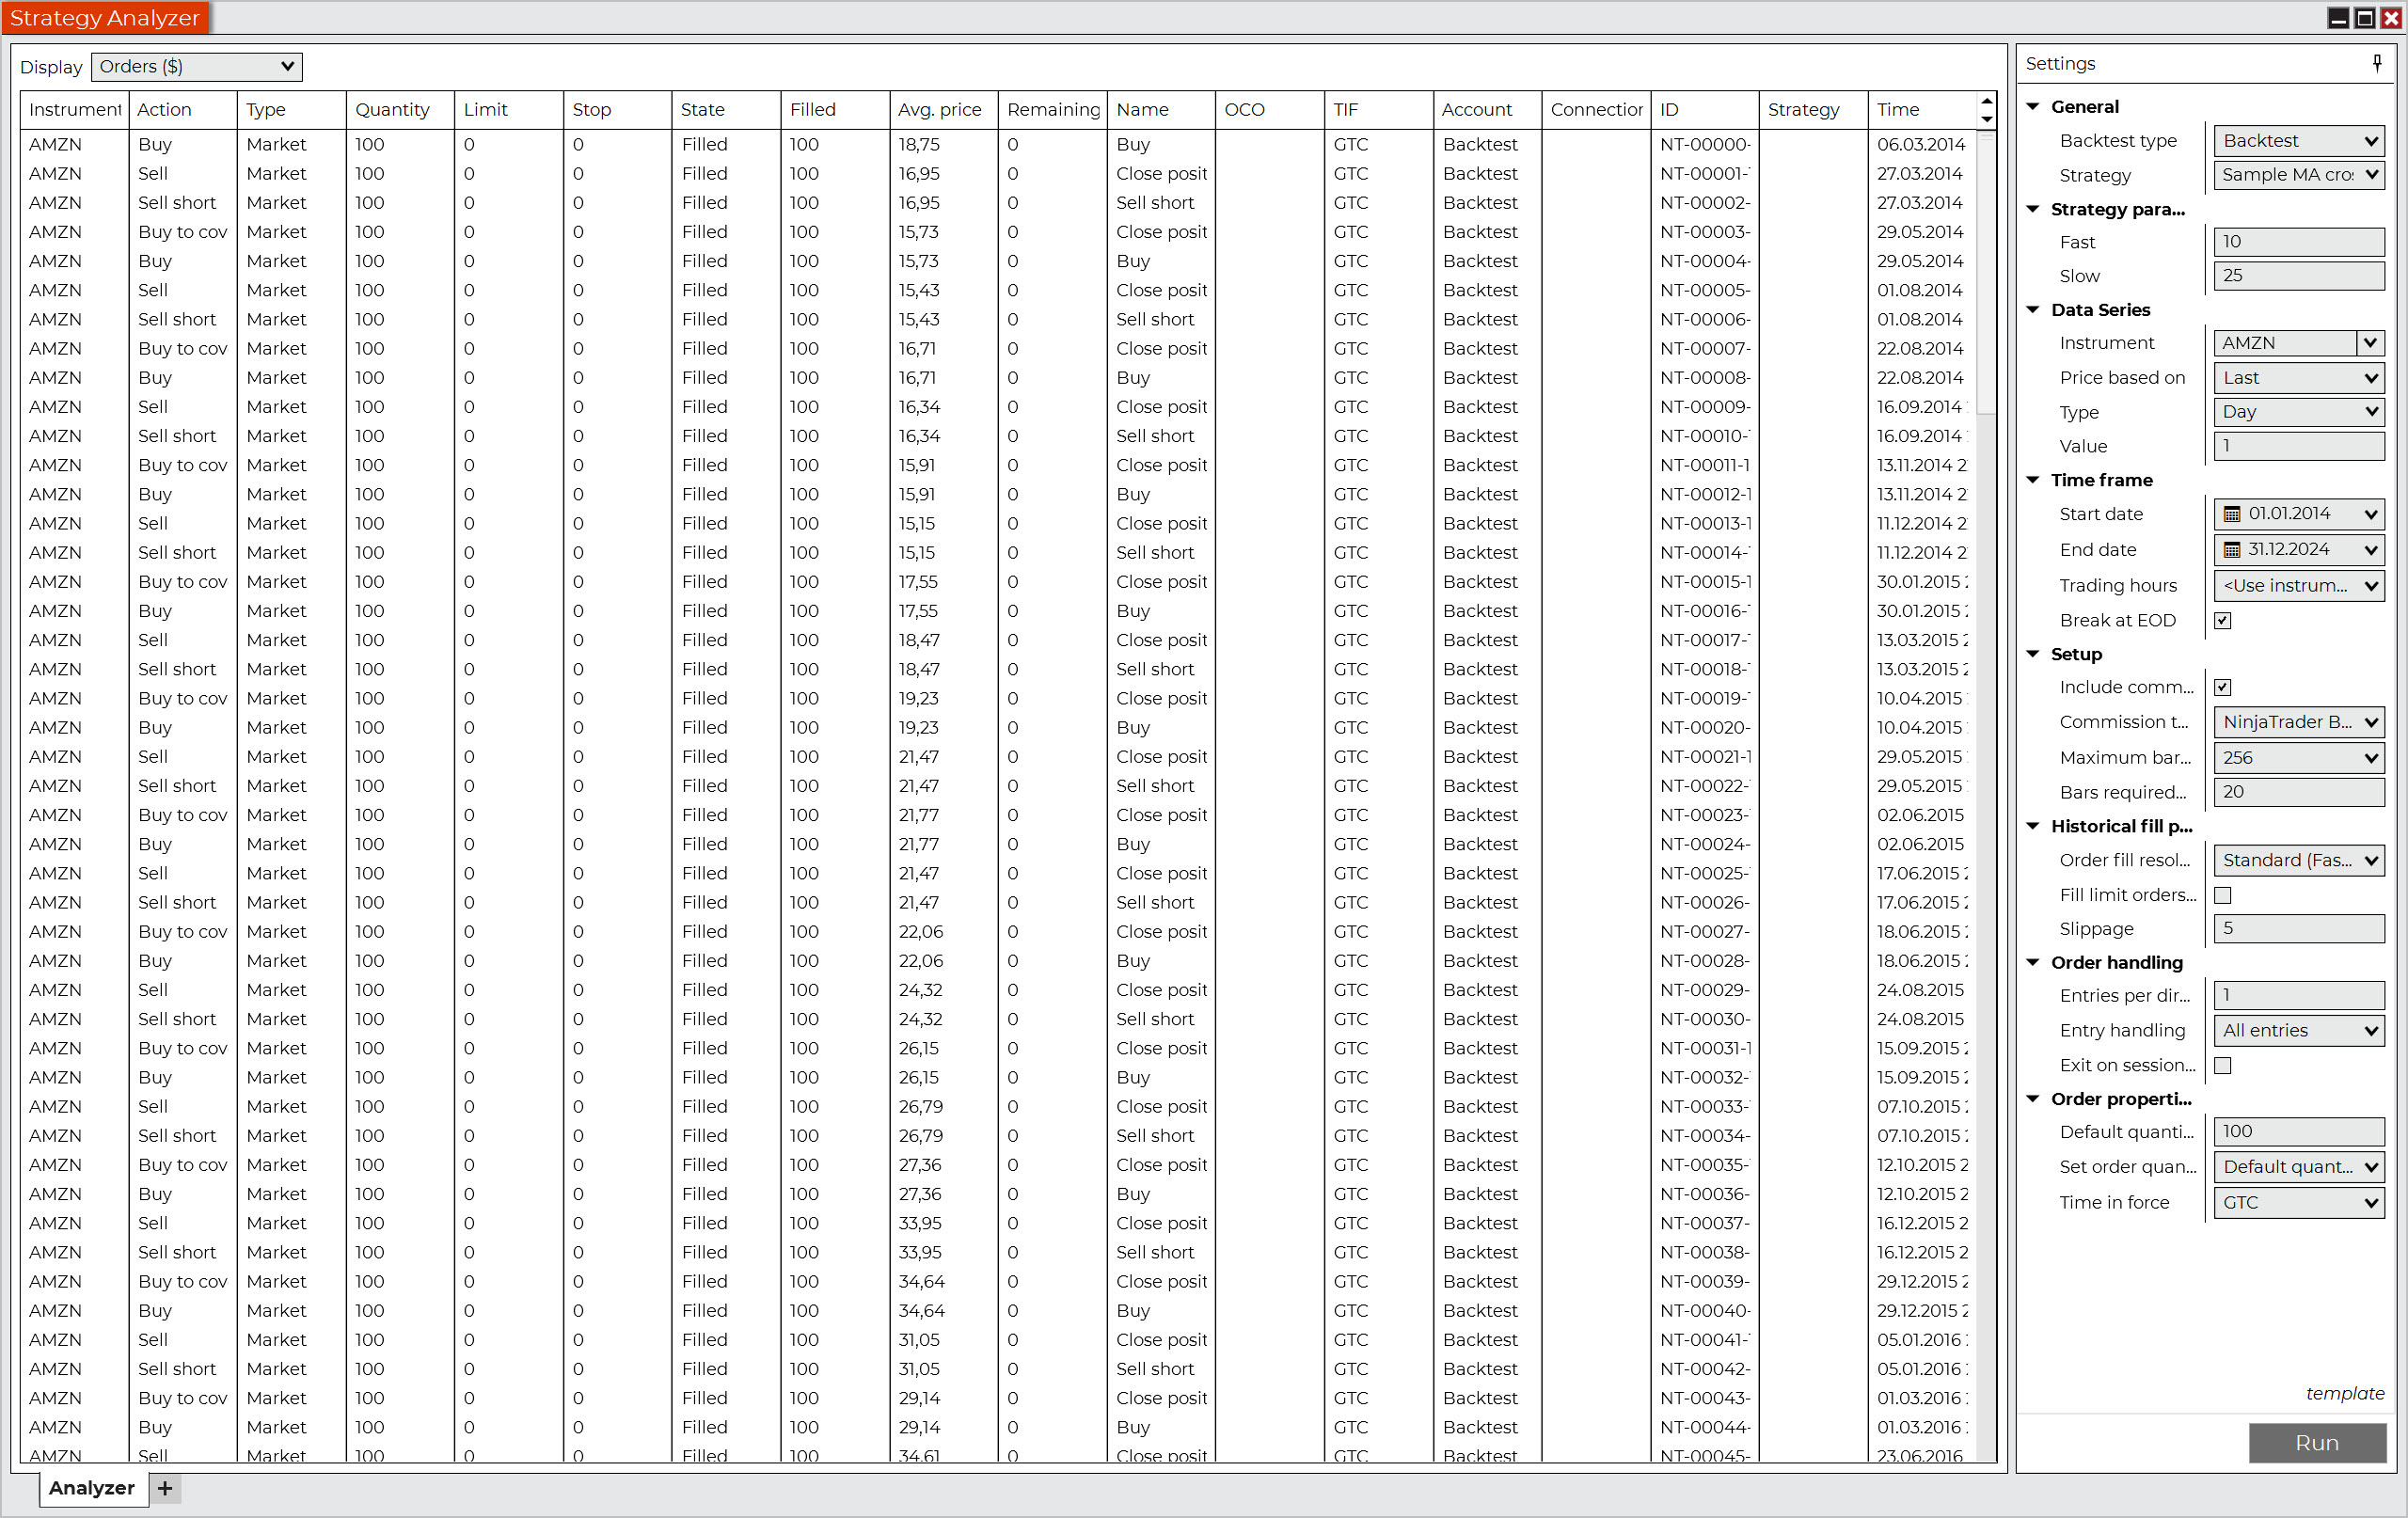
- Orders: List of orders used.
Here is an overview of what these report parts look like:
Basic strategy data in the Summary window.

Graphical representation of collected data in the Analysis window.
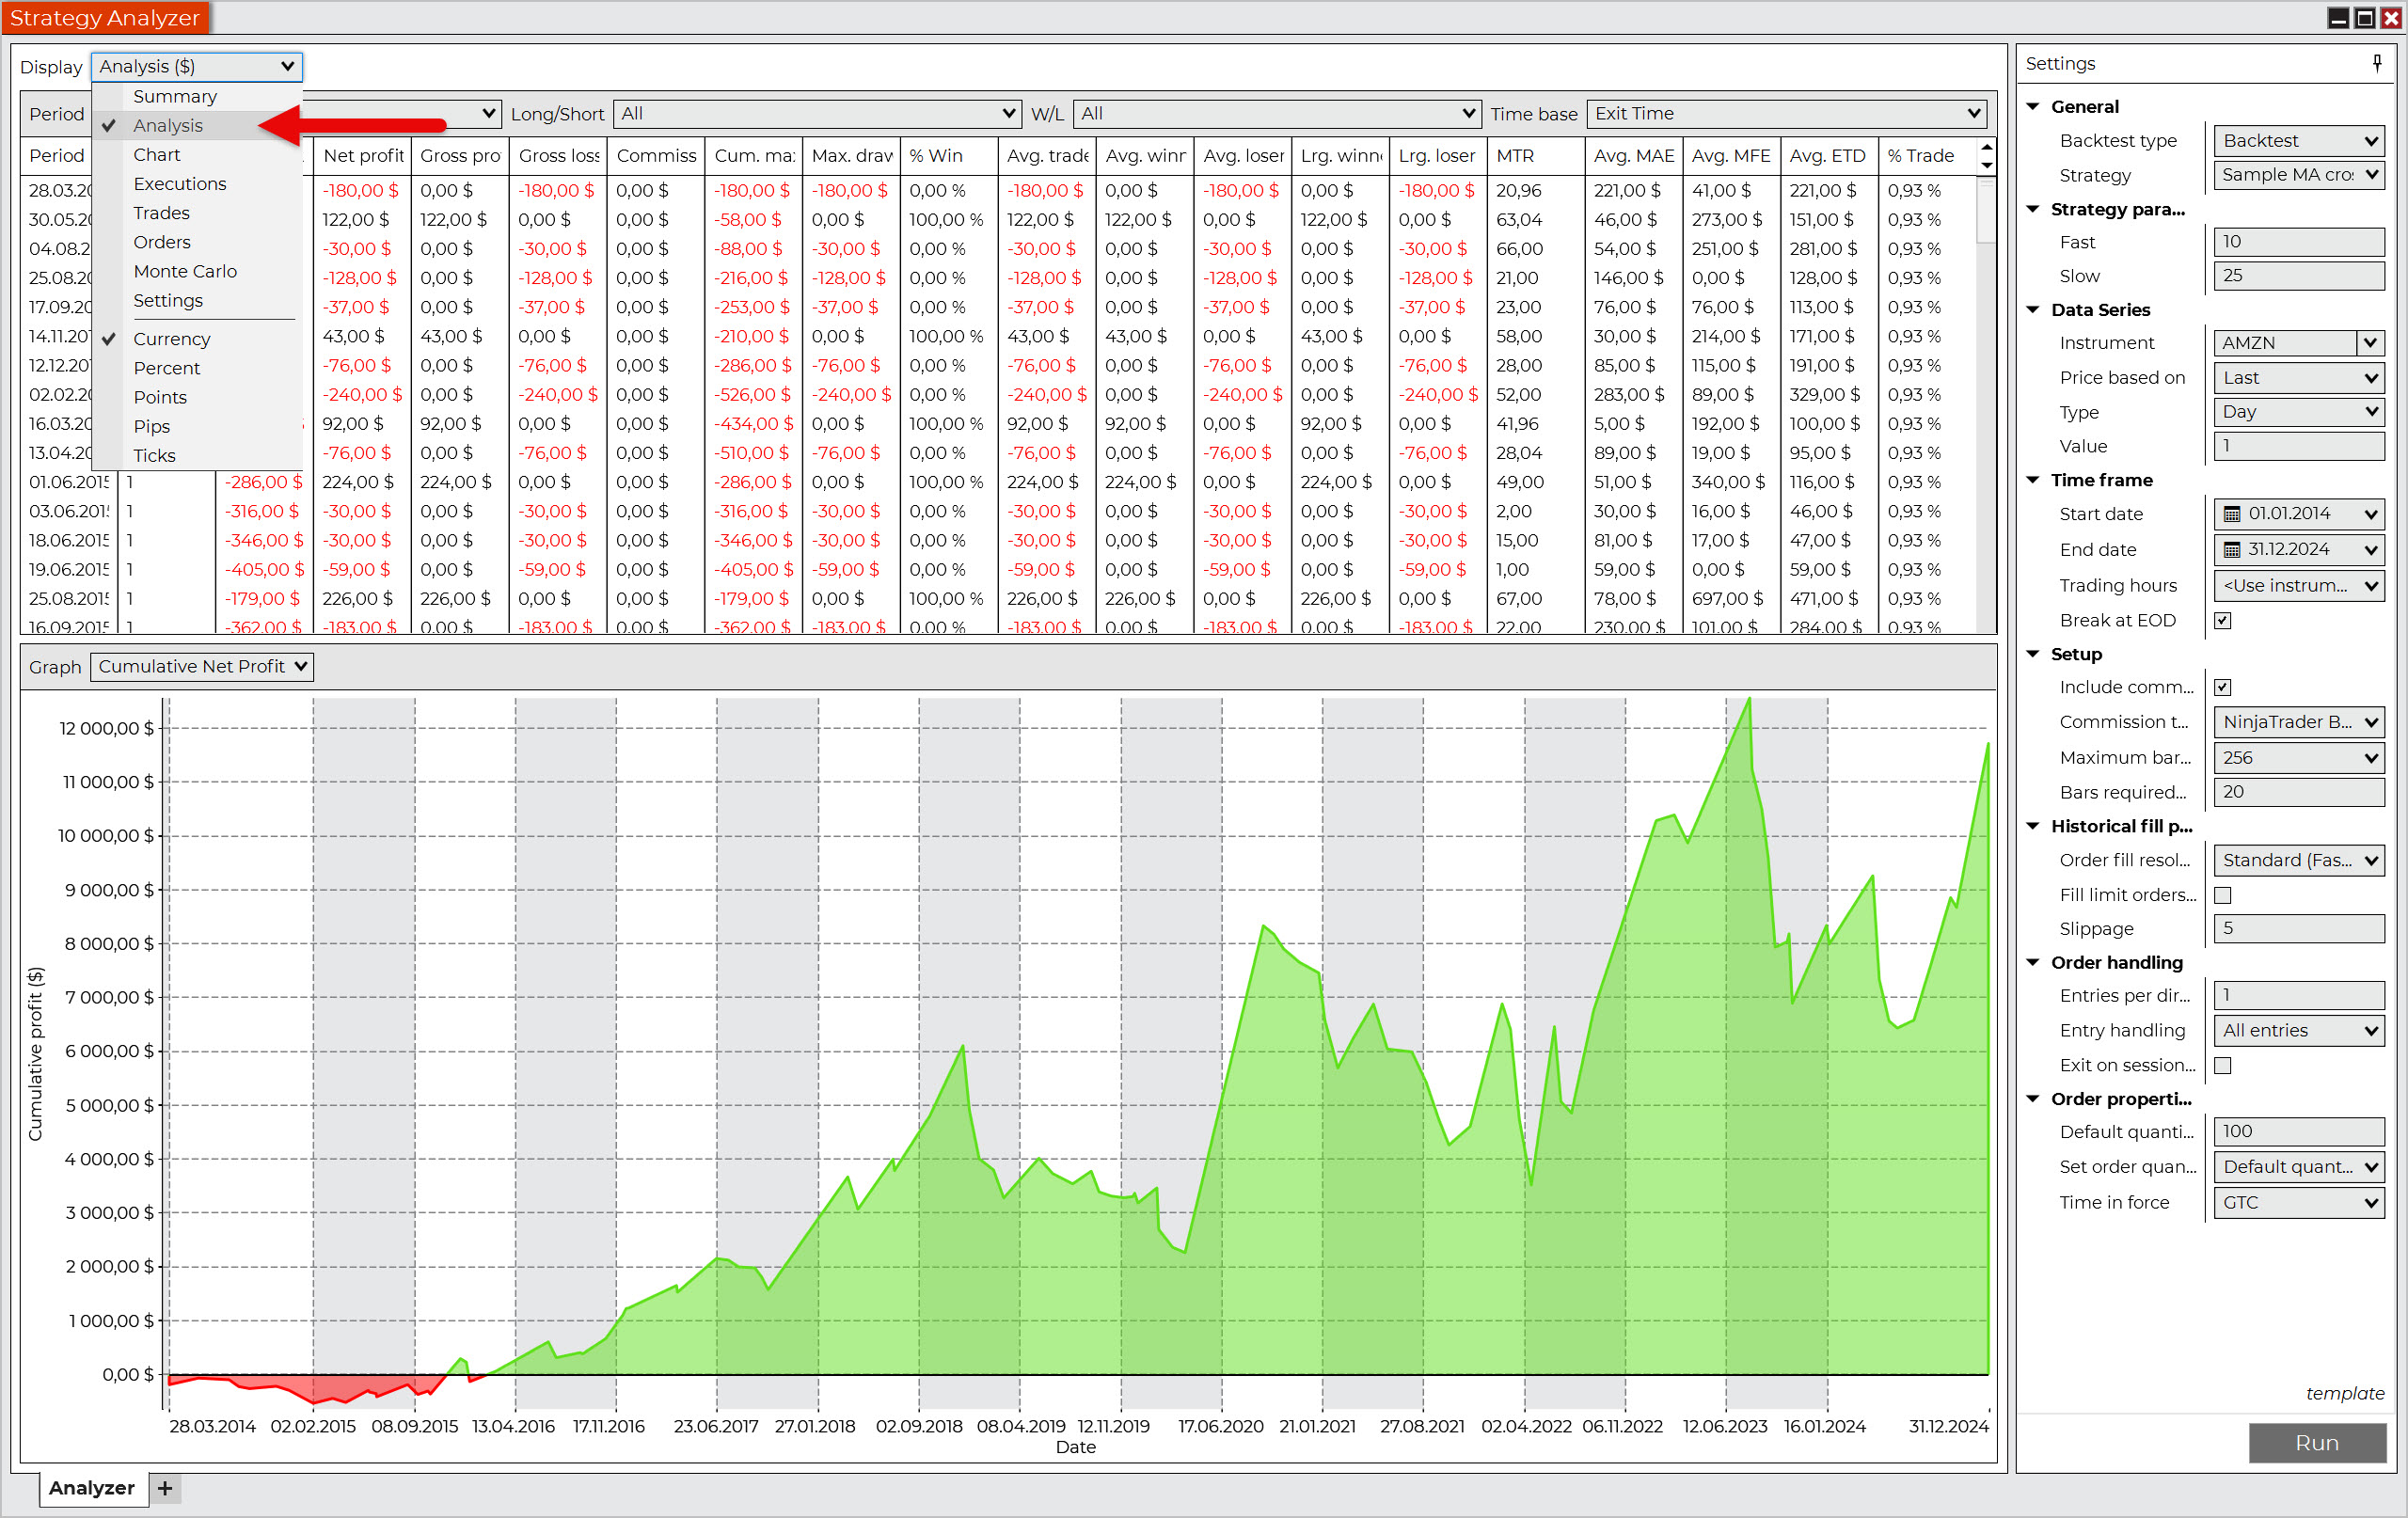
Additional strategy data in the Analysis window.
Price chart with executed trades in the Chart window.
List of individual entries and exits in the Executions window.
List of individual trades in the Trades window.
List of orders used in the Orders window.
The screenshots above show that the strategy works in general. However, keep in mind that the purpose of this example was not to show a profitable strategy, but only to demonstrate the possibilities of automated backtesting in NinjaTrader.
In order to determine whether a given strategy can be used in a live market, robustness tests would need to be performed. Unfortunately, this is far beyond the scope of this guide.
Frequently Asked uestions
What are the best alternatives to NinjaTrader?
If you want to backtest manually and don’t mind paying a few dollars for a subscription, then Sierra Chart is the best alternative.
For traders looking for an automated backtesting solution, there are two alternatives: TradeStation and AmiBroker.
Can NinjaTrader be used on a Mac?
Yes, of course. However, please note that NinjaTrader is Windows-based software. You will therefore need to use virtualization tools such as VMware Fusion Pro or Parallels Desktop.
Conclusion
Now you know exactly how to backtest in the NinjaTrader trading platform.
You have learned where to obtain high-quality historical data and how to import it into the platform. You know how to perform backtesting both manually and automatically, and you understand the importance of data collection and documentation. Backtesting spreadsheets are no longer a foreign concept to you, and a trading plan is the first thing that comes to mind when you want to test a strategy on historical data.
You are now equipped with all the necessary knowledge for backtesting on NinjaTrader. All that remains is to wish you many productive backtesting sessions.
Don’t hesitate and get started! Good luck.
